

It’s Day 23 of my 100 Days of Cloud journey, and todays post is about Azure Backup.
In previous posts, I talked about Azure Migrate and how it can help your cloud migration journey with assessments and cost calculators, and also about how Azure Site Recovery can act as a full Business Continuity and Disaster recovery solution.
Azure Backup provides a secure and cost effective solution to backup and recover both On-Premise and Azure cloud-based Virtual Machines, Files, Folders, Databases and even Azure Blobs and Managed Disks.
Azure Backup — Vaults
Azure Backups are stored in Vaults. There are 2 types of Vault:
- Recovery Services Vault
- Backup Vault
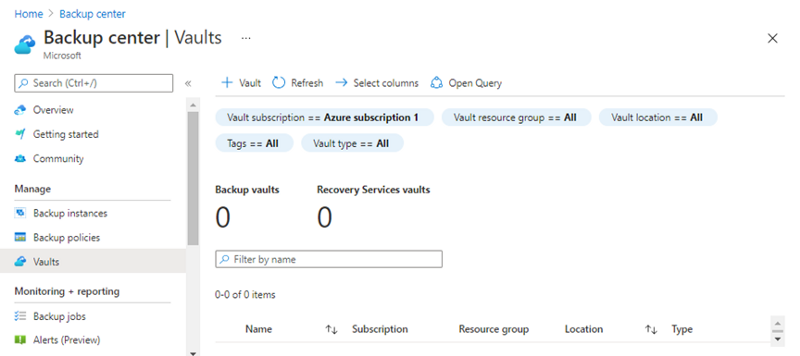
If we go to the Azure Portal and browse to the Backup Center, we can see “Vaults” listed in the menu:
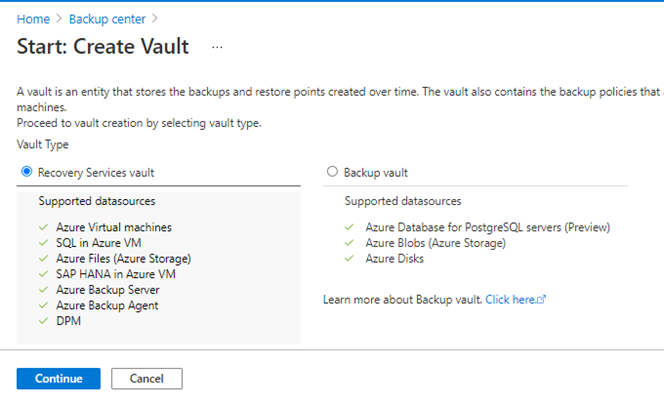
When we click on the button “+ Vault”, this gives us a screen which shows the differences between a Recovery Service vault and a Backup vault. It’s useful to make a note of these as it will help with planning your Backup Strategy.
So what is a vault? In simple terms, it’s an Azure Storage entity that’s used to hold data. And in much the same way as other Azure Storage Services, a vault has the following features:
- You can monitor backed up items in the Vault
- You can manage Vault access with Azure RBAC
– You can specify how the vault is replicated for redundancy. By default, Recovery Services vaults use Geo-redundant storage (GRS), however you can select Locally redundant storage (LRS) or Zone-redundant Storage (ZRS) depending on your requirements.
Azure Backup — Supported Scenarios
There are a number of scenarios you can use Azure Backup with:
- You can back up on-premises Windows machines directly to Azure by installing the Azure Backup Microsoft Azure Recovery Services (MARS) agent on each machine (Physical or Virtual). Linux machines aren’t supported.
- You can back up on-premises machines to a backup server — either System Center Data Protection Manager (DPM) or Microsoft Azure Backup Server (MABS). You can then back up the backup server to a Recovery Services vault in Azure. This is useful in scenarios where you need to keep longer term backups for multiple months/years in line with your organization’s data retention requirements.
- You can back up Azure VMs directly. Azure Backup installs a backup extension to the Azure VM agent that’s running on the VM. This extension backs up the entire VM.
- You can back up specific files and folders on the Azure VM by running the MARS agent.
- You can back up Azure VMs to the MABS that’s running in Azure, and you can then back up the MABS to a Recovery Services vault.
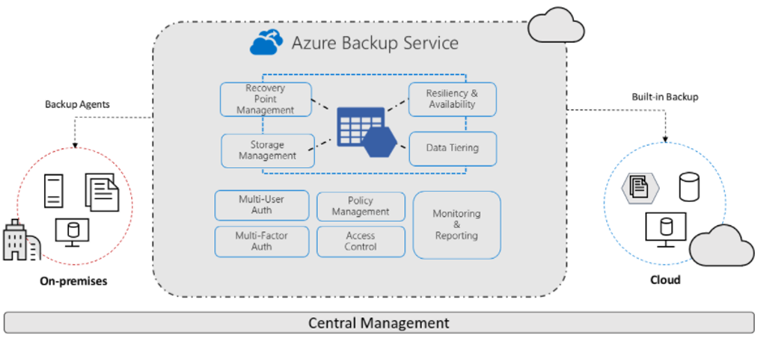
The diagram below shows a high level overview of Azure Backup:
Azure Backup — Policy
Like the majority of backup systems, Azure Backup relies on Policies. There are a few important points that you need to remember when using Backup Policies:
- A backup policy is created per vault.
- A policy consists of 2 components, Schedule and Retention.
- Schedule is when to take a backup, and can be defined as daily or weekly.
- Retention is how long to keep a backup, and this can be defined as daily, weekly, monthly or yearly.
- Monthly and yearly retention is referred to as Long Term Retention (LTR)
- If you change the retention period of an existing backup policy, the new retention will be applied to all of the older recovery points also.
Azure Backup — Offline Backup
The options we’ve discussed so far are applicable to online backup using either the MARS Backup Agent or local Agents using Azure Backup Server or DPM. These options are only really useful if you have a reasonably small amount of data to back up, and also have the bandwidth to transfer these backups to Azure.
However in some cases, you may have terabytes of data to transfer and it would not be possible from a network bandwidth perspective to do this. This is where Offline backup can help. This is offered in 2 modes:
- Azure Data Box — this is where Microsoft sends you a proprietary, tamper resistant Data Box where you can seed your data and send this back to Microsoft for upload in the Data Center to your Azure Subscription.
- Azure Import/Export Service — This is where you provision temporary storage known as the staging location and use prebuilt utilities to format and copy the backup data onto customer-owned disks.
Azure Backup — Benefits
Azure Backup delivers these key benefits:
- Offload of On-Premise backup workloads and long term data retention to Azure Storage
- Scale easily using Azure Storage
- Unlimited Data Transfer, and no data charges for inbound/outbound data
- Centralized Monitoring and Management
- Short and Long-term data retention
- Multiple redundancy options using LRS, GRS or ZRS
- App Consistent backups
- Offline seeding for larger amounts of data
Conclusion
Azure Backup offers a secure and cost-effective way to back up both On-Premise and Cloud resources. As usual, the full overview of the Azure Backup offering can be found on Microsoft Docs.
Hope you enjoyed this post, until next time!!

One thought on “100 Days of Cloud — Day 23: Azure Backup”