Azure Networking Zero to Hero – Network Security Groups

In this post, I’m going to stay within the boundaries of our Virtual Network and briefly talk about Network Security Groups, which filter network traffic between Azure resources in an Azure virtual network.

Overview

So, its a Firewall right?

NOOOOOOOOOO!!!!!!!!

While a Network Security Group (or NSG for short) contains Security Rules to allow or deny inbound/outbound traffic to/from several types of Azure Resources, it is not a Firewall (it may be what a Firewall looked like 25-30 years ago, but not now). NSG’s can be used in conjunction with Azure Firewall and other network security services in Azure to help secure and shape how your traffic flows between subnets and resources.

Default Rules

When you create a subnet in your Virtual Network, you have the option to create an NSG which will be automatically associated with the subnet. However, you can also create an NSG and manually associate it with either a subnet, or directly to a Network Interface in a Virtual Machine.

When an NSG is created, it always has a default set of Security Rules that look like this:

The default Inbound rules allow the following:

  • 65000 — All Hosts/Resources inside the Virtual Network to Communicate with each other
  • 65001 — Allows Azure Load Balancer to communicate with the Hosts/resources
  • 65500 — Deny all other Inbound traffic

The default Outbound rules allow the following:

  • 65000 — All Hosts/Resources inside the Virtual Network to Communicate with each other
  • 65001 — Allows all Internet Traffic outbound
  • 65500 — Deny all other Outbound traffic

The default rules cannot be edited or removed. NSG’s are created initially using a Zero-Trust model. The rules are processed in order of priority (lowest numbered rule is processed first). So you would need to build you rules on top of the default ones (for example, RDP and SSH access if not already in place).

Configuration and Traffic Flow

Some important things to note:

  • The default “65000” rules for both Inbound and Outbound – this allows all virtual network traffic. It means that if we have 2 subnets which each have a virtual machine, these would be able to communicate with each other without adding any additional rules.
  • As well as IP addresses and address ranges, we can use Service Tags which represents a group of IP address prefixes from a range of Azure services. These are managed and updated by Microsoft so you can use these instead of having to create and manage multiple Public IP’s for each service. You can find a full list of available Service Tags that can be used with NSG’s at this link. In the image above, “VirtualNetwork” and “AzureLoadBalancer” are Service Tags.
  • A virtual network subnet or interface can only have one NSG, but an NSG can be assigned to many subnets or interfaces. Tip from experience, this is not a good idea – if you have an application design that uses multiple Azure Services, split these services into dedicated subnets and apply NSG’s to each subnet.
  • When using a NSG associated with a subnet and a dedicated NSG associated with a network interface, the NSG associated with the Subnet is always evaluated first for Inbound Traffic, before then moving on to the NSG associated with the NIC. For Outbound Traffic, it’s the other way around — the NSG on the NIC is evaluated first, and then the NSG on the Subnet is evaluated. This process is explained in detail here.
  • If you don’t have a network security group associated to a subnet, all inbound traffic is blocked to the subnet/network interface. However, all outbound traffic is allowed.
  • You can only have 1000 Rules in an NSG by default. Previously, this was 200 and could be raised by logging a ticket with Microsoft, but the max (at time of writing) is 1000. This cannot be increased. Also, there is a max limit of 5000 NSG’s per subscription.

Logging and Visibility

  • Important – Turn on NSG Flow Logs. This is a feature of Azure Network Watcher that allows you to log information about IP traffic flowing through a network security group,  including details on source and destination IP addresses, ports, protocols, and whether traffic was permitted or denied. You can find more in-depth details on flow logging here, and a tutorial on how to turn it on here.
  • To enhance this, you can use Traffic Analytics, which analyzes Azure Network Watcher flow logs to provide insights into traffic flow in your Azure cloud.

Conclusion

NSGs are fundamental to securing inbound and outbound traffic for subnets within an Azure Virtual Network, and form one of the first layers of defense to protect application integrity and reduce the risk of data loss prevention.

However as I said at the start of this post, an NSG is not a Firewall. The layer 3 and layer 4 port-based protection that NSGs provide has significant limitations and cannot detect other forms of malicious attacks on protocols such as SSH and HTTPS that can go undetected by this type of protection.

And that’s one of the biggest mistakes I see people make – they assume that NSG’s will do the job because Firewalls and other network security sevices are too expensive.

Therefore, NSG’s should be used in conjunction with other network security tools, such as Azure Firewall and Web Application Firewall (WAF), for any devices presented externally to the internet or other private networks. I’ll cover these in detail in later posts.

Hope you enjoyed this post, until next time!!

Azure Networking Zero to Hero – Routing in Azure

In this post, I’m going to try and explain Routing in Azure. This is a topic that grows in complexity the more you expand your footprint in Azure in terms of both Virtual Networks, and also the services you use to both create your route tables and route your traffic.

Understanding Azure’s Default Routing

As we saw in the previous post when a virtual network is created, this also creates a route table. This contains a default set of routes known as System Routes, which are shown here:

SourceAddress prefixesNext hop type
DefaultVirtual Network Address SpaceVirtual network
Default0.0.0.0/0Internet
Default10.0.0.0/8None (Dropped)
Default172.16.0.0/12None (Dropped)
Default192.168.0.0/16None (Dropped)

Lets explain the “Next hop types” is in a bit more detail:

  • Virtual network: Routes traffic between address ranges within the address space of a virtual network. So lets say I have a Virtual Network with the 10.0.0.0/16 address space defined. I then have VM1 in a subnet with the 10.0.1.0/24 address range trying to reach VM2 in a subnet with the 10.0.2.0/24 address range. It know to keep this within the Virtual Network and routes the traffic successfully.
  • Internet: Routes traffic specified by the address prefix to the Internet. If the destination address range is not part of a Virtual Network address space, its gets routed to the Internet. The only exception to this rule is if trying to access an Azure Service – this goes across the Azure Backbone network no matter which region the service sits in.
  • None: Traffic routed to the None next hop type is dropped. This automatically includes all Private IP Addresses as defined by RFC1918, but the exception to this is your Virtual Network address space.

Simple, right? Well, its about to get more complicated …..

Additional Default Routes

Azure adds more default system routes for different Azure capabilities, but only if you enable the capabilities:

SourceAddress prefixesNext hop type
DefaultPeered Virtual Network Address SpaceVNet peering
Virtual network gatewayPrefixes advertised from on-premises via BGP, or configured in the local network gatewayVirtual network gateway
DefaultMultipleVirtualNetworkServiceEndpoint

So lets take a look at these:

  • Virtual network (VNet) peering: when a peering is created between 2 VNets, Azure adds the address spaces of each of the peered VNets to the Route tables of the source VNets.
  • Virtual network gateway: this happens when S2S VPN or Express Route connectivity is establised and adds address spaces that are advertised from either Local Network Gateways or On-Premises gateways via BGP (Border Gateway Protocol). These address spaces should be summarized to the largest address range coming from On-Premises, as there is a limit of 400 routes per route table.
  • VirtualNetworkServiceEndpoint: this happens when creating a direct service endpoint for an Azure Service, enables private IP addresses in the VNet to reach the endpoint of an Azure service without needing a public IP address on the VNet.

Custom Routes

The limitations of sticking with System Routes is that everything is done for you in the background – there is no way to make changes.

This is why if you need to make change to how your traffic gets routed, you should use Custom Routes, which is done by creating a Route Table. This is then used to override Azure’s default system routes, or to add more routes to a subnet’s route table.

You can specify the following “next hop types” when creating user-defined routes:

  • Virtual Appliance: This is typically Azure Firewall, Load Balancer or other virtual applicance from the Azure Marketplace. The appliance is typically deployed in a different subnet than the resources that you wish to route through the Virtual Appliance. You can define a route with 0.0.0.0/0 as the address prefix and a next hop type of virtual appliance, with the next hop address set as the internal IP Address of the virtual appliance, as shown below. This is useful if you want all outbound traffic to be inspected by the appliance:
  • Virtual network gateway: used when you want traffic destined for specific address prefixes routed to a virtual network gateway. This is useful if you have an On-Premises device that inspects traffic an determines whether to forward or drop the traffic.
  • None: used when you want to drop traffic to an address prefix, rather than forwarding the traffic to a destination.
  • Virtual network: used when you want to override the default routing within a virtual network.
  • Internet: used when you want to explicitly route traffic destined to an address prefix to the Internet

You can also use Service Tags as the address prefix instead of an IP Range.

How Azure selects which route to use?

When outbound traffic is sent from a subnet, Azure selects a route based on the destination IP address, using the longest prefix match algorithm. So if 2 routes exist with 10.0.0.0/16 and a 10.0.0.0/24, Azure will select the /24 as it has the longest prefix.

If multiple routes contain the same address prefix, Azure selects the route type, based on the following priority:

  • User-defined route
  • BGP route
  • System route

So, the initial System Routes are always the last ones to be checked.

Conclusion and Resources

I’ve put in some links already in the article. The main place to go for a more in-depth deep dive on Routing is this MS Learn Article on Virtual Network Traffic Routing.

As regards people to follow, there’s no one better than my fellow MVP Aidan Finn who writes extensively about networking over at his blog. He also delivered this excellent session at the Limerick Dot Net Azure User Group last year which is well worth a watch for gaining a deep understanding of routing in Azure.

Hope you enjoyed this post, until next time!!

Azure Networking Zero to Hero – Intro and Azure Virtual Networks

Welcome to another blog series!

This time out, I’m going to focus on Azure Networking, which covers a wide range of topics and services that make up the various networking capabilities available within both Azure cloud and hybrid environments. Yes I could have done something about AI, but for those of you who know me, I’m a fan of the classics!

The intention is to have this blog series serve as both a starting point for anyone new to Azure Networking who is looking to start a learning journey towards that AZ-700 certification, or as an easy reference point for anyone looking for a list of blogs specific to the wide scope of services available in the Azure Networking family.

There isn’t going to be a set number of blog posts or “days” – I’m just going to run with this one and see what happens! So with that, lets kick off with our first topic, which is Virtual Networks.

Azure Virtual Networks

So lets start with the elephant in the room. Yes, I have written a blog post about Azure Virtual Networks before – 2 of them actually as part of my “100 Days of Cloud” blog series, you’ll find Part 1 and Part 2 at these links.

Great, so thats todays blog post sorted!!! Until next ti …… OK, I’m joking – its always good to revise and revisit.

After a Resource Group, a virtual network is likely to be the first actual resource that you create. Create a VM, Database or Web App, the first piece of information it asks you for is what Virtual Network to your resource in.

But of course if you’ve done it that way, you’ve done it backwards because you really should have planned your virtual network and what was going to be in it first! A virtual network acts as a private address space for a specific set of resource groups or resources in Azure. As a reminder, a virtual network contains:

  • Subnets, which allow you to break the virtual network into one or more dedicated address spaces or segments, which can be different sizes based on the requirements of the resource type you’ll be placing in that subnet.
  • Routing, which routes traffic and creates a routing table. This means data is delivered using the most suitable and shortest available path from source to destination.
  • Network Security Groups, which can be used to filter traffic to and from resources in an Azure Virtual Network. Its not a Firewall, but it works like one in a more targeted sense in that you can manage traffic flow for individual virtual networks, subnets, and network interfaces to refine traffic.

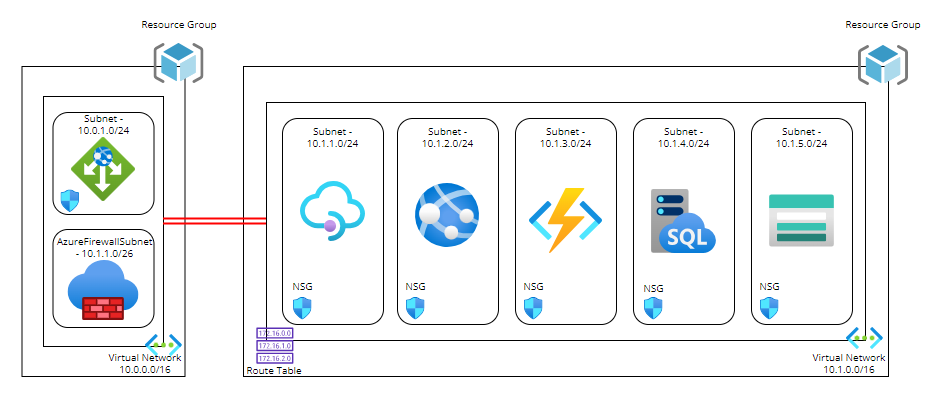
A lot of wordy goodness there, but the easiest way to illustrate this is using a good old diagram!

Lets do a quick overview:

  • We have 2 Resource Groups using a typical Hub and Spoke model where the Hub contains our Application Gateway and Firewall, and our Spoke contains our Application components. The red lines indicate peering between the virtual networks so that they can communicate with each other.
  • Lets focus on the Spoke resource group – The virtual network has an address space of 10.1.0.0/16 defined.
  • This is then split into different subnets where each of the components of the Application reside. Each subnet has an NSG attached which can control traffic flow to and from different subnets. So in this example, the ingress traffic coming into the Application Gateway would then be allows to pass into the API Management subnet by setting allow rules on the NSG.
  • The other thing we see attached to the virtual network is a Route Table – we can use this to define where traffic from specific sources is sent to. We can use System Routes which are automatically built into Azure, or Custom Routes which can be user defined or by using BGP routes across VPN or Express Route services. The idea in our diagram is that all traffic will be routed back to Azure Firewall for inspection before forwarding to the next destination, which can be another peered virtual network, across a VPN to an on-premises/hybrid location, or straight out to an internet destination.

Final thoughts

Some important things to note on Virtual Networks:

  • Planning is everything – before you even deploy your first resource group, make sure you have your virtual networks defined, sized and mapped out for what you’re going to use them for. Always include scaling, expansion and future planning in those decisions.
  • Virtual Networks reside in a single resource group, but you technically can assign addresses from subnets in your virtual network to resources that reside in different resource groups. Not really a good idea though – try to keep your networking and resources confined within resource group and location boundaries.
  • NSG’s are created using a Zero-Trust model, so nothing gets in or out unless you define the rules. The rules are processed in order of priority (lowest numbered rule is processed first), so you would need to build you rules on top of the default ones (for example, RDP and SSH access if not already in place).

Hope you enjoyed this post, until next time!!

The A-Z of Azure Policy

I’m delighted to be contributing to Azure Spring Clean for the first time. The annual event is organised by Azure MVP’s Joe Carlyle and Thomas Thornton and encourages you to look at your Azure subscriptions and see how you could manage it better from a Cost Management, Governance, Monitoring and Security perspective. You can check out all of the posts in this years Azure Spring Clean here. For this year, my contribution is the A-Z of Azure Policy!

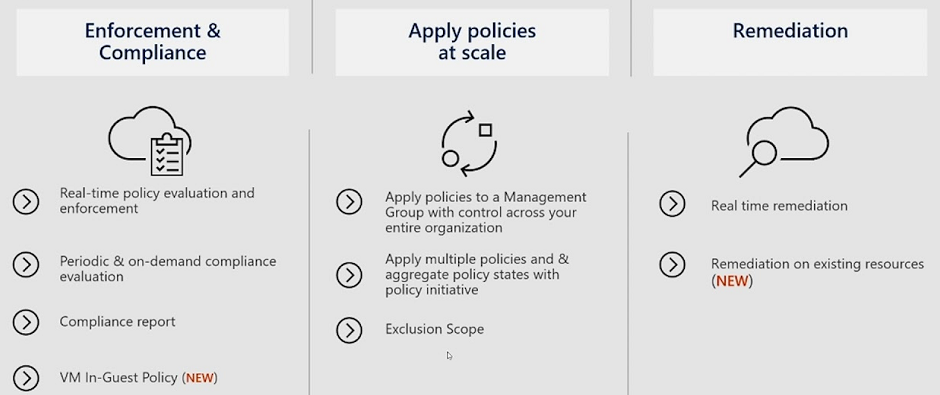
Azure Policy is one of the key pillars of a Well Architected Framework for Cloud Adoption. It enables you to enforce standards across either single or multiple subscriptions at different scope levels and allows you to bring both existing and new resources into compliance using bulk and automated remediation.

These policies enforce different rules and effects over your resources so that those resources stay compliant with your corporate standards and service level agreements. Azure Policy meets this need by evaluating your resources for noncompliance with assigned policies.

Image Credit - Microsoft

Image Credit: Microsoft

Policies define what you can and cannot do with your environment. They can be used individually or in conjunction with Locks to ensure granular control. Let’s look at some simple examples where Policies can be applied:

  • If you want to ensure resources are deployed only in a specific region.
  • If you want to use only specific Virtual Machine or Storage SKUs.
  • If you want to block any SQL installations.
  • If you want to enforce Tags consistently across your resources.

So that’s it – you can just apply a policy and it will do what you need it to do? The answer is both Yes and No:

  • Yes, in the sense that you can apply a policy to define a particular set of business rules to audit and remediate the compliance of existing resources against those rules.
  • No in the sense that there is so much more to it than that.

There is much to understand about how Azure Policy can be used as part of your Cloud Adoption Framework toolbox. And because there is so much to learn, I’ve decided to do an “A-Z” of Azure Policy and show the different options and scenarios that are available.

Before we start on the A-Z, a quick disclaimer …. There’s going to be an entry for every letter of the alphabet, but you may have to forgive me if I use artistic license to squeeze a few in (Letters like Q, X and Z spring to mind!).

So, grab a coffee (or whatever drink takes your fancy) and let’s start on the Azure Policy alphabet!

A

Append is the first of our Policy Effects and is used to add extra fields to resources during update or creation, however this is only available with Azure Resource Manager (ARM). The example below sets IP rules on a Storage Account:

"then": {
    "effect": "append",
    "details": [{
        "field": "Microsoft.Storage/storageAccounts/networkAcls.ipRules",
        "value": [{
            "action": "Allow",
            "value": "134.5.0.0/21"
        }]
    }]
}

Assignment is the definition of what resources or scope your Policy is being applied to.

Audit is the Policy Effect that evaluates the resources and report a non-compliance in the logs. It does not take any actions; this is report-only.

"then": {
    "effect": "audit"
}

AuditIfNotExists is the Policy Effect that evaluates whether a property is missing. So for example, we can say if the type of Resource is a Virtual Machine and we want to know if that Virtual Machine has a particular tag or extension present. If yes, the resource will be returned as Compliant, if not, it will return a non-compliance. The example below evaluates Virtual Machines to determine whether the Antimalware extension exists then audits when missing:

{
    "if": {
        "field": "type",
        "equals": "Microsoft.Compute/virtualMachines"
    },
    "then": {
        "effect": "auditIfNotExists",
        "details": {
            "type": "Microsoft.Compute/virtualMachines/extensions",
            "existenceCondition": {
                "allOf": [{
                        "field": "Microsoft.Compute/virtualMachines/extensions/publisher",
                        "equals": "Microsoft.Azure.Security"
                    },
                    {
                        "field": "Microsoft.Compute/virtualMachines/extensions/type",
                        "equals": "IaaSAntimalware"
                    }
                ]
            }
        }
    }
}

B

Blueprints – Instead of having to configure features like Azure Policy for each new subscription, with Azure Blueprints you can define a repeatable set of governance tools and standard Azure resources that your organization requires. This allows you to scale the configuration and organizational compliance across new and existing subscriptions with a set of built-in components that speed the development and deployment phases.

Built-In –Azure provides hundreds of built-in Policy and Initiative definitions for multiple resources to get you started. You can find then both on the Microsoft Learn site or on GitHub.

C

Compliance State shows the state of the resource when compared to the policy that has been applied. Unsurprisingly this has 2 states, Compliant and Non-Compliant

Costs – if you are running Azure Policy on Azure resources, then its free. However, you can use Azure Policy to cover Azure Arc resources and there are specific scenarios where you will be charged:

  • Azure Policy guest configuration (includes Azure Automation change tracking, inventory, state configuration): $6/Server/Month
  • Kubernetes Configuration: First 6 vCPUs are free, $2/vCPU/month

Custom Policy definitions are ones that you create yourself when a Built-In Policy doesn’t meet the requirements of what you are trying to achieve.

D

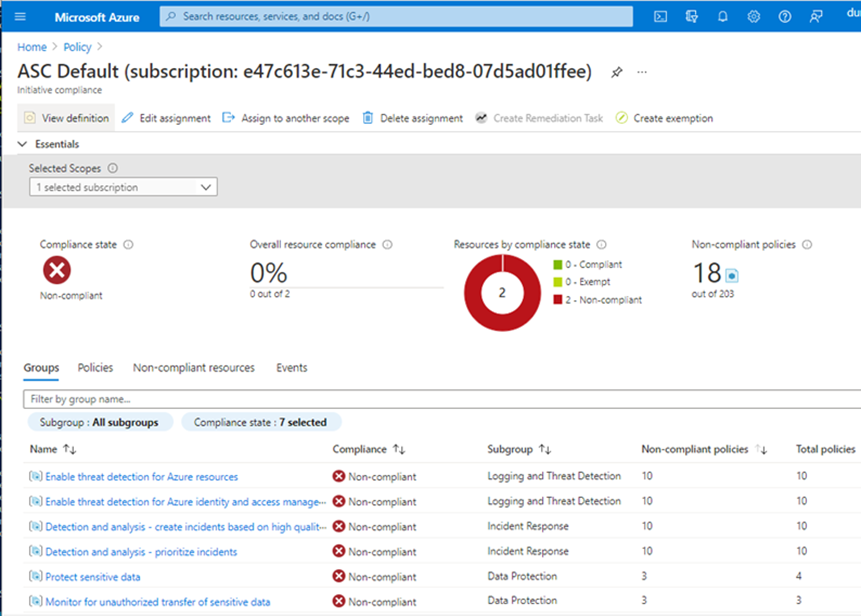
Dashboards in the Azure Portal give you a graphical overview of the compliance state of your Azure environments:

Definition Location is the scope to where the Policy or Initiative is assigned. This can be Management Group, Subscription, Resource Group or Resource.

Deny is the Policy Effect used to prevent a resource request or action that doesn’t match the defined standards.

"then": {
    "effect": "deny"
}

DeployIfNotExists is the Policy Effect used to apply the action defined in the Policy Template when a resource is found to be non-compliant. This is used as part of a remediation of non-compliant resources. Important point to note – policy assignments that use a DeployIfNotExists effect require a managed identity to perform remediation.

Docker Security Baseline is a set of default configuration settings which ensure that Docker Containers in Azure are running based on a recommended set of regulatory and security baselines.

E

Enforcement Mode is a property that allows you to enable/disable enforcement of policy effects while still evaluating compliance.

Evaluation is the process of scanning your environment to determine the applicability and compliance of assigned policies.

F

Fields are used in policy definitions to specify a property or alias. In the example below, the field property contains “location” and “type” at different stages of the evaluation:

"if": {
        "allOf": [{
                "field": "location",
                "notIn": "[parameters('listOfAllowedLocations')]"
            },
            {
                "field": "location",
                "notEquals": "global"
            },
            {
                "field": "type",
                "notEquals": "Microsoft.AzureActiveDirectory/b2cDirectories"
            }
        ]
    },
    "then": {
        "effect": "Deny"
    }
}

G

GitHub – you can use GitHub to build an “Azure Policy as Code” workflow to manage your policies as code, control the lifecycle of updating definitions, and automate the process of validating compliance results.

Governance Visualizer – I have to include this because I think its an awesome tool – Julian Hayward’s AzGovViz tool is a PowerShell script which captures Azure governance capabilities such as Azure Policy, RBAC and Blueprints and a lot more. If you’re not using it, now is the time to start.

Group – within an Initiative, you can group policy definitions for categorization. The Regulatory Compliance feature uses this to group definitions into controls and compliance domains.

H

Hierarchy – this sounds simple but is important. The location that you assign the policy should contain all resources that you want to target under that resource hierarchy. If the definition location is a:

  • Subscription – Only resources within that subscription can be assigned the policy definition.
  • Management group – Only resources within child management groups and child subscriptions can be assigned the policy definition. If you plan to apply the policy definition to several subscriptions, the location must be a management group that contains each subscription.

I

Initiative (or Policy Set) is a set of Policies that have been grouped together with the aim of either targeting a specific set of resources, or to evaluate and remediate a specific set of definitions or parameters. For example, you could group several tagging policies into a single initiative that is targeted at a specific scope instead of applying multiple policies individually.

J

JSON – Policy definitions are written in JSON format. The policy definition contains elements for:

  • mode
  • parameters
  • display name
  • description
  • policy rule
    • logical evaluation
    • effect

An example of the “Allowed Locations” built-in policy is shown below

{
  "properties": {
    "displayName": "Allowed locations",
    "policyType": "BuiltIn",
    "description": "This policy enables you to restrict the locations...",
    "mode": "Indexed",
    "parameters": {
      "listOfAllowedLocations": {
        "type": "Array",
        "metadata": {
          "description": "Locations that can be specified....",
          "strongType": "location",
          "displayName": "Allowed locations"
        }
      }
    },
    "policyRule": {
      "if": {
        "allOf": [
          {
            "field": "location",
            "notIn": "[parameters('listOfAllowedLocations')]"
          },
          {
            "field": "location",
            "notEquals": "global"
          },
          {
            "field": "type",
            "notEquals": "Microsoft.AzureActiveDirectory/b2cDirectories"
          }
        ]
      },
      "then": {
        "effect": "Deny"
      }
    }
  },
  "id": "/providers/Microsoft.Authorization/policyDefinitions/e56962a6-4747-49cd-b67b-bf8b01975c4c",
  "type": "Microsoft.Authorization/policyDefinitions",
  "name": "e56962a6-4747-49cd-b67b-bf8b01975c4c"
}

K

Key Vault – you can integrate Key Vault with Azure Policy to audit the key vault and its objects before enforcing a deny operation to prevent outages. Current built-ins for Azure Key Vault are categorized in four major groups: key vault, certificates, keys, and secrets management.

Kubernetes – Azure Policy uses Gatekeeper to apply enforcements and safeguards on your clusters (both Azure Kubernetes Service (AKS) and Azure Arc enabled Kubernetes). This then reports back into your centralized Azure Policy Dashboard on the following:

  • Checks with Azure Policy service for policy assignments to the cluster.
  • Deploys policy definitions into the cluster as constraint template and constraint custom resources.
  • Reports auditing and compliance details back to Azure Policy service.

After installing the Azure Policy Add-on for AKS, you can apply individual policy definitions or initiatives to your cluster.

L

Lighthouse – for Service Providers, you can use Azure Lighthouse to deploy and manage policies across multiple customer tenants.

Linux Security Baseline is a set of default configuration settings which ensure that Linux VMs in Azure are running based on a recommended set of regulatory and security baselines.

Logical Operators are optional condition statements that can be used to see if resources have certain configurations applied. There are 3 logical operators – not, allOf and anyOf.

  • Not means that the opposite of the condition should be true for the policy to be applied.
  • AllOf requires all the conditions defined to be true at the same time.
  • AnyOf requires any one of the conditions to be true for the policy to be applied.
"policyRule": {
  "if": {
    "allOf": [{
        "field": "type",
        "equals": "Microsoft.DocumentDB/databaseAccounts"
      },
      {
        "field": "Microsoft.DocumentDB/databaseAccounts/enableAutomaticFailover",
        "equals": "false"
      },
      {
        "field": "Microsoft.DocumentDB/databaseAccounts/enableMultipleWriteLocations",
        "equals": "false"
      }
    ]
  },
  "then": {

M

Mode tells you the type of resources for which the policy will be applied. Allowed values are “All” (where all Resource Groups and Resources are evaluated) and “indexed” (where policy is evaluated only for resources which support tags and location)

Modify is a Policy Effect that is used to add, update, or remove properties or tags on a subscription or resource during creation or update. Important point to note – policy assignments that use a Modify effect require a managed identity to perform remediation. If you don’t have a managed identity, use Append instead. The example below is replacing all tags with a value of environment with a value of test:

"then": {
    "effect": "modify",
    "details": {
        "roleDefinitionIds": [
            "/providers/Microsoft.Authorization/roleDefinitions/b24988ac-6180-42a0-ab88-20f7382dd24c"
        ],
        "operations": [
            {
                "operation": "addOrReplace",
                "field": "tags['environment']",
                "value": "Test"
            }
        ]
    }
}

N

Non-Compliant is the state which indicates that a resource did not conform to the policy rule in the policy definition.

O

OK, so this is my first failure. Surprising, but lets keep going!

P

Parameters are used for providing inputs to the policy. They can be reused at multiple locations within the policy.

{
    "properties": {
        "displayName": "Require tag and its value",
        "policyType": "BuiltIn",
        "mode": "Indexed",
        "description": "Enforces a required tag and its value. Does not apply to resource groups.",
        "parameters": {
            "tagName": {
                "type": "String",
                "metadata": {
                    "description": "Name of the tag, such as costCenter"
                }
            },
            "tagValue": {
                "type": "String",
                "metadata": {
                    "description": "Value of the tag, such as headquarter"
                }
            }
        },
        "policyRule": {
            "if": {
                "not": {
                    "field": "[concat('tags[', parameters('tagName'), ']')]",
                    "equals": "[parameters('tagValue')]"
                }
            },
            "then": {
                "effect": "deny"
            }
        }
    }
}

Policy Rule is the part of a policy definition that describes the compliance requirements.

Policy State describes the compliance state of a policy assignment.

Q

Query Compliance – While the Dashboards in the Azure Portal (see above) provide you with a visual method of checking your overall compliance, there are a number of command line and automation tools you can use to access the compliance information gnerated by your policy and initiative assignments:

az policy state trigger-scan --resource-group "MyRG"

  • Azure PowerShell using the following command:

Start-AzPolicyComplianceScan -ResourceGroupName 'MyRG'

R

Regulatory Compliance describes a specific type of initiative that allows grouping of policies into controls and categorization of policies into compliance domains based on responsibility (Customer, Microsoft, Shared). These are available as built-in initiatives (there are built-in initiatives from CIS, ISO, PCI DSS, NIST, and multiple Government standards), and you have the ability to create your own based on specific requirements.

Remediation is a way to handle non-compliant resources. You can create remediation tasks for resources to bring these to a desired state and into compliance. You use DeployIfNotExists or Modify effects to correct violating policies.

S

Security Baseline for Azure Security Benchmark – this is a set of policies that comes from guidance from the Microsoft cloud security benchmark version 1.0. The full Azure Policy security baseline mapping file can be found here.

Scope is the location where the policy definition is being assigned to. This can be Management Group, Subscription, Resource Group or Resource.

T

Tag Governance is a crucial part of organizing your Azure resources into a taxonomy. Tags can be the basis for applying your business policies with Azure Policy or tracking costs with Cost Management. The template shown below shows how to enforce Tag values across your resources:

{
   "properties": {
      "displayName": "Require tag and its value",
      "policyType": "BuiltIn",
      "mode": "Indexed",
      "description": "Enforces a required tag and its value. Does not apply to resource groups.",
      "parameters": {
         "tagName": {
            "type": "String",
            "metadata": {
               "description": "Name of the tag, such as costCenter"
            }
         },
         "tagValue": {
            "type": "String",
            "metadata": {
               "description": "Value of the tag, such as headquarter"
            }
         }
      },
      "policyRule": {
         "if": {
            "not": {
               "field": "[concat('tags[', parameters('tagName'), ']')]",
               "equals": "[parameters('tagValue')]"
            }
         },
         "then": {
            "effect": "deny"
         }
      }
   },
   "id": "/providers/Microsoft.Authorization/policyDefinitions/1e30110a-5ceb-460c-a204-c1c3969c6d62",
   "type": "Microsoft.Authorization/policyDefinitions",
   "name": "1e30110a-5ceb-460c-a204-c1c3969c6d62"
}

U

Understanding how Effects work is key to understanding Azure Policy. By now, we’ve listed all the effects out above. The key thing to remember is that each policy definition has a single effect, which determines what happens when an evaluation finds a match. There is an order in how the effects are evaluated:

  • Disabled is checked first to determine whether the policy rule should be evaluated.
  • Append and Modify are then evaluated. Since either could alter the request, a change made may prevent an audit or deny effect from triggering. These effects are only available with a Resource Manager mode.
  • Deny is then evaluated. By evaluating deny before audit, double logging of an undesired resource is prevented.
  • Audit is evaluated.
  • Manual is evaluated.
  • AuditIfNotExists is evaluated.
  • denyAction is evaluated last.

Once these effects return a result, the following 2 effects are run to determine if additional logging or actions are required:

  • AuditIfNotExists
  • DeployIfNotExists

V

Visual Studio Code contains an Azure Policy code extension which allows you to create and modify policy definitions, run resource compliance and evaluate your policies against a resource.

W

Web Application Firewall – Azure Web Application Firewall (WAF) combined with Azure Policy can help enforce organizational standards and assess compliance at-scale for WAF resources.

Windows Security Baseline is a set of default configuration settings which ensure that Windows VMs in Azure are running based on a recommended set of regulatory and security baselines.

X

X is for ….. ah come on, you’re having a laugh ….. fine, here you go (artistic license taken!):

Xclusion – this of course should read Exclusion ….. when assigned, the scope includes all child resource containers and child resources. If a child resource container or child resource shouldn’t have the definition applied, each can be excluded from evaluation by setting notScopes.

Xemption – this of course should read Exemption …. this is a feature used to exempt a resource hierarchy or individual resource from evaluation. These resources are therefore not evaluated and can have a temporary waiver (expiration) period where they are exempt from evaluation and remediation.

Y

YAML – You can use Azure DevOps to check Azure Policy Compliance using using YAML Pipelines. However, you need to use the AzurePolicyCheckGate@0 task. The syntax is shown below:

# Check Azure Policy compliance v0
# Security and compliance assessment for Azure Policy.
- task: AzurePolicyCheckGate@0
  inputs:
    azureSubscription: # string. Alias: ConnectedServiceName. Required. Azure subscription. 
    #ResourceGroupName: # string. Resource group. 
    #Resources: # string. Resource name.

Z

Zero Non-Compliant – which is exactly the position you want to get to!

Z is also for Zzzzzzzz, which may be the state you’re in if you’ve managed to get this far!

Summary

So thats a lot to take in, but it gives you an insight into the different options that are available in Azure Policy to ensure that your Azure environments can meet both governance and cost management objectives for your organization.

In this post, I’ve stayed with the features of Azure Policy and apart from a few examples didn’t touch on the many different methods you can use to assign and manage policies which are:

  • Azure Portal
  • Azure CLI
  • Azure PowerShell
  • .NET
  • JavaScript
  • Python
  • REST
  • ARM Template
  • Bicep
  • Terraform

As always, check out the official Microsoft Learn documentation for a more in-depth deep dive on Azure Policy.

Hope you enjoyed this post! Be sure to check out the rest of the articles in this years Azure Spring Clean.

Can we prevent Cloud Repatriation in Azure?

I’ve seen a lot of articles in the last few months talking about Cloud Repatriation, so I’ve decided to look into this more and find out more about:

  • What is Cloud Repatriation?
  • Why is it suddenly a topic?
  • Why its not as easy as it sounds?
  • How did this happen in the first place?
  • Why it should never become an issue?

What is Cloud Repatriation?

Lets start with the easy question and look for the definition of what it is. Repatriation is a term that has been around for a while and is defined in its simplest form as:

“the process of returning a thing or a person to its place of origin”

So if we take that definition and apply it to technology, Cloud Repatriation is the process of companies moving their services out of Microsoft Azure (or other Public Cloud providers such as AWS or GCP) and relocating those services back to the On-Premises or Private Cloud environments that they originated from.

Why is it suddenly a topic?

One word – cost. The cost of running a Cloud Computing environment isn’t the same as running an On-Premises environment.

In an On-Premises environment, we work with predictable cost models when it comes to Equipment, Licensing and Staffing costs. The only variable is Power which is in a constant state of flux and change. This leads us down the CapEx route which forces companies into predicting the costs involved over a 3-5 year period. Finance people love this as it means they can safely predict future costs and budgets, and not have to worry about unexpected charges affecting their balance sheets.

The first part of that previous paragraph is ambiguous. Unless your company is static with zero growth projections (and lets be honest, no company is), its going to be difficult to predict costs or a period of years:

  • How many servers will you need to run your estate? If you order too little, you’ll need to buy more and your CFO won’t like that after you told them that these were the only costs needed for the next 3 years.
  • If you order too much, its overspend and equipment/license wastage and you may not be approved for additional equipment in your next Budget cycle (which leads you to use unsupported and out of warranty equipment that may lead to more costs to keep that operational).
  • You may have also hired either too few staff (leading to overwork and burnout) or too many staff (which leads to idleness and ultimately reducing the workforce).

Cloud Computing environments use the OpEx which works differently in that it uses a Pay-As-You-Use model. You use a Cloud Service and are billed monthly for the cost of using it. You have options to scale the service up or down as required, and you can also purchase Reserved Instances or Savings Plans over a 3/5 year period in order to reduce the costs and have that “CapEx-feel” to Cloud Computing.

The problem is that there is no clearly defined way of keeping those costs consistent, and Microsoft’s recent announcement on price increases for European Customers (and depending on your currency, this was as much as 15%) has meant that CFOs and CTOs are scrambling to look at alternative solutions to the Cloud.

And in some cases, the word “Repatriation” has been thrown about and the question being asked is “were we wrong to move to Azure/AWS/GCP, and should we look to move our servers and data back?”

Why its not as easy as it sounds?

So you want to move back? It sounds easy, and if your Cloud Migration involved only a “Lift And Shift” or Rehost (where you migrated your VMs as-is and made no modifications to them), then fire away! Buy your equipment, install your favourite hypervisor and off you go! There are 3rd party products (such as Carbon) on the market that will bring your VMs back to either VMware or Hyper-V.

You can also migrate Office365 mailboxes back to On-Premises Exchange Servers by setting up a migration batch in EAC, so that process is simple.

But what if you did more than just Rehost? Lets remind ourselves of the 5 R’s of Cloud Rationalization:

  • Rehost – also known and Lift and Shift.
  • Refactor – customizing your apps and infrastructure to align with the Cloud.
  • Rearchitect – divides your app into different parts or MicroServices.
  • Rebuild – completely rebuild and redevelop your app.
  • Replace – completely replace the app with a cloud-native SaaS application.

If you’ve done anything more than Rehost during your migration to Azure, then you have a bit of work on your hands getting it back. It’s not impossible by any means but as with all Cloud Services, it’s a lot easier to get them into the Cloud than it is to get them out. If you’ve redesigned your app to make it Cloud-Native using any of the other 4 “R’s”, then you need to realise that you need to recreate that environment on your On-Premises, and that may not be easy and cost a lot more than it is running the service in Azure in the first place!

How did this happen in the first place?

To work out why this should never have become an issue, we need to go back through the mists of time and work out why the migrations happened in the first place. It was most likely down to either:

  • Running old and unsupported hardware.
  • Complex systems that were difficult to manage and maintain.
  • Enhanced Security.
  • Easier Scalability of services.

And if you moved to Azure, its likely that you used either :

  • Azure Site Recovery (and were using Azure as a DR platform to initially test how your VMs would work).
  • Azure Migrate (where you ran a discovery assessment on the load of your VMs over a period of time up to 30 days, and used that assessment as a means of sizing your target Azure VMs).

The original version of Azure Migrate only supported migration of VMware VM workloads to Azure. The new version (released in November 2019) included Database and Web Server migration features, and Application Discovery.

In all likelihood, some companies went down the same route as the initial Office365 migrations (where they only migrated Email and never used any of the other underlying services included in their licenses), and in doing their Cloud Migrations to Azure decided to effectively “Rehost-only” and not use the additional benefits that were available. So instead of running Web Servers or Applications as part of an Azure App Service, they may have been left running on VMs with underlying Web or App Services.

Another good example here is the Finance or Warehouse Management Application that ran on a VM and also required a dedicated SQL backend (that also ran on a VM). Instead of refactoring that into an App Service or a Serverless SQL Database, it was left running on VMs in Azure. We all know that these VMs have spikes at certain times every month, so in that case the scalability that could have offered cost savings wasn’t implemented.

Why it should never have become an issue?

There are a number of contributing factors why Cloud Computing costs can spiral out of control. I’ve made the case for these below, and in some cases what can be done to address them:

  • Azure Reserved Instances – this is what Finance people love as they immediate savings and some semblance of how they can “CapEx their OpEx” costs over a longer period of time.
  • Azure Cost Management – Setting a budget or at least budget alerts on monthly spend can at least give you an indication of where you are each month. If you’re getting budget alerts emails on the 10th of each month, then you haven’t got either your budget or your Service SKU’s and Sizing right.
  • Azure Policy – have you set policies to say that you can only have certain VM SKUs, running on certain disk types, in certain regions?
  • RBAC Roles – this is the most important one and the biggest factor in “spend-creep”. Who can do what in your Azure Subscription? For example, have you granted developers Owner access in their own Resource Group so they can spin up what they want? Changing a SKU on a VM is single click operation, as is changing Disk type from HDD to SSD, redundancy from LRS to GRS etc. And do the policies you have set above apply across the subscription or have you exclusions set somewhere? Having control of your environemnt and assigning the correct roles.
  • Assessments – OK, this is a “after the horse has bolted” scenario, but its never too late to do it. Asking questions like why did you move in the first place, does it align with business goals, strategy and governance objectives.
  • Azure Advisor – its there, on every resource you are running in Azure and also as its own page in the portal, giving you recommendations based on over/under consumption and how you can address this.
  • Backup/DR- this has long been a bone of contention for some companies and I’ve experienced some who see Cloud-based backup solutions as either unnecessary or too expensive (because being in the cloud means we don’t need Backup or DR, right?).

Conclusion

I’ve based this article purely on costs and how you can utilize the various Tools, Policies and Governance tools available in Azure that can help make final decisions on whether Cloud Repatriation is the right choice for your business.

Hope you enjoyed this post, until next time!

Microsoft Ignite 2022 – Highlights of the Announcements (with a few personal opinions thrown in)!

For this year’s Microsoft Ignite, in-person conferences were held in cities around the world after two years of being online and I was fortunate enough to attend the Manchester Spotlight event last week.

At the conference Microsoft had their usual presentations, ‘Ask the Expert’ sessions, exhibition areas and a Cloud Skills Challenge. But of course it’s the announcements that everyone looks forward to the most, where improvements, changes and updates to the various technologies in the Microsoft product portfolio are revealed.

I’ve picked out my top highlights below!

  • Azure Stack HCI

I’m on both sides of the fence about the Azure Stack HCI announcements.

I love the Azure Stack HCI product and have been using it since the days when it was called Storage Spaces Direct and ran on Hyper-Converged Infrastructure in on-premises datacenters. As it has evolved, Microsoft has invested heavily in the Azure Stack HCI product, which allows you to run Azure Managed Infrastructure in your own datacentres and combine on-premises infrastructure with Azure Cloud Services.

One of the big announcements was around licensing, and gives Enterprise Agreement customers with Software Assurance the ability to exchange their existing licensed cores of Windows Server Datacentre to get Azure Stack HCI at no additional cost. This includes the right to run unlimited Azure Kubernetes Service and unlimited Windows Server guest workloads on the Azure Stack HCI cluster.

Speaking of Kubernetes, support for Azure Kubernetes Service on Azure Stack HCI is now available, meaning you can deploy and manage containerised apps side-by-side with your VMs on the same physical server or cluster. You can also now make provisioning for hybrid AKS clusters directly from Azure onto your Azure Stack HCI using Azure Arc

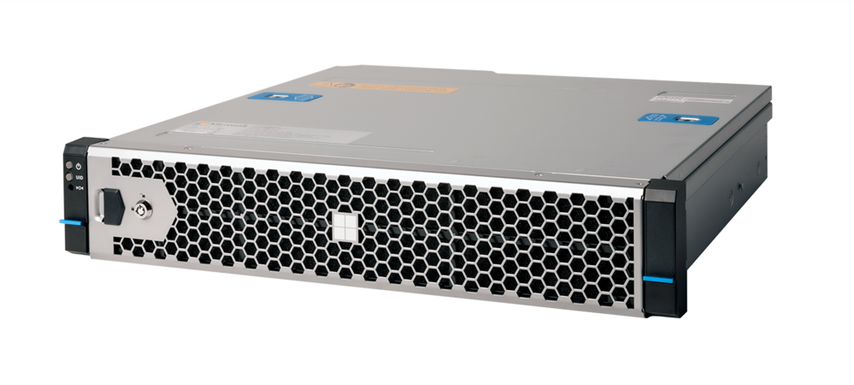
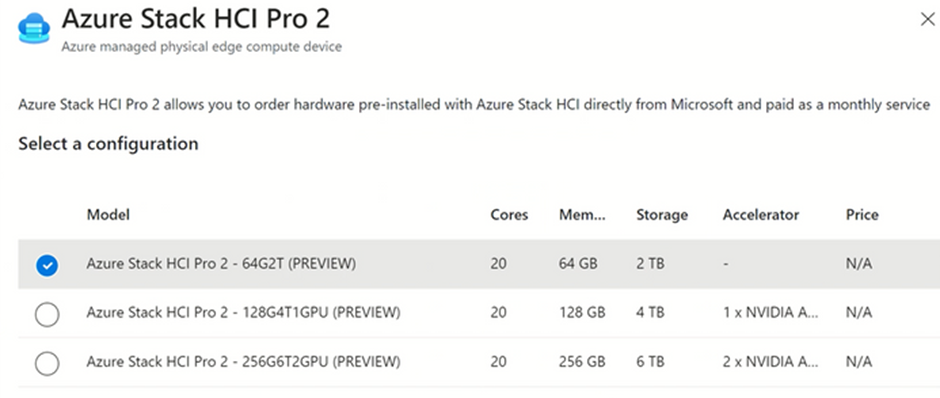
On the hardware side, you could previously purchase validated hardware for multiple vendors but in early 2023, Microsoft will begin offering an Azure Stack HCI integrated system based on hardware that’s designed, shipped, and supported by Microsoft (in partnership with Dell). 

This will be available in several configurations:

I mentioned both sides of the fence above, and the licensing announcement is one of the worrying ones, because like the recent announcements that Defender for Servers requires an Azure Subscription (Microsoft Defender for Endpoint (Server Version) is no longer available on the EA price list), we’re now potentially going down the route of Microsoft only allowing Windows Server Datacenter to run on Azure Stack HCI accredited hardware. Or potentially getting rid of the Windows Server Datacenter SKU entirely and having it as a “cloud-connected only” product. Only time will tell.

  • Azure Savings Plan for Compute

Azure Savings Plan for Compute is based on consumption, and allows you to by a one- or three-year savings plan and commit to a spend of $5 per hour per virtual machine (VM). This is based on Azure Advisor Recommendations in the Cost Management and Billing section of the Azure Portal.

Once purchased, this is applied on a hourly basis based on consumption and even if you go above the $5 spend, the initial commitment is still billed at the lower rate and any additional consumption is billed at a Pay-As-You-Go rate.

The main difference between this and Reserved Instances is that Reserved Instances is an up-front commitment whether the VM is powered on or not. Azure Savings Plan for Compute unlocks those lower savings based on consumption.

You can find more details in this article on the Microsoft Community Hub.

  • Azure Virtual Machine Scale Sets – Mixing Standard and Spot instances

Staying on the Cost Savings topic, you can now specify a % of Spot Instance VMs that you wish to run in a VM Scale Set.

This feature (which is in Preview) allows you to reduce compute infrastructure costs by leveraging the deep discounts that Spot VMs can provide while maintaining the compute capacity your workload needs. 

More information can be found here.

  • Microsoft 365 updates

A huge number of announcements were made about Microsoft 365 at this year’s Ignite, most notably:

  • The release of the Microsoft 365 app, which will replace the Office Mobile and Office for Windows App for all Microsoft 365 customers who use this as part of their subscriptions.
  • Teams Premium, which will be available to E5 subscriptions and will bring enhanced meeting features such as insights and live translation in more than 40 languages so that participants can read captions in their own language.
  • Microsoft Places, which will assist with the hybrid working model and let everyone know who will be in the office at what times, where colleagues are sitting, what meetings to attend in person; and how to book space on the days your team is planning to go into the office.

The Teams announcements are great, in particular the live translation option. For us as a multi-national and multi-language organisation, this is a massive step in fostering the inclusion of all users. There is an assumption in the world that spoken English is the native language of Tech, but it’s not everyone’s first language.

  • Microsoft Intune

Microsoft Endpoint Manager is being renamed to Microsoft Intune, which is what it was called before it was renamed to Endpoint Manager. This effectively bundles all Endpoint Management tools under a single brand, including Microsoft Configuration Manager. Some of the main features announced were:

  • ServiceNow Integration
  • Cloud LAPS for Azure Virtual Machines
  • Update Policies or MacOS and Linux Support
  • Endpoint Privileged Management – no more permanent admin permissions on devices!

For me, Endpoint Privileged Management is huge addition which removes the need for any permanent administrative permissions on devices. Cloud LAPS is also a huge security step.

  • Security

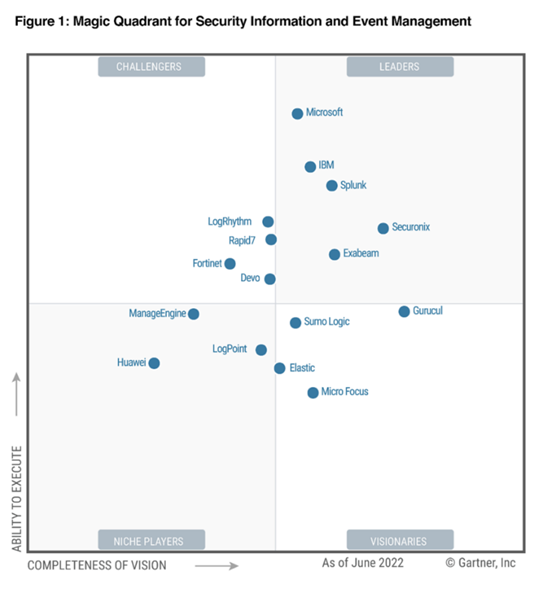
Finally on to Security, which was a big focus this year. This year’s updates to the Microsoft Security portfolio coincided with the announcement that Microsoft is now recognised as a leader in the Gartner Magic Quadrant for Security Information and Event Management.

First and foremost is Microsoft’s announcement of a limited-time sale of 50% off Defender for Endpoint Plan 1 and Plan 2 licenses, allowing organisations to do more and spend less by modernising their security with a leading endpoint protection platform. The offer runs until June 2023.

Microsoft 365 Defender now automatically disrupts ransomware attacks. This is possible because Microsoft 365 Defender collects and correlates signals across endpoints, identities, emails, documents and cloud apps into unified incidents and uses the breadth of signal to identify attacks early with a high level of confidence. Microsoft 365 Defender can automatically contain affected assets, such as endpoints or user identities. This helps stop ransomware from spreading laterally.

A number of new capabilities have been announced for Defender for Cloud:

  • Microsoft Defender for DevOps: A new solution that will provide visibility across multiple DevOps environments to centrally manage DevOps security, strengthen cloud resource configurations in code and help prioritise remediation of critical issues in code across multi-pipeline and multicloud environments. With this preview, leading platforms like GitHub and Azure DevOps are supported and other major DevOps platforms will be supported shortly.
  • Microsoft Defender Cloud Security Posture Management (CSPM): This solution, available in preview, will build on existing capabilities to deliver integrated insights across cloud resources, including DevOps, runtime infrastructure and external attack surfaces, and will provide contextual risk-based information to security teams. Defender CSPM provides proactive attack path analysis, built on the new cloud security graph, to help identify the most exploitable resources across connected workloads to help reduce recommendation noise by 99%.
  • Microsoft cloud security benchmark: A comprehensive multicloud security framework is now generally available with Microsoft Defender for Cloud as part of the free Cloud Security Posture Management experience. This built-in benchmark maps best practices across clouds and industry frameworks, enabling security teams to drive multicloud security compliance.
  • Expanded workload protection capabilities: Microsoft Defender for Servers will support agentless scanning, in addition to an agent-based approach to VMs in Azure and AWS. Defender for Servers P2 will provide Microsoft Defender Vulnerability Management premium capabilities.

If you’d like to read more about Microsoft’s Ignite announcements from the conference, then go to Microsoft’s Book of News here.

Hope you enjoyed this post, until next time!

Control your Azure Virtual Desktop costs with Scaling Plans

Cloud Computing has changed the way we approach our enterprise infrastructure.

The amount of options available to us now means that we can finally ditch that dusty old server sitting the the bottom of the server rack (or in some cases at the back of a cupboard) for a modern secure solution that we don’t need to sit and pray in front of every time we need to restart it.

The Problem with the Cloud

But …. some people would prefer to keep old “Dusty Springfield” alive because the effort to migrate and in some cases re-architect the service is too much and too costly. And thats the thing we hear the most when a suggestion to migrate to a cloud service is raised – “the cloud is very expensive…”.

And lets be honest, it is …..

Money money money ……

There, I said it. Out Loud. In Print. Cloud Computing is expensive. There’s a helicopter hovering over my house at the minute but I’m sure its nothing to worry about ……

In all seriousness though, when scoping out a Cloud solution the first thing that is looked at is cost. You can argue as much as you want about the redundancy, the lower power and cooling costs, lack of hardware costs etc. The bean counters will look at the bottom line and say “we’re not paying that much now….”. And “Dusty Springfield” limps on defiantly in corner.

Of course, your cloud computing costs are defined by the options you select and what level of redundancy you need. Scale Sets, Storage redundancy across zones and regions. Or just keep it as locally redundant storage? Then you get into the sizing of your solutions.

How the Costs add up

Azure Virtual Desktop is one of those cool technologies that can help you provide a secure environment for your users to access Cloud or Hybrid environments in a consistent and unified experience. But because its built on underlying VMs which you need to size based on your requirements, the costs can mount up.

Lets take a look at an example of a standard Azure Virtual Desktop host pool that contains 10 Session Hosts which are delivering Remote Apps to 100 users. The Session Hosts are generally sized from the General Purpose VM type and the most common one used is the “Standard_D4s_v3”, which has 4 vCPU’s and 16GB memory.

The base cost for this VM if you create a standard Azure Virtual machine comes in at approx $160 per month.

Standard Virtual Machine Type

However, if we use this VM type for our Azure Virtual Desktop Session Hosts with Windows 10 Enterprise Multi-Session version 21H2 with Microsoft 365 Apps installed, the cost then jumps to $290 per month.

Azure Virtual Desktop Virtual Machine Type

So, lets go back to our 10 Session Hosts – at that price we’re talking $2900 per month, or just under $35000 per year. And thats for just 10 VMs in the environment. And thats why Cloud Computing is expensive! Of course, this doesn’t take into account reserved instances or spot instances, but you get the idea.

The $290 per month cost for a VM isn’t based on a cost per month – its based on 730 hours of usage or 24 hours multiplied by just over 30. This where you can start cutting into that $35000 per year cost, and where Scaling Plans applied to your Azure Virtual Desktop Host Pools can help.

Scaling Plans

Scaling Plans lets you scale your session host virtual machines (VMs) in a host pool up or down to optimize deployment costs. You can create a scaling plan based on:

  • Time of day
  • Specific days of the week
  • Session limits per session host

You follow the guidelines below when creating your scaling plan:

  • At the time of writing, you can only configure autoscale with existing Pooled host pools. This won’t work with Personal host pools
  • You must create the scaling plan in the same Azure region as the host pool you assign it to.
  • All host pools you use with autoscale must have a configured MaxSessionLimit parameter. Don’t use the default value.
  • You must grant Azure Virtual Desktop access to manage the power state of your session host VMs.

Create a custom RBAC role

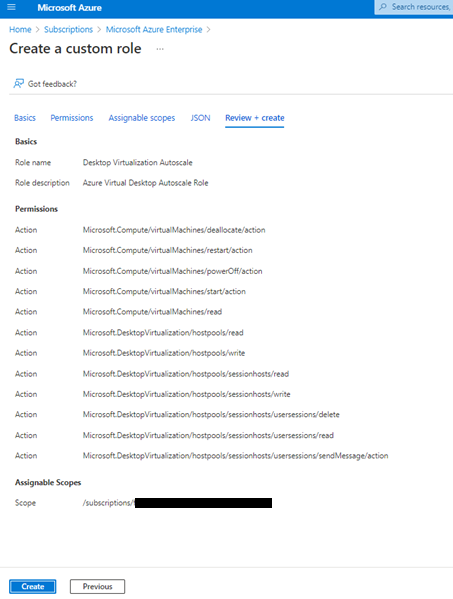
Now that we know the benefits and rules, the first thing we need to do is create a custom RBAC role. This custom role and assignment will allow Azure Virtual Desktop to manage the power state of any VMs in those subscriptions. It will also let the service apply actions on both host pools and VMs when there are no active user sessions.

The steps for creating the Custom RBAC Role are as follows (this is the same for creating any Custom RBAC Role):

  • First, create a json file using whatever your favourite editor is (I’m using Sublime in this example). Save the file as avdscale.json and add the following information into it:
  • Open the Azure portal and go to Subscriptions and select a subscription that contains a host pool and session host VMs you want to use with autoscale. Select Access control (IAM). Select the + Add button, then select Add custom role from the drop-down menu.

  • On the “Basics” screen, go to Baseline permissions and browse to the avdscale.json file that you just created.
  • This will import all of your settings, so on the next screen you will see the permissions that you had specified in your json file.
  • Next, we have “Assignable Scopes”. You want to assign this at subscription level as assigning this custom role at any level lower than your subscription, such as the resource group, host pool, or VM, will prevent autoscale from working properly.
  • We can now skip to the “Review and Create” screen, as this will validate and list out our permissions for the RBAC role. Review these and then click “Create”:
  • And once thats created, we can see its been created as a Custom Role:

  • Now we need to add a Role Assignment for our RBAC Role. So we click on “Add role assignment”

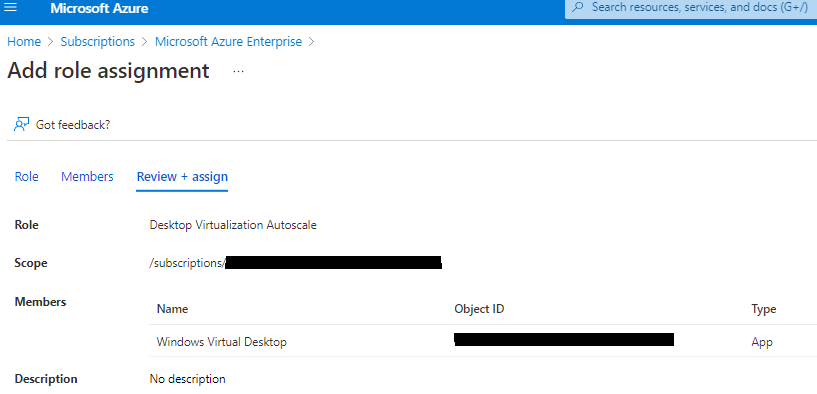
  • We select our Custom RBAC role and in the members screen, we choose to assign access to a User, group or service principal. From the select members screen, search for “Windows Virtual Desktop”
  • Go to “Review and Assign” and click create:
  • And we can see that at subscription level the role has been assigned:

Create our Scaling Plan

Now that our RBAC role is done, we can create our scaling plan.
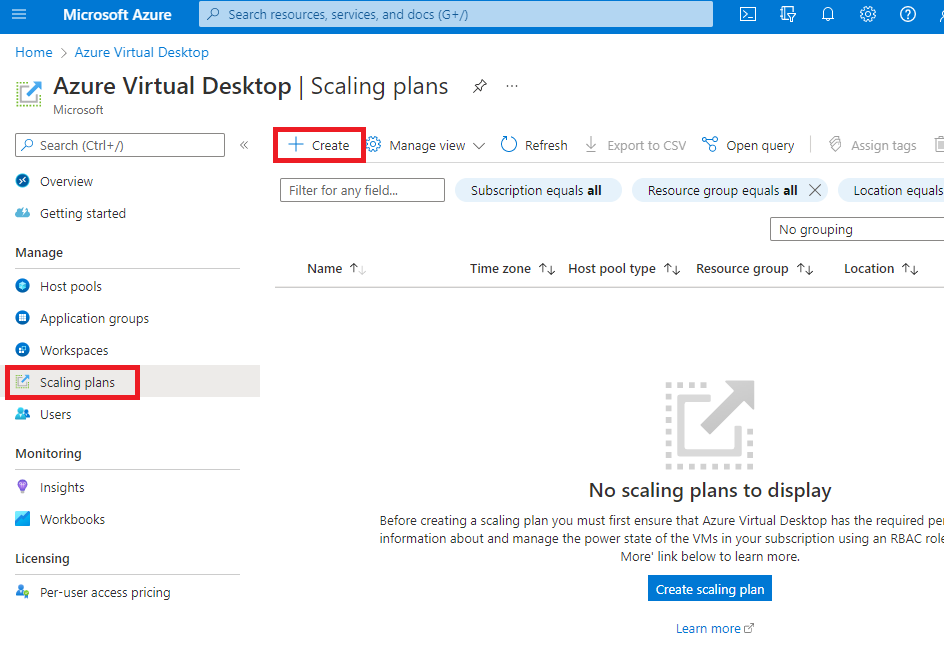
  • Open the Azure portal. In the search bar, type Azure Virtual Desktop and select the matching service entry. Select Scaling Plans, then select Create.
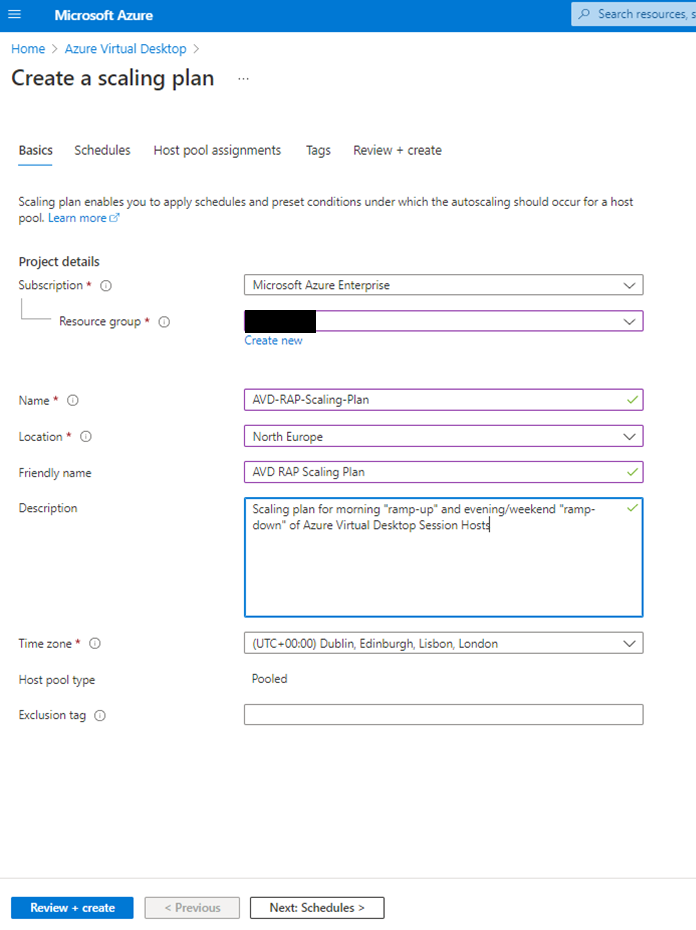
  • On the Basics screen, provide the following:
    • Subscription and Resource Group where the Scaling Plan will be created
    • Name
    • Location (remember this needs to be in the same region as your Host Pool)
    • Time Zone

The other entries are optional, however an important one to note is Exclusion Tags – you can use this in conjunction with Tags to excluse certain VMs from autoscaling operations

  • Click next and this will bring you to the Schedules screen. Click on Add Schedule
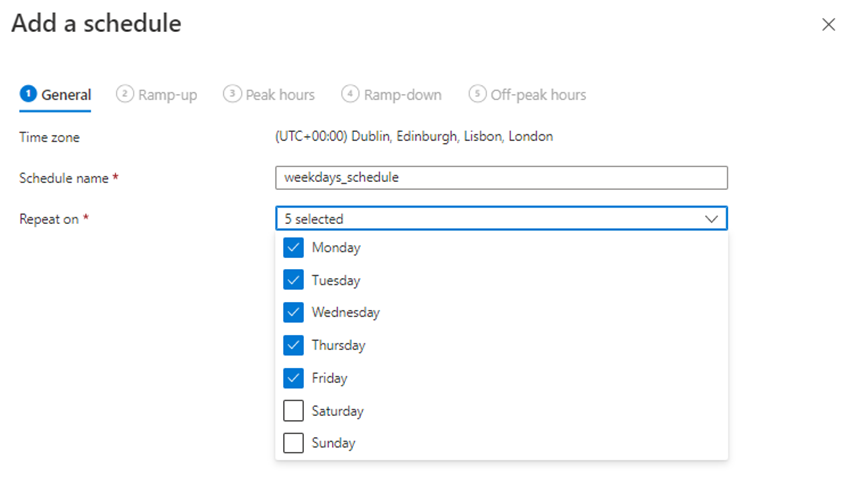
  • In the General screen, we enter a Schedule Name and also select the days we want the schedule to apply to.
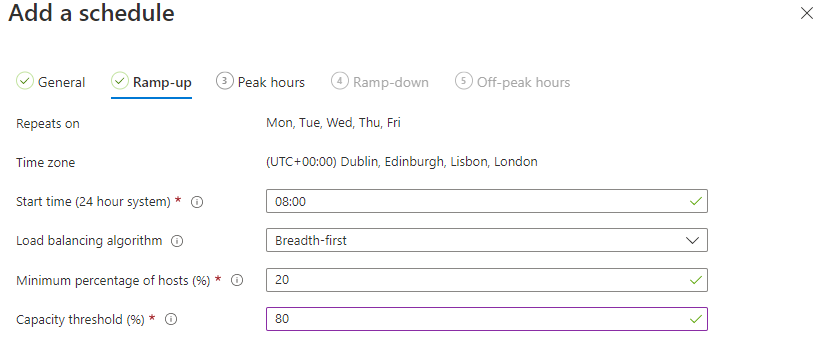
  • In the Ramp-up screen, we specify a default starting point.
    • So in this instance, we want to have 20% (or 2 out of our 10 Session Hosts) powered on and ready to accept connections at 08:00.
    • We’ve selected “Breadth First” for Load balancing – this means users will be spread evenly across available hosts and is recommended for consistent performance.
    • Finally, we have set a Capacity threshold of 80%. If you recall, we set our hosts to accept a maximum of 10 connections. We have 2 hosts powered on, so once we reach 16 users across those 2 hosts, the next host will automatically power on.
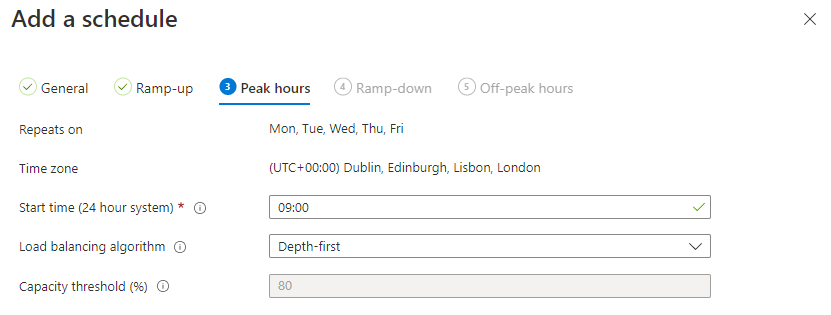
  • Next up is Peak hours. For this we specify a starting time (which is normally when the majority of your users will be logging on) and we’ve also flipped the Load Balancing to “Depth-first”, which will load up all available hosts with user sessions (up to our 80% threshold) before bringing another one online. This is really up to you as to how you want to load balance, but as a reminder:
    • Breadth-first load balancing distributes new user sessions across all available session hosts in the host pool.
    • Depth-first load balancing distributes new sessions to any available session host with the highest number of connections that hasn’t reached its session limit yet.
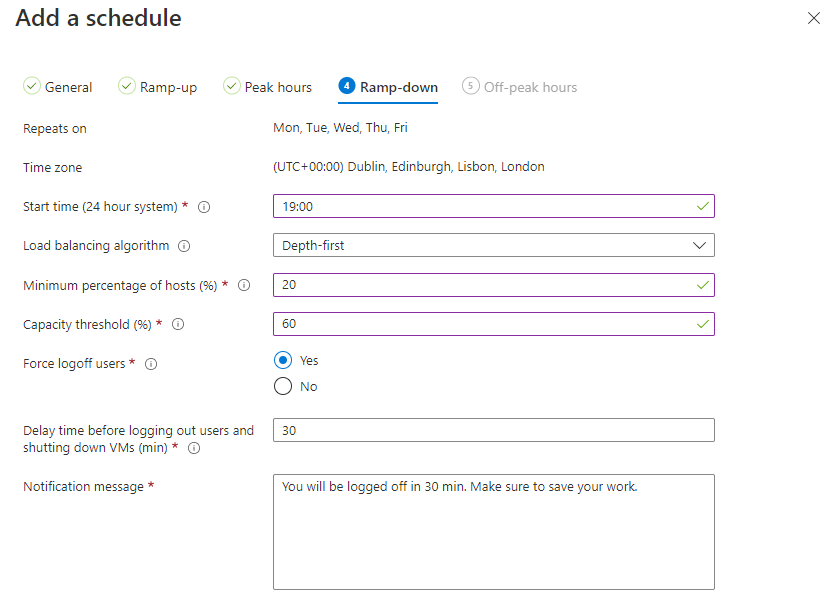
  • Next up is Ramp-down, this is where we start deallocating hosts at the end of the working day and as you can see, the target is to get back down to 20% of the hosts. The important point to make here is the “Force logoff users” option. If this is enabled then the following applies:
    • This will choose the session host with the lowest number of user sessions to shut down. Autoscale will put the session host in drain mode, send all active user sessions a notification telling them they’ll be signed out, and then sign out all users after the specified wait time is over. After autoscale signs out all user sessions, it then deallocates the VM.
    • During ramp-down, autoscale will only shut down VMs if all existing user sessions in the host pool can be consolidated to fewer VMs without exceeding the capacity threshold.
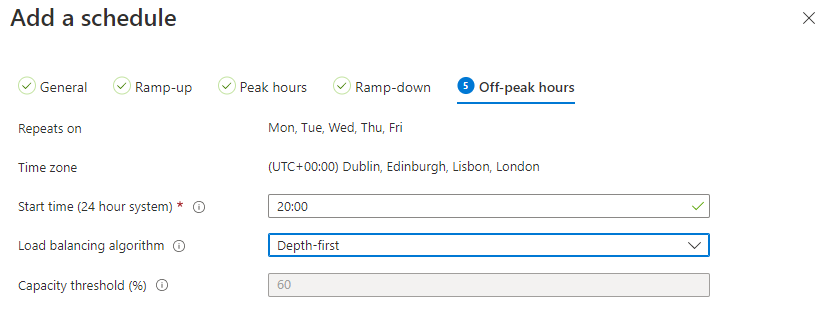
  • Finally, we get to “Off-peak hours” which is the end of the “Ramp-down” period.
  • And thats our weekday schedule created. You can also go back in and create a weekend schedule where you can bring the number of hosts down to 10% and have a higher capacity threshold at weekends:
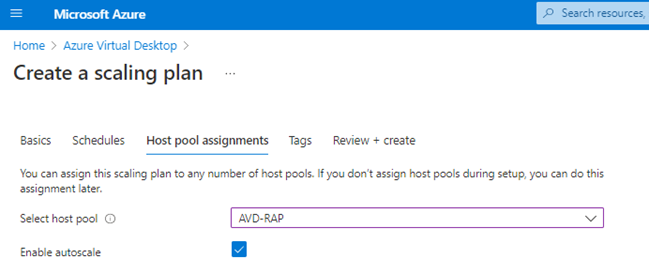
  • Once the schedules are created, we assign the Scaling Plan to our Host pool and click on “Enable autoscale”:
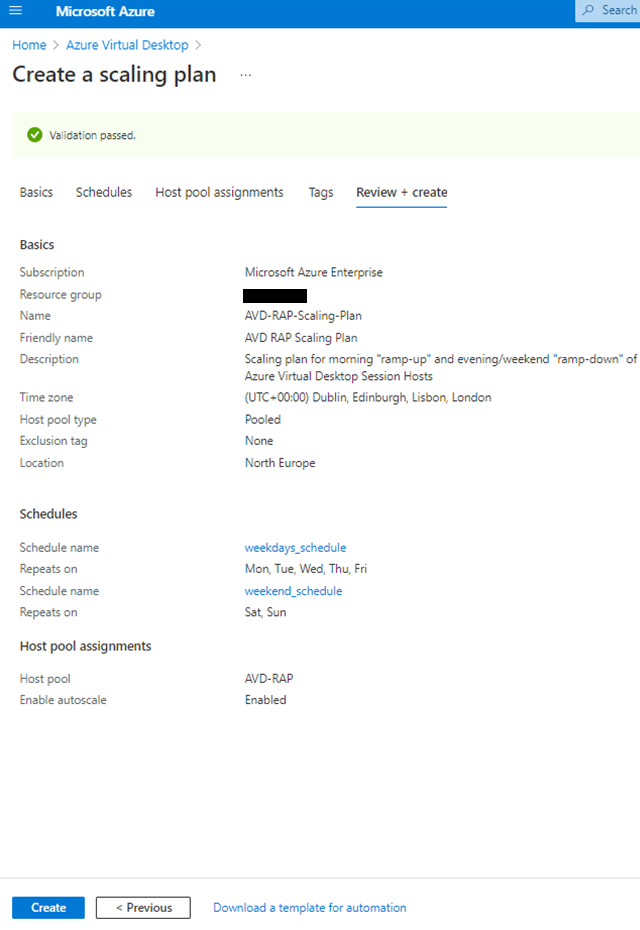
  • And now we can validate our options and click on “Review and create”:

Give all of this about an hour to kick in and you will see your Azure Virtual Desktop session hosts automatically deallocated as per your schedules if not in use!

Money money money ….

Earlier in this post, I gave a yearly figure of approx $35000 to run our 10 Session Host VMs. However, that figure is based on full consumption. So lets do some very quick calculations to see how our scaling plan affects that figure:

  • As we said, a single VM running at full consumption (or the full 730 hours) will cost us $290 per month.
  • Based on our schedules created above, we’re going to have 1 VM running full time for both weekdays and weekends. So thats $290 per month, or $3,480 per year.
  • We’re then guaranteed to have 1 VM running from Monday until Friday for 24 hours, and also on weekends for 12 hours each day (depending on how schedule is created). Thats effectively 6 days a week instead of 7. So we need to calculate that over a year which is a case of getting 6/7ths of our full price figure. Thats coming in at $2,983 per year for that VM.
  • Now, its back to the other 8 VMs and the 100 users who are using this. “If” those 100 users are logged on, the other 8 VMs will be up for 12 hours a day from Monday to Friday only as per our schedule. So for that, we need to get 5/7ths of our full price figure (which is $2,486) and then half it because we’re only using for 12 hours a day (and thats coming in at $1,243 per VM).

In summary, what we’ve got is:

  • $3,480 – 1 VM at full consumption
  • $2,983 – 1 VM at slightly reduced consumption for weekdays and weekends
  • $9,944 – 8 VMs running for 12 hours a day from Monday to Friday

Add those figures up and you get a total of $16,407. And we need to remember, that figure doesn’t available cost reductions like Reserved Instances or Hybrid Benefit.

Conclusion

So by implementing a Scaling Plan for the Host pool above, we’ve saved ourselves nearly $20,000. Again I’m going to stress the figures I’m quoting here are approximate, may not represent what you see in your own personal or enterprise subscriptions, and should not be taken as exact savings. Make sure to speak to your Microsoft TAM or Cloud Service Provider for more details. You can find out more about scaling plans here.

Hope you enjoyed this post, until next time!

100 Days of Cloud – Day 100: The End of the Beginning

Its Day 100 of my 100 Days of Cloud Journey.

Day 100….. I’ve made it! So its time to reflect on the journey, look back at what prompted me to do it, the original goals, how that changed over time and remind myself that this is definitely not the end!

Back before the Start…..

Before we start into the why’s of how “100 Days” came about, we need to go back to a different time for us all – March 2020, when none of us knew what was around the corner despite the reports that something wasn’t well in a part of China that none of us had ever heard of.

The story starts with me on my way home from my brothers’ wedding in Melbourne, and while waiting for the connection during the stopover in Dubai I came across an article informing me that Microsoft were retiring the MCSE certification for good in July 2020, and that there would be no 2019 version of the cert as it was all moving to Azure. I made note of the article and like most articles that interested me, I bookmarked it for future reading and probably emailed myself a copy to remind me to revisit it.

Damn you MCSE retirement!

And therein lies the problem – like most IT people, I have lots of great ideas and intentions and save them away for future reference. Its getting back to them and actually doing them thats the problem.

So anyway – 5 days after arriving home, the country went into lockdown and I was consigned to the makeshift desk in spare room. A few weeks went by, and having become Netflix-man and gotten bored with it, I was doom-scrolling through my emails late one night and came across the MCSE email I’d sent to myself.

It bothered me because I was using the technology on a daily basis,a nd also because I hadn’t pushed myself into doing an exam since I took one of the MCSE 2012 exams 3 years previously. So I have 3 months – I’ll at least get the MCSA portion done, right?

Not quite – I managed to clear the first 2 exams, but then Microsoft threw me a lifeline by extending the deadline to January 2021. Suddenly it was achievable again but I didn’t want to rest on my laurels and become complacent, so I pushed on. MCSA was achieved in July, and the MCSA duly completed by August. So goal achieved!

2 things happened in between MCSA and MCSE.

Firstly, I signed up to Cloudskills.io after seeing a Google Ad offering their Azure Admin Associate Course content for $7. I then signed up for the full platform after subscribing to their Podcast and realising that I needed to know the Fundamentals of Azure before diving deeper.

Secondly, I came across the 100 Days of Cloud website and Github hosted by people like Andrew Brown and Gwyneth Pena Siguenza. Wasn’t really ready for that jump yet, but did my usual bookmark and email to myself for future reference…..

2020 quickly became 2021, and by mid-2021 a number of things had happened:

  • I’d signed up for my free Azure Account and was experimenting with the services on offer.
  • Based on this I’d passed the Az-900 (Azure Fundamentals), AZ-104 (Azure Admin Associate), AZ-140 (Azure Virtual Desktop) and SC-300 (Identity and Access).
  • I’d gone deeper into CloudSkills.io, joined their Community, and started attending User Groups remotely.
  • I’d also changed job and started working for Ekco, a growing MSP based in Dublin.

The Driver behind 100 Days

So over the course of Summer 2021 I was attending user groups and getting involved in Cloudskills.io, and got the opportunity to meet Mike Pfeiffer on a call. I’ve always been a Mike Pfeiffer fan-boy, right back to the old days when he was blogging about Active Directory and Exchange right up to his Pluralsight content that I had used during my MCSE studies. During our conversation, Mike asked me 2 questions:

  • Are you producing any content?
  • Why not (response to answer provided)?

This introduced me to the concept of SODOTO, or:

  • See One – observe someone else teaching you about something.
  • Do One – can you do it yourself based on the teachings above.
  • Teach One – can you get a deep understanding of what you’ve learned and teach that back to an audience in either video or blog format so that they understand it.

This led me to start a blog and the original series on Monitoring Docker Containers with InfluxDB and Grafana. And that got me into the blogging bug for a few months – release a blog every week was the goal.

When that series finished, I wrote a few other smaller blogs, but eventually needed another goal – a longer term one that I could commit to. I’d always wanted to go deeper into Azure and learn more about all of the services that were offered. I played about in my own tenant and through Bootcamps had dived a bit deeper. But it was a big monster, how was I going to do it?

And during another one of my late night doom-scrolling sessions, I came across the 100 Days bookmark that I’d saved the previous year. And the lightbulb in my head turned on …

100 Days

And so I started. I knew I could transfer some of the skills I’d already learned across, so I started small and went for the basic IaaS stuff that I knew well.

At the start, the idea was that I would do 100 Days straight. It became very clear to me around Day 12 that is wasn’t going to be possible because I was doing this as a SODOTO model, and if I had tried to do it I was going to crash and burn quickly and regularly.

Thats the key, and a great piece of advice – learn at a pace that you are comfortable with and can sustain. Don’t rush it, it just won’t go in.

At the start, I was doing this for me – as a challenge that I wanted to finish, and doing it in the open held me accountable. It also meant that family, friends, work colleagues and social connections could enquire and joke about when the next blog was coming out. It wasn’t about likes or followers. It was about me learning and tying together components of the Azure and other cloud ecosystems and how they connect.

And at that point it evolves into being not just about me, but about the followers and giving something back to them and to the wider community.

Lets take Azure Virtual Desktop as an example – I have experience of working with Citrix, so the concepts are pretty transferrable. But think about all of the underlying concepts you need to know:

  • Virtual Machines
  • Storage
  • Authentication
  • MFA
  • Identity
  • Desktop and App Management

You very quicky realize that although all of those are standalone service offerings in Azure, they are not just intertwined in Azure Virtual Desktop but in hundreds of other Azure services. And knowing them as a baseline will give you a better understanding when you go to learn the rest of the services!

Time to give Thanks!

There were times when I never thought I’d reach this goal and doubted myself, but I had some unbelievable support and encouragement along the way.

Firstly and most importantly my wife and family, who put up with me disappearing back to the laptop most evenings and tolerated the late nights where I screamed curses at deployments that had gone wrong. Also for giving me “the eye” every time I flopped down on the couch in the evenings and encouraged me to embrace the challenge and keep going.

To my friends and work colleagues who kept me going with their encouragement, banter and interest in the blog. I’m not going to name you all becasue I’m sure to forget someone, but you’ve all been brilliant.

To my mentors. The opportunity to get to know people like Mike Pfeiffer, Robin Smorenburg, Derek Smith and Kevin Evans, and to be able to pick their brains and get tips and encouragement from them has been mind-blowing. There are many more who I haven’t mentioned, particularly the gang over at Cloudskills.io. You guys are all awesome and you know it – any success I have is down to you.

To the community who have chipped in with words of encouragement and support along the way. To people like Michal Marchlewski, Karl Cooke, Gregor Suttie, Daniel McLoughlin,John Lunn and many more – thanks for reaching out and for the support guys, it really meant a lot.

Finally to everyone who has read the blog and gotten in contact with messages of support and telling me that the blog has helped them and been useful to them. Thank you from the bottom of my heart, even helping one person would have made it all worthwhile, but the response has been genuinely amazing.

Conclusion and What happens next!

What happens next is I’m going to take a break from blogging for a few weeks! I’m going to Scottish Summit on June 10th, so if you see me there please do come over and stay hello! Or please feel free to reach out to me on my social channels. Once I get back from Scotland, I’ll come up with the next challenge, whatever that may be!

I hope you’ve enjoyed the 100 Days as much as I have and have found it useful. As the title says, this is not the end, its just the end of the beginning of the journey.

Until next time!

100 Days of Cloud – Day 99: Microsoft Build 2022

Its Day 99 of my 100 Days of Cloud journey and in todays post we’ll take a quick look at some of the announcements coming out of Microsoft Build.

Microsoft Build is an annual event that is primarily focused on the development side of the Microsoft ecosystem, however like all Microsoft events there are normally some really cool announcements around new technologies and updates to existing technologies.

I’m going to focus particularly on updates to the technologies that I’ve blogged about over the last 99 days! In effect, I’m providing some updates to the blog posts so that if you’ve followed me on the journey this far, you’ll get to here and have the latest news and features!

Azure Container Apps

Azure Container Apps is now Generally Available. This enables you to run microservices and containerized apps on a serverless platform.

Common uses of Azure Container Apps include:

  • Deploying API endpoints
  • Hosting background processing applications
  • Handling event-driven processing
  • Running microservices

Applications built on Azure Container Apps can dynamically scale based on the following characteristics:

  • HTTP traffic
  • Event-driven processing
  • CPU or memory load

We looked at Azure Container instances on Day 82. The key differences between the 2 are:

  • If you need to spin up multiple container (e.g. front end / backend / database), Azure Container Apps is a better choice as it comes with Dapr (Distributed Application Runtime) and it will auto retry the requests and add some telemetry data.
  • If you just need long running jobs or you don’t need multiple containers to communicate with each other, you can go with Azure Container Instances.

You can check out the blog post announcement here, and the offical Microsoft Docs page here for more information.

Azure Cosmos DB

We looked at Azure Cosmos DB back on Day 64 and learned that it is a fully managed NoSQL database provides high availability, globally-distributed access to data with very low latency. There are a number of APIs to choose from that best meets the needs of your database requirements.

Some of the new featres announced for CosmosDB are:

  • Increased serverless capacity to 1 TB.
  • Shared throughput across database partitions.
  • Support for hierarchical partition keys.
  • An improved 30-day free trial experience, now generally available, and support for MongoDB data in the Azure Cosmos DB Linux desktop emulator.
  • A new, free, continuous backup and point-in-time restore capability enables seven-day data recovery and restoration from accidental deletes
  • Role-based access control support for Azure Cosmos DB API for MongoDB offers enhanced security.

You can find out more about the Cosmos DB enhancements here.

Azure Stack HCI

Its timely that we only looked at Azure Stack HCI on Day 95 and commented that your Azure Stack HCI Cluster can contain between 2 and 16 physical servers.

The new single node Azure Stack HCI, now generally available, fulfills the growing needs of customers in remote locations while maintaining the innovation of native integration with Azure Arc. It offers customers the flexibility to deploy the stack in smaller spaces and with less processing needs, optimizing resources while still delivering quality and consistency.

Additional benefits include:

  • Smaller Azure Stack HCI solutions for environments with physical space constraints or that do not require built-in resiliency, like retail stores and branch offices.
  • A smaller footprint to reduce hardware and operational costs.
  • The same scale applies, so you can start at 1 and scale up to 16 nodes if required.

You can find out more about the AZure Stack HCI announcement here.

Azure Migrate

On Day 18 we looked at Azure Migrate, which is an Azure technology which automates planning and migration of your on-premise servers from Hyper-V, VMware or Physical Server environments.

Enhancements to the service now streamline and simlify cloud migration and modernization:

  • Agentless discovery and grouping of dependent Hyper-V virtual machines (VMs) and physical servers to ensure all required components are identified and included during a move to Azure. This feature is generally available.
  • Azure SQL assessment improvements for better customer experience. Assessments now include recommendations for SQL Server on Azure VMs and support for Hyper-V VMs and physical stacks, along with already existing assessments for Azure SQL Managed Instance and Azure SQL Database. This feature is in preview.
  • Pause and resume of migration function has been included to provide control over the migration window. This mechanism can be used to schedule migrations during off-peak periods. This feature is in preview.
  • Discovery, assessment and modernization of ASP.NET web apps to native Azure Application Service. Customers can discover and modernize an ASP.NET web app to Azure Kubernetes Service (AKS) Application Service Container and discover Java apps running on Apache Tomcat.

Conclusion

So thats a quick rundown of the main updates from Microsoft Build. You can find information on all of the updates that were released here in the Microsoft Build Book of News, and its also not too late to register and watch some of the recorded and on-demand sessions from Microsoft Build by signing up here.

As with all Microsoft Conferences, there’s a CloudSkills Challenge and you have until June 21st to sign up and complete the modules from one of the 8 challenges are available. As always, you can earn a free certification exam pass if you complete the challenge! You can sign up here and the list of rules and exams eligible is here!

Hope you enjoyed this post, until next time!

100 Days of Cloud – Day 98: Azure Bicep

Its Day 98 of my 100 Days of Cloud journey and in todays post we’ll take a quick look at Azure Bicep.

Azure Bicep is a domain-specific language (DSL) that uses a declarative syntax to deploy Azure resources. In a Bicep file, you define the infrastructure you want to deploy to Azure, and then use that file throughout the development lifecycle to repeatedly deploy your infrastructure. Your resources are deployed in a consistent manner.

Bicep v JSON

We’ve seen Azure Resource Manager Templates and how they can be used to define your infrastructure based on JSON Templates. Bicep is part of the Azure Resource Managet Template family – the difference is that Bicep is a launguage that uses .bicep files instead of .json files.

If we take a look at the differences between the 2 – below is a JSON template where we want to deploy a Storage Account:

And here we have a Bicep file deploying the same storage account:

You can see the difference in file size and the simpler syntax in use with Bicep over JSON. However, when you build Bicep templates and perform a deployment operation, it will transpile into an ARM template, and then Resource Manager will go and deploy your resources to Azure. So effectively the runtime is unchanged; Bicep only provides an abstract layer and reduces the pain of working with JSON.

You can also use the Bicep Playground to view Bicep and equivalent JSON side by side. This will allow you can compare the implementations of the same infrastructure. You can also decompile an existing ARM template to Bicep, see Decompiling ARM template JSON to Bicep.

Benefits of Azure Bicep

  • Authoring experience: When you use the Bicep Extension for VS Code to create your Bicep files, you get a first-class authoring experience. The editor provides rich type-safety, intellisense, and syntax validation.
  • Repeatable results: Repeatedly deploy your infrastructure throughout the development lifecycle and have confidence your resources are deployed in a consistent manner. Bicep files are idempotent, which means you can deploy the same file many times and get the same resource types in the same state. You can develop one file that represents the desired state, rather than developing lots of separate files to represent updates.
  • Orchestration: You don’t have to worry about the complexities of ordering operations. Resource Manager orchestrates the deployment of interdependent resources so they’re created in the correct order. When possible, Resource Manager deploys resources in parallel so your deployments finish faster than serial deployments. You deploy the file through one command, rather than through multiple imperative commands.
  • Modularity: You can break your Bicep code into manageable parts by using modules. The module deploys a set of related resources. Modules enable you to reuse code and simplify development. Add the module to a Bicep file anytime you need to deploy those resources.
  • Integration with Azure services: Bicep is integrated with Azure services such as Azure Policy, template specs, and Blueprints.
  • Preview changes: You can use the what-if operation to get a preview of changes before deploying the Bicep file. With what-if, you see which resources will be created, updated, or deleted, and any resource properties that will be changed. The what-if operation checks the current state of your environment and eliminates the need to manage state.
  • No state or state files to manage: All state is stored in Azure. Users can collaborate and have confidence their updates are handled as expected.
  • No cost and open source: Bicep is completely free. You don’t have to pay for premium capabilities. It’s also supported by Microsoft support.

Limitations

  • Limited to Azure — Bicep isn’t going to fly if someone is using multi-cloud and wants to use the same language across multiple cloud providers. This where Terraform has the advantage in this space.
  • Learning Curve — Bicep is basically a new language that expects some learning and understanding in spite of being very simple. Most of the users can prefer to use JSON instead, and if you are familiar with traditional JSON ARM Templates you may decide to stick with that.

Conclusion

Azure Bicep is an exciting technology that promises to make deployments easier if you are using only Azure. There are some great resources out there to start your learning journey:

Hope you all enjoyed this post, until next time!