I’m delighted to be contributing to Azure Spring Clean for the first time. The annual event is organised by Azure MVP’s Joe Carlyle and Thomas Thornton and encourages you to look at your Azure subscriptions and see how you could manage it better from a Cost Management, Governance, Monitoring and Security perspective. You can check out all of the posts in this years Azure Spring Clean here. For this year, my contribution is the A-Z of Azure Policy!
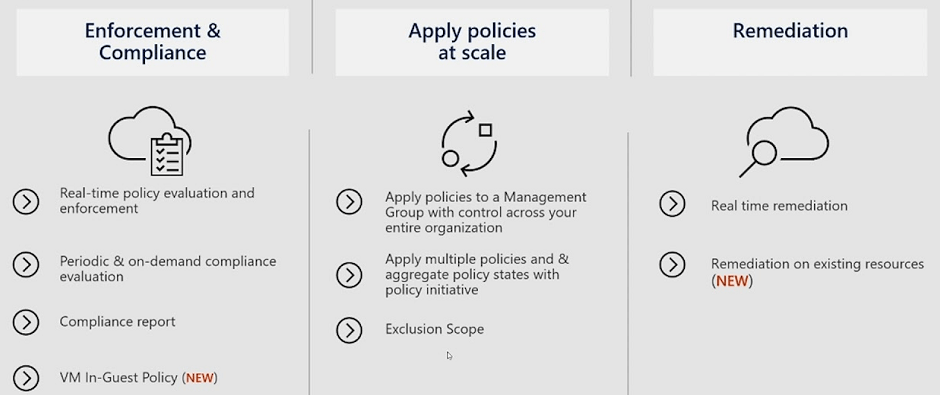
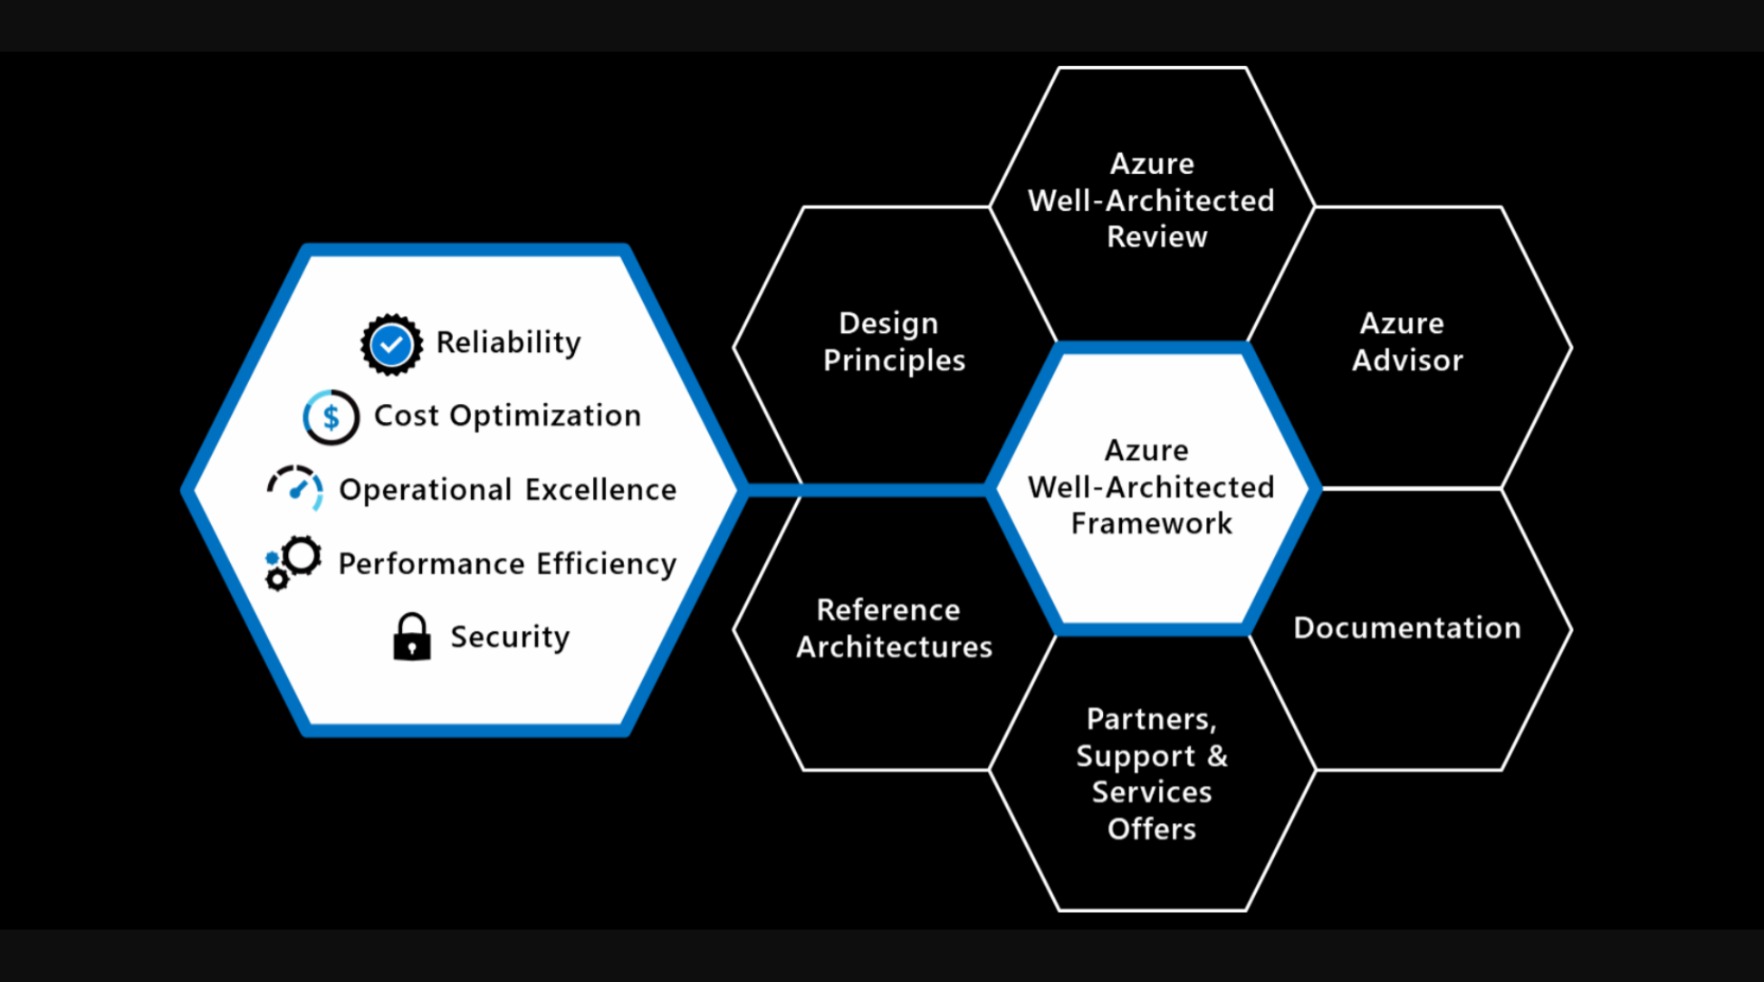
Azure Policy is one of the key pillars of a Well Architected Framework for Cloud Adoption. It enables you to enforce standards across either single or multiple subscriptions at different scope levels and allows you to bring both existing and new resources into compliance using bulk and automated remediation.
These policies enforce different rules and effects over your resources so that those resources stay compliant with your corporate standards and service level agreements. Azure Policy meets this need by evaluating your resources for noncompliance with assigned policies.
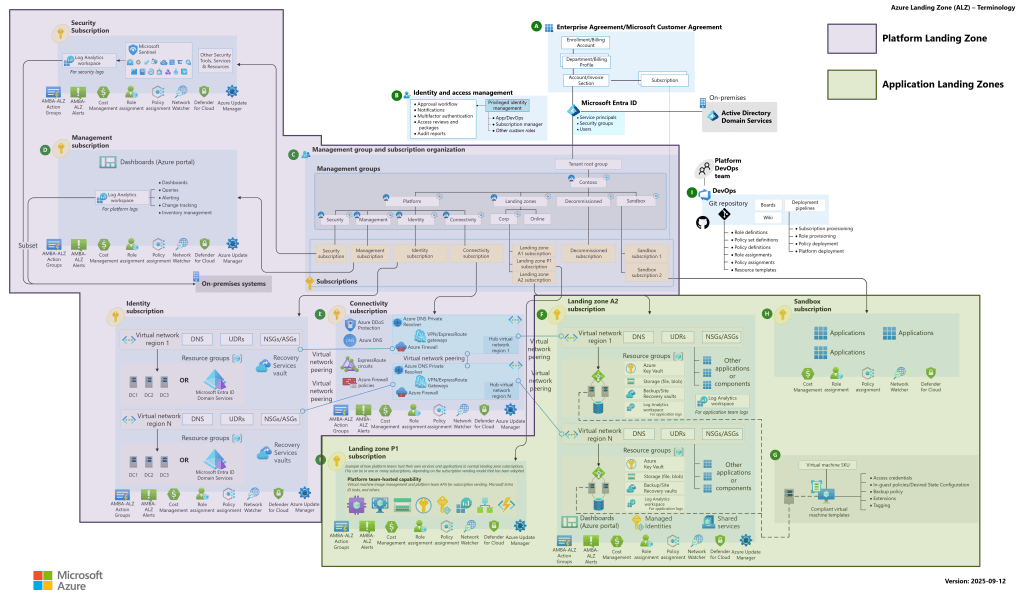
Image Credit: Microsoft
Policies define what you can and cannot do with your environment. They can be used individually or in conjunction with Locks to ensure granular control. Let’s look at some simple examples where Policies can be applied:
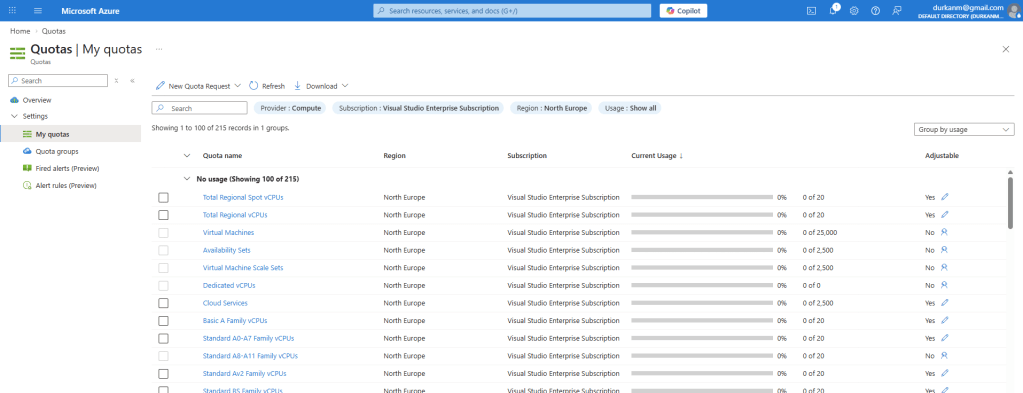
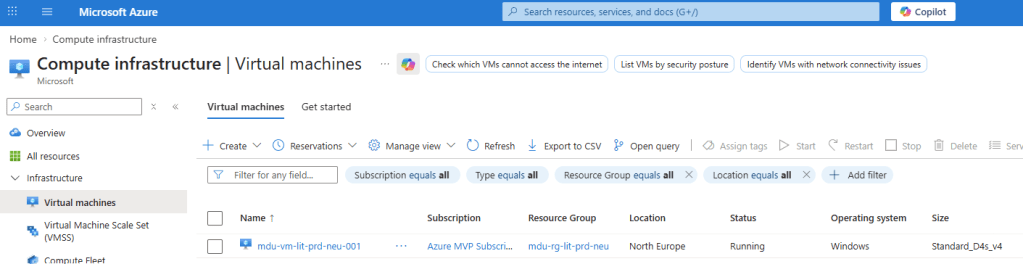
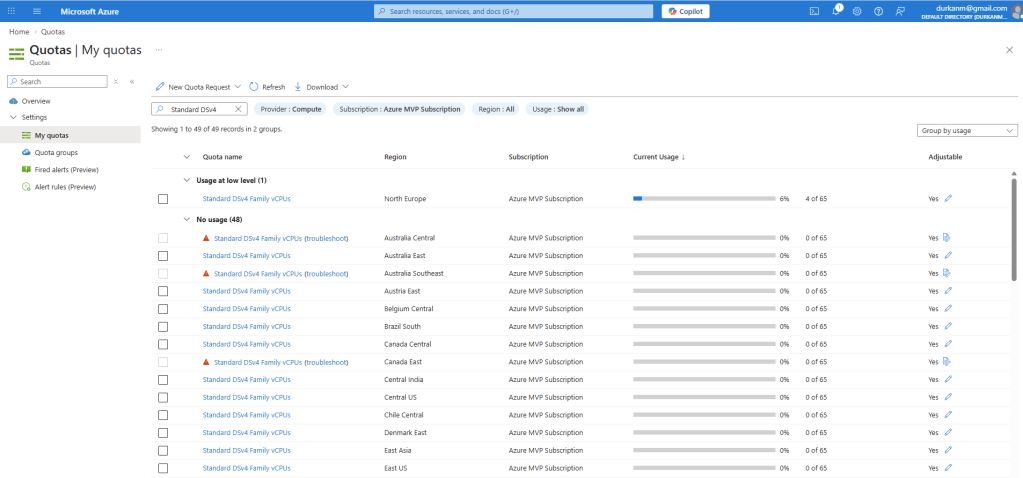
- If you want to ensure resources are deployed only in a specific region.
- If you want to use only specific Virtual Machine or Storage SKUs.
- If you want to block any SQL installations.
- If you want to enforce Tags consistently across your resources.
So that’s it – you can just apply a policy and it will do what you need it to do? The answer is both Yes and No:
- Yes, in the sense that you can apply a policy to define a particular set of business rules to audit and remediate the compliance of existing resources against those rules.
- No in the sense that there is so much more to it than that.
There is much to understand about how Azure Policy can be used as part of your Cloud Adoption Framework toolbox. And because there is so much to learn, I’ve decided to do an “A-Z” of Azure Policy and show the different options and scenarios that are available.
Before we start on the A-Z, a quick disclaimer …. There’s going to be an entry for every letter of the alphabet, but you may have to forgive me if I use artistic license to squeeze a few in (Letters like Q, X and Z spring to mind!).
So, grab a coffee (or whatever drink takes your fancy) and let’s start on the Azure Policy alphabet!
A
Append is the first of our Policy Effects and is used to add extra fields to resources during update or creation, however this is only available with Azure Resource Manager (ARM). The example below sets IP rules on a Storage Account:
"then": {
    "effect": "append",
    "details": [{
        "field": "Microsoft.Storage/storageAccounts/networkAcls.ipRules",
        "value": [{
            "action": "Allow",
            "value": "134.5.0.0/21"
        }]
    }]
}
Assignment is the definition of what resources or scope your Policy is being applied to.
Audit is the Policy Effect that evaluates the resources and report a non-compliance in the logs. It does not take any actions; this is report-only.
"then": {
    "effect": "audit"
}
AuditIfNotExists is the Policy Effect that evaluates whether a property is missing. So for example, we can say if the type of Resource is a Virtual Machine and we want to know if that Virtual Machine has a particular tag or extension present. If yes, the resource will be returned as Compliant, if not, it will return a non-compliance. The example below evaluates Virtual Machines to determine whether the Antimalware extension exists then audits when missing:
{
    "if": {
        "field": "type",
        "equals": "Microsoft.Compute/virtualMachines"
    },
    "then": {
        "effect": "auditIfNotExists",
        "details": {
            "type": "Microsoft.Compute/virtualMachines/extensions",
            "existenceCondition": {
                "allOf": [{
                        "field": "Microsoft.Compute/virtualMachines/extensions/publisher",
                        "equals": "Microsoft.Azure.Security"
                    },
                    {
                        "field": "Microsoft.Compute/virtualMachines/extensions/type",
                        "equals": "IaaSAntimalware"
                    }
                ]
            }
        }
    }
}
B
Blueprints – Instead of having to configure features like Azure Policy for each new subscription, with Azure Blueprints you can define a repeatable set of governance tools and standard Azure resources that your organization requires. This allows you to scale the configuration and organizational compliance across new and existing subscriptions with a set of built-in components that speed the development and deployment phases.
Built-In –Azure provides hundreds of built-in Policy and Initiative definitions for multiple resources to get you started. You can find then both on the Microsoft Learn site or on GitHub.
C
Compliance State shows the state of the resource when compared to the policy that has been applied. Unsurprisingly this has 2 states, Compliant and Non-Compliant
Costs – if you are running Azure Policy on Azure resources, then its free. However, you can use Azure Policy to cover Azure Arc resources and there are specific scenarios where you will be charged:
- Azure Policy guest configuration (includes Azure Automation change tracking, inventory, state configuration): $6/Server/Month
- Kubernetes Configuration: First 6 vCPUs are free, $2/vCPU/month
Custom Policy definitions are ones that you create yourself when a Built-In Policy doesn’t meet the requirements of what you are trying to achieve.
D
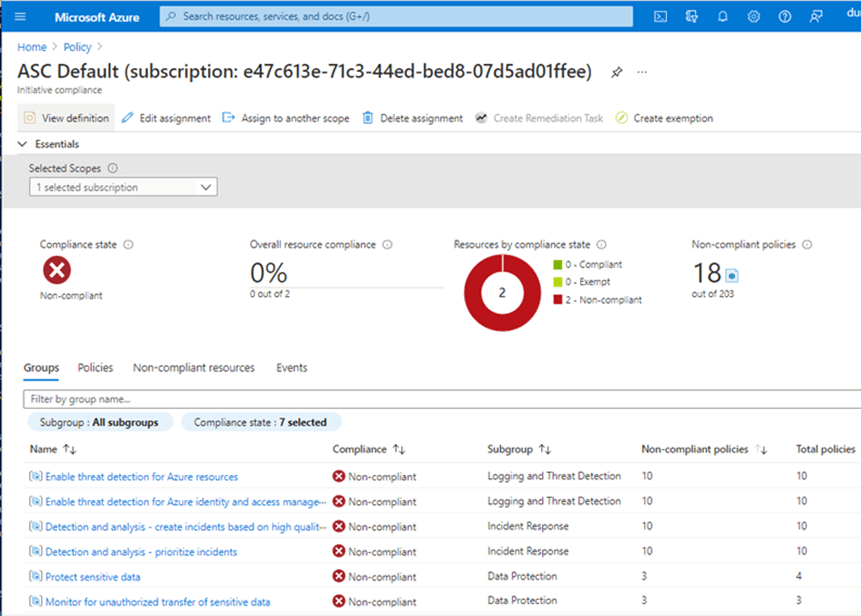
Dashboards in the Azure Portal give you a graphical overview of the compliance state of your Azure environments:
Definition Location is the scope to where the Policy or Initiative is assigned. This can be Management Group, Subscription, Resource Group or Resource.
Deny is the Policy Effect used to prevent a resource request or action that doesn’t match the defined standards.
"then": {
    "effect": "deny"
}
DeployIfNotExists is the Policy Effect used to apply the action defined in the Policy Template when a resource is found to be non-compliant. This is used as part of a remediation of non-compliant resources. Important point to note – policy assignments that use a DeployIfNotExists effect require a managed identity to perform remediation.
Docker Security Baseline is a set of default configuration settings which ensure that Docker Containers in Azure are running based on a recommended set of regulatory and security baselines.
E
Enforcement Mode is a property that allows you to enable/disable enforcement of policy effects while still evaluating compliance.
Evaluation is the process of scanning your environment to determine the applicability and compliance of assigned policies.
F
Fields are used in policy definitions to specify a property or alias. In the example below, the field property contains “location” and “type” at different stages of the evaluation:
"if": {
        "allOf": [{
                "field": "location",
                "notIn": "[parameters('listOfAllowedLocations')]"
            },
            {
                "field": "location",
                "notEquals": "global"
            },
            {
                "field": "type",
                "notEquals": "Microsoft.AzureActiveDirectory/b2cDirectories"
            }
        ]
    },
    "then": {
        "effect": "Deny"
    }
}
G
GitHub – you can use GitHub to build an “Azure Policy as Code” workflow to manage your policies as code, control the lifecycle of updating definitions, and automate the process of validating compliance results.
Governance Visualizer – I have to include this because I think its an awesome tool – Julian Hayward’s AzGovViz tool is a PowerShell script which captures Azure governance capabilities such as Azure Policy, RBAC and Blueprints and a lot more. If you’re not using it, now is the time to start.
Group – within an Initiative, you can group policy definitions for categorization. The Regulatory Compliance feature uses this to group definitions into controls and compliance domains.
H
Hierarchy – this sounds simple but is important. The location that you assign the policy should contain all resources that you want to target under that resource hierarchy. If the definition location is a:
- Subscription – Only resources within that subscription can be assigned the policy definition.
- Management group – Only resources within child management groups and child subscriptions can be assigned the policy definition. If you plan to apply the policy definition to several subscriptions, the location must be a management group that contains each subscription.
I
Initiative (or Policy Set) is a set of Policies that have been grouped together with the aim of either targeting a specific set of resources, or to evaluate and remediate a specific set of definitions or parameters. For example, you could group several tagging policies into a single initiative that is targeted at a specific scope instead of applying multiple policies individually.
J
JSON – Policy definitions are written in JSON format. The policy definition contains elements for:
- mode
- parameters
- display name
- description
- policy rule
- logical evaluation
- effect
An example of the “Allowed Locations” built-in policy is shown below
{
  "properties": {
    "displayName": "Allowed locations",
    "policyType": "BuiltIn",
    "description": "This policy enables you to restrict the locations...",
    "mode": "Indexed",
    "parameters": {
      "listOfAllowedLocations": {
        "type": "Array",
        "metadata": {
          "description": "Locations that can be specified....",
          "strongType": "location",
          "displayName": "Allowed locations"
        }
      }
    },
    "policyRule": {
      "if": {
        "allOf": [
          {
            "field": "location",
            "notIn": "[parameters('listOfAllowedLocations')]"
          },
          {
            "field": "location",
            "notEquals": "global"
          },
          {
            "field": "type",
            "notEquals": "Microsoft.AzureActiveDirectory/b2cDirectories"
          }
        ]
      },
      "then": {
        "effect": "Deny"
      }
    }
  },
  "id": "/providers/Microsoft.Authorization/policyDefinitions/e56962a6-4747-49cd-b67b-bf8b01975c4c",
  "type": "Microsoft.Authorization/policyDefinitions",
  "name": "e56962a6-4747-49cd-b67b-bf8b01975c4c"
}
K
Key Vault – you can integrate Key Vault with Azure Policy to audit the key vault and its objects before enforcing a deny operation to prevent outages. Current built-ins for Azure Key Vault are categorized in four major groups: key vault, certificates, keys, and secrets management.
Kubernetes – Azure Policy uses Gatekeeper to apply enforcements and safeguards on your clusters (both Azure Kubernetes Service (AKS) and Azure Arc enabled Kubernetes). This then reports back into your centralized Azure Policy Dashboard on the following:
- Checks with Azure Policy service for policy assignments to the cluster.
- Deploys policy definitions into the cluster as constraint template and constraint custom resources.
- Reports auditing and compliance details back to Azure Policy service.
After installing the Azure Policy Add-on for AKS, you can apply individual policy definitions or initiatives to your cluster.
L
Lighthouse – for Service Providers, you can use Azure Lighthouse to deploy and manage policies across multiple customer tenants.
Linux Security Baseline is a set of default configuration settings which ensure that Linux VMs in Azure are running based on a recommended set of regulatory and security baselines.
Logical Operators are optional condition statements that can be used to see if resources have certain configurations applied. There are 3 logical operators – not, allOf and anyOf.
Not means that the opposite of the condition should be true for the policy to be applied. AllOf requires all the conditions defined to be true at the same time. AnyOf requires any one of the conditions to be true for the policy to be applied.
"policyRule": {
  "if": {
    "allOf": [{
        "field": "type",
        "equals": "Microsoft.DocumentDB/databaseAccounts"
      },
      {
        "field": "Microsoft.DocumentDB/databaseAccounts/enableAutomaticFailover",
        "equals": "false"
      },
      {
        "field": "Microsoft.DocumentDB/databaseAccounts/enableMultipleWriteLocations",
        "equals": "false"
      }
    ]
  },
  "then": {
M
Mode tells you the type of resources for which the policy will be applied. Allowed values are “All” (where all Resource Groups and Resources are evaluated) and “indexed” (where policy is evaluated only for resources which support tags and location)
Modify is a Policy Effect that is used to add, update, or remove properties or tags on a subscription or resource during creation or update. Important point to note – policy assignments that use a Modify effect require a managed identity to perform remediation. If you don’t have a managed identity, use Append instead. The example below is replacing all tags with a value of environment with a value of test:
"then": {
    "effect": "modify",
    "details": {
        "roleDefinitionIds": [
            "/providers/Microsoft.Authorization/roleDefinitions/b24988ac-6180-42a0-ab88-20f7382dd24c"
        ],
        "operations": [
            {
                "operation": "addOrReplace",
                "field": "tags['environment']",
                "value": "Test"
            }
        ]
    }
}
N
Non-Compliant is the state which indicates that a resource did not conform to the policy rule in the policy definition.
O
OK, so this is my first failure. Surprising, but lets keep going!
P
Parameters are used for providing inputs to the policy. They can be reused at multiple locations within the policy.
{
    "properties": {
        "displayName": "Require tag and its value",
        "policyType": "BuiltIn",
        "mode": "Indexed",
        "description": "Enforces a required tag and its value. Does not apply to resource groups.",
        "parameters": {
            "tagName": {
                "type": "String",
                "metadata": {
                    "description": "Name of the tag, such as costCenter"
                }
            },
            "tagValue": {
                "type": "String",
                "metadata": {
                    "description": "Value of the tag, such as headquarter"
                }
            }
        },
        "policyRule": {
            "if": {
                "not": {
                    "field": "[concat('tags[', parameters('tagName'), ']')]",
                    "equals": "[parameters('tagValue')]"
                }
            },
            "then": {
                "effect": "deny"
            }
        }
    }
}
Policy Rule is the part of a policy definition that describes the compliance requirements.
Policy State describes the compliance state of a policy assignment.
Q
Query Compliance – While the Dashboards in the Azure Portal (see above) provide you with a visual method of checking your overall compliance, there are a number of command line and automation tools you can use to access the compliance information gnerated by your policy and initiative assignments:
az policy state trigger-scan --resource-group "MyRG"
- Azure PowerShell using the following command:
Start-AzPolicyComplianceScan -ResourceGroupName 'MyRG'
R
Regulatory Compliance describes a specific type of initiative that allows grouping of policies into controls and categorization of policies into compliance domains based on responsibility (Customer, Microsoft, Shared). These are available as built-in initiatives (there are built-in initiatives from CIS, ISO, PCI DSS, NIST, and multiple Government standards), and you have the ability to create your own based on specific requirements.
Remediation is a way to handle non-compliant resources. You can create remediation tasks for resources to bring these to a desired state and into compliance. You use DeployIfNotExists or Modify effects to correct violating policies.
S
Security Baseline for Azure Security Benchmark – this is a set of policies that comes from guidance from the Microsoft cloud security benchmark version 1.0. The full Azure Policy security baseline mapping file can be found here.
Scope is the location where the policy definition is being assigned to. This can be Management Group, Subscription, Resource Group or Resource.
T
Tag Governance is a crucial part of organizing your Azure resources into a taxonomy. Tags can be the basis for applying your business policies with Azure Policy or tracking costs with Cost Management. The template shown below shows how to enforce Tag values across your resources:
{
   "properties": {
      "displayName": "Require tag and its value",
      "policyType": "BuiltIn",
      "mode": "Indexed",
      "description": "Enforces a required tag and its value. Does not apply to resource groups.",
      "parameters": {
         "tagName": {
            "type": "String",
            "metadata": {
               "description": "Name of the tag, such as costCenter"
            }
         },
         "tagValue": {
            "type": "String",
            "metadata": {
               "description": "Value of the tag, such as headquarter"
            }
         }
      },
      "policyRule": {
         "if": {
            "not": {
               "field": "[concat('tags[', parameters('tagName'), ']')]",
               "equals": "[parameters('tagValue')]"
            }
         },
         "then": {
            "effect": "deny"
         }
      }
   },
   "id": "/providers/Microsoft.Authorization/policyDefinitions/1e30110a-5ceb-460c-a204-c1c3969c6d62",
   "type": "Microsoft.Authorization/policyDefinitions",
   "name": "1e30110a-5ceb-460c-a204-c1c3969c6d62"
}
U
Understanding how Effects work is key to understanding Azure Policy. By now, we’ve listed all the effects out above. The key thing to remember is that each policy definition has a single effect, which determines what happens when an evaluation finds a match. There is an order in how the effects are evaluated:
- Disabled is checked first to determine whether the policy rule should be evaluated.
- Append and Modify are then evaluated. Since either could alter the request, a change made may prevent an audit or deny effect from triggering. These effects are only available with a Resource Manager mode.
- Deny is then evaluated. By evaluating deny before audit, double logging of an undesired resource is prevented.
- Audit is evaluated.
- Manual is evaluated.
- AuditIfNotExists is evaluated.
- denyAction is evaluated last.
Once these effects return a result, the following 2 effects are run to determine if additional logging or actions are required:
- AuditIfNotExists
- DeployIfNotExists
V
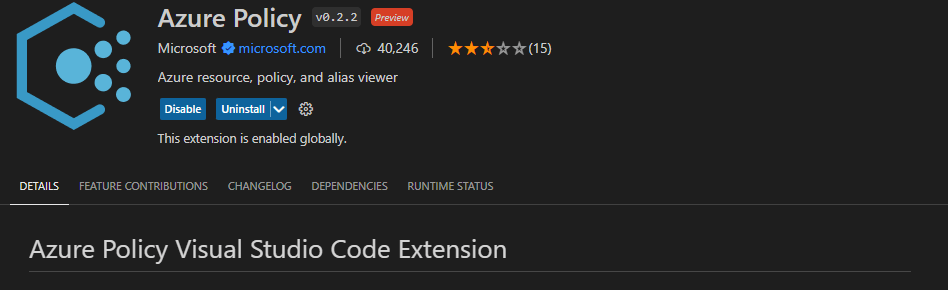
Visual Studio Code contains an Azure Policy code extension which allows you to create and modify policy definitions, run resource compliance and evaluate your policies against a resource.
W
Web Application Firewall – Azure Web Application Firewall (WAF) combined with Azure Policy can help enforce organizational standards and assess compliance at-scale for WAF resources.
Windows Security Baseline is a set of default configuration settings which ensure that Windows VMs in Azure are running based on a recommended set of regulatory and security baselines.
X
X is for ….. ah come on, you’re having a laugh ….. fine, here you go (artistic license taken!):
Xclusion – this of course should read Exclusion ….. when assigned, the scope includes all child resource containers and child resources. If a child resource container or child resource shouldn’t have the definition applied, each can be excluded from evaluation by setting notScopes.
Xemption – this of course should read Exemption …. this is a feature used to exempt a resource hierarchy or individual resource from evaluation. These resources are therefore not evaluated and can have a temporary waiver (expiration) period where they are exempt from evaluation and remediation.
Y
YAML – You can use Azure DevOps to check Azure Policy Compliance using using YAML Pipelines. However, you need to use the AzurePolicyCheckGate@0 task. The syntax is shown below:
# Check Azure Policy compliance v0
# Security and compliance assessment for Azure Policy.
- task: AzurePolicyCheckGate@0
  inputs:
    azureSubscription: # string. Alias: ConnectedServiceName. Required. Azure subscription.
    #ResourceGroupName: # string. Resource group.
    #Resources: # string. Resource name.
Z
Zero Non-Compliant – which is exactly the position you want to get to!
Z is also for Zzzzzzzz, which may be the state you’re in if you’ve managed to get this far!
Summary
So thats a lot to take in, but it gives you an insight into the different options that are available in Azure Policy to ensure that your Azure environments can meet both governance and cost management objectives for your organization.
In this post, I’ve stayed with the features of Azure Policy and apart from a few examples didn’t touch on the many different methods you can use to assign and manage policies which are:
- Azure Portal
- Azure CLI
- Azure PowerShell
- .NET
- JavaScript
- Python
- REST
- ARM Template
- Bicep
- Terraform
As always, check out the official Microsoft Learn documentation for a more in-depth deep dive on Azure Policy.
Hope you enjoyed this post! Be sure to check out the rest of the articles in this years Azure Spring Clean.