Three Azure Networking Assumptions That Will Burn You in Production

Azure networking documentation covers a lot of ground. What it is less good at is surfacing the assumptions embedded in common configurations — the things that appear safe on paper but create real risk in production environments.

This post is about three of those assumptions:

  • NSG service tags and when to use them instead of IP ranges
  • The impact of default routes on Azure service connectivity
  • The behaviour of Private Endpoints in relation to NSG enforcement.

These are not edge cases — they appear in standard Azure architectures and are the source of a disproportionate number of production networking incidents.

NSG Service Tags vs IP Ranges and CIDRs — Getting the Choice Right

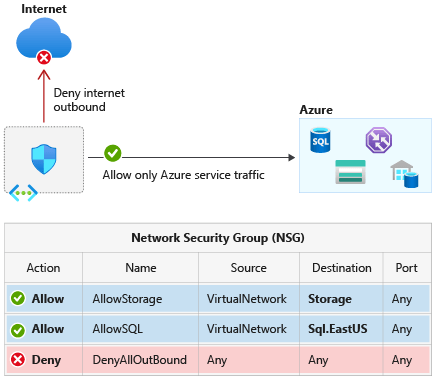
Network Security Groups are the primary mechanism for controlling traffic in Azure virtual networks. When writing NSG rules, you have two options for specifying the source or destination of traffic: you can use explicit IP addresses and CIDR ranges, or you can use service tags.

Image Credit – Microsoft Learn

Both approaches have a place. The mistake is using one when you should be using the other.

What Service Tags Actually Are

Image Credit – Microsoft Learn

A service tag is a named group of IP address prefixes associated with a specific Azure service. When you reference a service tag in an NSG rule, Azure resolves it to the underlying IP ranges automatically — and manages and updates those ranges on a weekly basis. When you use a service tag, you are delegating IP list management to Microsoft. For Azure-managed services like Storage, Key Vault, and Azure Monitor, that is exactly the right trade-off. You should not be manually maintaining and updating those ranges.

When to Use Service Tags

Service tags belong in NSG rules wherever you are controlling traffic to or from an Azure-managed service whose IP ranges change over time: Azure Monitor, Key Vault, Container Registry, SQL, Service Bus, Event Hub. They are also the right choice for platform-level rules — using the AzureLoadBalancer tag for health probe allowances, for example, is far more reliable than trying to maintain a list of probe IPs.

When IP Ranges and CIDRs Are the Right Choice

Explicit CIDRs belong in NSG rules when you are controlling traffic between resources you own — on-premises ranges, partner network CIDRs, specific application subnets within your own VNet, or third-party services with stable published IP ranges. When your security team needs to audit exactly which addresses a rule permits, a CIDR answers that definitively. A service tag defers the answer to a Microsoft-managed list that changes weekly.

The Service Tag Scope Problem

The most common service tag mistake is using broad global tags when regional variants are available and appropriate.

Consider AzureCloud. Using this tag in an NSG rule opens access to the IP ranges associated with all Azure services globally — and critically, that includes IP addresses used by other Azure customers, not just Microsoft’s own infrastructure. This means AzureCloud is a much broader permission than most engineers assume. Microsoft’s own documentation explicitly warns that in most scenarios, allowing traffic from all Azure IPs via this tag is not recommended. If your workload only needs to communicate with services in West Europe, using AzureCloud.WestEurope instead gives you the same coverage for your actual traffic pattern while dramatically reducing the permitted address space.

TagScopeRecommendation
AzureCloudAll Azure IP ranges globally — very broadAvoid. Use regional variant or specific service tag.
AzureCloud.WestEuropeAzure IP ranges for West Europe onlyUse when regional scoping is sufficient.
StorageAll Azure Storage endpoints globallyPrefer Storage.<region> where possible.
Storage.WestEuropeAzure Storage in West Europe onlyPreferred for regionally scoped workloads.
AzureMonitorAzure Monitor endpointsAppropriate for monitoring agent outbound rules.
AzureLoadBalancerAzure Load Balancer probe IPsAlways use for health probe allow rules.

The practical enforcement approach is to use Azure Policy to flag or deny NSG rules that reference broad global tags where regional equivalents exist. This moves the governance left — catching overly permissive rules before they reach production rather than after.

# Verify current service tag ranges for a region
az network list-service-tags \
--location westeurope \
--output json \
--query "values[?name=='AzureCloud.WestEurope']"

Default Routes, UDRs, and What Force Tunnelling Actually Breaks

Routing all outbound traffic through a central firewall via a 0.0.0.0/0 UDR is a standard hub-and-spoke pattern. Security teams require it, and it works — but it consistently catches engineers out in one area the documentation does not make obvious enough.

The problem is not that a default route intercepts too much traffic at the network layer. The problem is that most force-tunnelling configurations are deployed without firewall rules to permit the Azure service traffic that workloads silently depend on, and the symptoms that follow are rarely traced back to the routing change quickly.

168.63.129.16 — The Platform IP You Need to Understand

Before going further, it is worth being precise about 168.63.129.16. Microsoft documents this as a virtual public IP address — not a link-local address, but a special public IP owned by Microsoft and used across all Azure regions and national clouds. It provides DNS name resolution, Load Balancer health probe responses, DHCP, VM Agent communication, and Guest Agent heartbeat for PaaS roles.

The important thing to know about 168.63.129.16 in the context of UDRs is this: Microsoft Learn explicitly states that this address is a virtual IP of the host node and as such is not subject to user defined routes. Azure’s DHCP system injects a specific classless static route for 168.63.129.16/32 via the subnet gateway, ensuring platform traffic bypasses UDRs at the platform level. A 0.0.0.0/0 default route does not intercept traffic to this address.

What a 0.0.0.0/0 UDR does intercept is everything else: general internet-bound traffic, and outbound traffic to Azure service public endpoints — including Azure Monitor, Azure Key Vault, Microsoft Entra ID, Azure Container Registry, and any other PaaS service your workloads communicate with. These services are reachable via public IPs, and those IPs are subject to UDRs.

⚠️ What actually breaks when you deploy a 0.0.0.0/0 UDR without firewall rules Workloads that depend on Azure Monitor for diagnostics stop sending telemetry. Managed identity token acquisition fails if traffic to the Entra ID and IMDS endpoints is not permitted by the firewall. Applications pulling images from Azure Container Registry, secrets from Key Vault, or messages from Service Bus will lose connectivity. The common thread is that your firewall is now in the path of traffic it has not been told to permit. The workloads fail; the routing change is often not the first place anyone looks.

The Right Approach to Force Tunnelling

Deploying a 0.0.0.0/0 UDR and a corresponding firewall must be treated as a single unit of change, not two separate steps. The firewall rules need to be in place before the UDR is applied, not after symptoms appear.

Before any UDR deployment, inventory the Azure service dependencies of every workload on the affected subnet and verify that the firewall policy explicitly permits outbound traffic to the corresponding service tags. AzureMonitor, AzureActiveDirectory, AzureKeyVault, Storage, AzureContainerRegistry — each service your workloads depend on must have a corresponding firewall application or network rule. Then verify Effective Routes on the affected subnets and NICs to confirm what will happen before it happens.

# Review effective routes before any UDR change
az network nic show-effective-route-table \
--resource-group <rg-name> \
--name <nic-name> \
--output table

A route table change that appears clean from a routing perspective can still break applications if the firewall has gaps. Effective Routes verification and firewall rule review should both be mandatory steps in any network change process that involves UDRs.

Private Endpoints and the NSG Enforcement Gap

Private Endpoints are one of the most effective controls for locking down access to Azure PaaS services. When you deploy a Private Endpoint for a storage account, Key Vault, or SQL database, that service gets a private IP on your VNet subnet and traffic travels within the Azure backbone. The assumption that naturally follows — that an NSG on the Private Endpoint’s subnet controls access to it — is incorrect by default.

How NSG Evaluation Works for Private Endpoints

By default, network policies are disabled for a subnet in a virtual network — which means NSG rules are not evaluated for traffic destined for Private Endpoints on that subnet. This is a platform default, not a misconfiguration. A deny rule you expect to block access from a specific source will be silently ignored.

⚠️ Why this matters An application or workload with network connectivity to the Private Endpoint’s subnet can reach the private IP of the endpoint regardless of the NSG rules you have defined. There is no error, no alert, and no indication in the portal that the NSG is not being evaluated. The exposure is silent.

Enabling NSG Enforcement on Private Endpoint Subnets

Microsoft added the ability to restore NSG evaluation for Private Endpoint traffic through a subnet property called privateEndpointNetworkPolicies. Setting this property to Enabled causes NSG rules to be evaluated for traffic destined for Private Endpoints on that subnet, in the same way they would be for any other resource.

Azure CLI Method:

# Enable NSG enforcement for Private Endpoints on a subnet
az network vnet subnet update \
--resource-group <rg-name> \
--vnet-name <vnet-name> \
--name <subnet-name> \
--disable-private-endpoint-network-policies false

Portal Method:

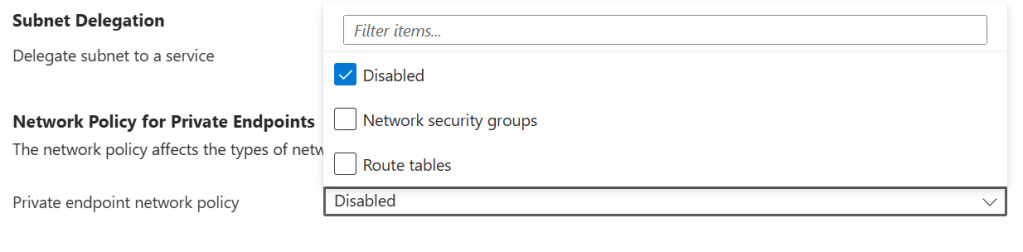
This change should be applied to all subnets where Private Endpoints are deployed, and it should be part of your standard subnet configuration in IaC rather than something applied reactively after deployment. In Terraform, the equivalent property is private_endpoint_network_policies = “Enabled” on the subnet resource.

NSG Rules Are Not Enough on Their Own

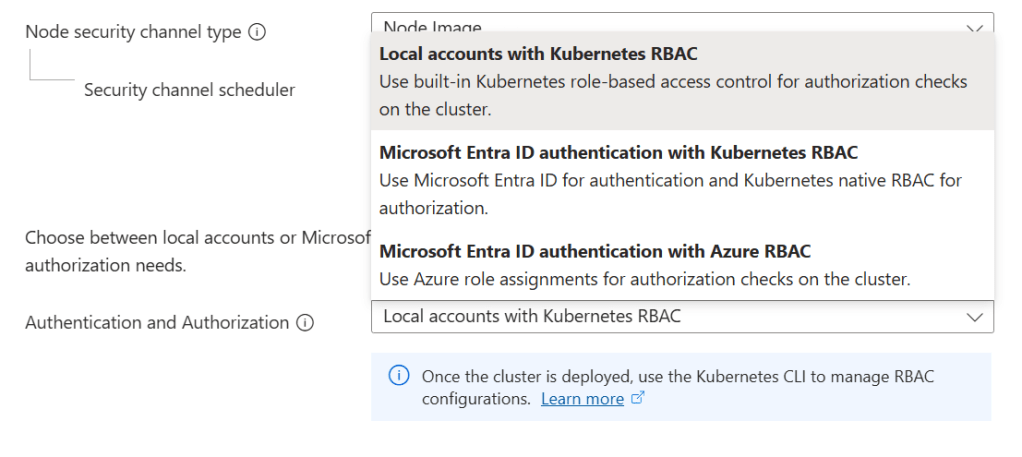
Enabling NSG enforcement is necessary, but it is not sufficient as the only access control for sensitive data services. Network controls restrict which sources can reach an endpoint — they cannot govern what those sources do once connected. Managed Identity with scoped RBAC assignments should be the minimum access model for any workload reaching Azure data services through a Private Endpoint.

✅ The defence-in-depth model for Private Endpoints Enable privateEndpointNetworkPolicies on the subnet so that NSG rules are enforced. Write NSG rules that restrict inbound access to the Private Endpoint’s private IP to only the sources that need it. Require Managed Identity authentication with scoped RBAC assignments for all service access. Disable public network access on the backing service entirely. These controls work together — removing any one of them weakens the posture.

Summary: Three Controls, Three Gaps

AreaCommon AssumptionThe RealityThe Fix
NSG Service TagsAzureCloud is a safe, conservative choiceAzureCloud is a broad, dynamic tag covering all Azure IPs globallyUse regional tags (AzureCloud.WestEurope). Enforce with Azure Policy.
Default Routes / UDRsA 0.0.0.0/0 UDR and a firewall are all you need to control outbound traffic168.63.129.16 is not subject to UDRs, but all Azure service endpoint traffic is — if the firewall has no rules for it, workloads break silentlyDefine firewall rules for all Azure service dependencies before applying the UDR. Check Effective Routes first.
Private EndpointsAn NSG on the PE subnet controls access to the endpointNSG rules are not evaluated for PE traffic by defaultEnable privateEndpointNetworkPolicies on the subnet. Require Managed Identity + RBAC.

Conclusion

The three patterns in this post — service tag scoping, force-tunnelling configuration, and Private Endpoint NSG enforcement — share a common characteristic: they are not wrong configurations. They are default behaviours, or natural-seeming choices, whose consequences the documentation does not surface at the point where those choices are made.

The goal is to move the point of discovery earlier. Understanding that AzureCloud covers other customers’ IP ranges before writing that NSG rule. Knowing that a 0.0.0.0/0 UDR puts your firewall in the path of all Azure service traffic before applying that route table. Checking Private Endpoint network policies before writing the first NSG rule for a PE subnet. These are the things that turn reactive incident investigation into proactive design decisions.

Azure networking is not inherently complex. But it rewards engineers who take the time to understand what the defaults are doing, and why.

AKS Identity and Access Control: Securing Your Cluster

In the previous post on AKS Networking, we defined how traffic flows into, through, and out of an AKS cluster. We designed ingress entry points, internal service communication patterns, and controlled egress paths.

Now we turn to identity and access control. Because networking defines connectivity, traffic design defines flow — and identity defines trust.

A well-networked cluster with weak identity controls is still a security liability. In this post we cover the full identity and access control surface of AKS: choosing the right Authentication and Authorisation model, Entra ID integration, RBAC, Workload Identity, secrets management, and Zero Trust principles.

Why Identity Is the New Perimeter

Traditional security models relied on network perimeters, and in its simplest form used to look something like this:

If you were inside the network, you were trusted. That model has broken down. Cloud environments, remote access, and microservice architectures have dissolved those traditional perimeters entirely.

Zero Trust redefines the security model: never trust, always verify. Every access request — from a human, a service, a device, or a workload — must be authenticated and authorised explicitly, regardless of where it originates.

For AKS, this means identity must be applied at every layer:

  • Who can access the cluster control plane?
  • What can users and operators do once inside?
  • How do pods authenticate to Azure services?
  • Where are secrets stored and how are they retrieved?

Getting these controls right from the start is far easier than retrofitting them later. And the first decision you make when you create the cluster sets the foundation for everything that follows.

Choosing Your Authentication and Authorization Model

When creating an AKS cluster, the single most important security decision is the Authentication and Authorisation mode under Security configuration in the Azure Portal. There are three options:

• Local accounts with Kubernetes RBAC
• Microsoft Entra ID authentication with Kubernetes RBAC
• Microsoft Entra ID authentication with Azure RBAC

The choice you make here shapes the entire identity posture of your cluster — not just who can log in, but how access is reviewed, audited, and governed over time.

Option 1: Local Accounts with Kubernetes RBAC

This is what you get if you click through the portal without changing the default. Users authenticate using static credentials retrieved with:

az aks get-credentials --admin

These credentials are certificate-based, do not expire by default, and are not tied to any individual identity. There is no integration with any external identity provider. Access control inside the cluster uses native Kubernetes RBAC objects, configured manually.

Pros
  • Zero external dependencies — works in air-gapped or disconnected environments
  • Simplest setup, fastest to get running
  • Full compatibility with all Kubernetes tooling
  • Useful for short-lived development or test clusters
Cons
  • Static credentials: the admin kubeconfig never expires by default and cannot be scoped to an individual user
  • No audit trail of who accessed the cluster — only that something with the credential did
  • No integration with your organisation’s identity provider, MFA, or Conditional Access
  • Credential rotation is manual and operationally demanding
  • Shared credentials violate least-privilege: every administrator has the same level of access
  • Cannot disable local accounts while this mode is selected
CapabilityAvailable?
Entra ID / SSO integration❌ No
MFA enforcement❌ No
Conditional Access policies❌ No
Per-user audit trail❌ No
Kubernetes RBAC✅ Yes
Azure RBAC❌ No
Credential rotation required⚠️ Manual
❌ Production Warning  This option should not be used for production clusters. It is appropriate only for development, testing, or fully isolated environments where Entra ID integration is not possible.

Option 2: Microsoft Entra ID Authentication with Kubernetes RBAC

Users authenticate via their Entra ID identity using the Azure CLI or kubelogin. What they can do inside the cluster is controlled by Kubernetes RBAC objects — Roles, ClusterRoles, and RoleBindings — which reference Entra users and groups as subjects.

Entra ID groups can be used as RBAC subjects directly, so access can be managed centrally through group membership rather than per-user bindings. Local accounts can be fully disabled, removing the static credential backdoor.

Pros
  • Full Entra ID authentication — users log in with their corporate identity
  • MFA and Conditional Access policies apply to cluster access automatically
  • Audit trail in Entra ID sign-in logs and Kubernetes audit logs
  • Group-based access: manage cluster permissions via Entra ID group membership
  • Local admin accounts can be disabled, removing static credentials entirely
  • GitOps-friendly: RBAC manifests can be stored and managed in version control
  • Fine-grained namespace-level permissions via Kubernetes RBAC
Cons
  • RBAC manifests must be managed inside the cluster — they are not visible in Azure IAM
  • Access reviews require checking both Entra ID group membership and Kubernetes manifests
  • Kubernetes RBAC does not natively support time-limited or just-in-time role assignments
  • More setup required than Option 1 — Entra ID groups need to be created and maintained
CapabilityAvailable?
Entra ID / SSO integration✅ Yes
MFA enforcement✅ Yes
Conditional Access policies✅ Yes
Per-user audit trail✅ Yes
Kubernetes RBAC✅ Yes
Azure RBAC❌ No
Access visible in Azure IAM❌ No — managed in cluster
GitOps-friendly RBAC✅ Yes
✅ Good Fit For  Teams that want centralised identity through Entra ID but prefer managing access control via Kubernetes-native manifests and GitOps workflows. Commonly chosen by platform engineering teams that already manage cluster configuration through code.

Option 3: Microsoft Entra ID Authentication with Azure RBAC

Authentication flows through Entra ID as in Option 2, but authorisation is handled by Azure RBAC rather than Kubernetes RBAC bindings. Access is assigned via role assignments on the AKS resource itself — the same model used for any other Azure resource. This means cluster access is visible in Azure IAM, participates in access reviews, and can integrate with Privileged Identity Management for just-in-time elevation. Four built-in roles are provided:

Azure Built-In RoleScopeWhat It Grants
Azure Kubernetes Service RBAC Cluster AdminCluster-wideFull access to all Kubernetes objects across all namespaces
Azure Kubernetes Service RBAC AdminNamespaceFull admin access within a specific namespace, including RBAC management
Azure Kubernetes Service RBAC WriterNamespaceRead/write to most objects; can access Secrets. Cannot view or modify roles or role bindings.

⚠️ Can access Secrets and impersonate any ServiceAccount in the namespace — use with caution.
Azure Kubernetes Service RBAC ReaderCluster or NSRead-only access to most objects. Cannot view Secrets, roles, or role bindings.

⚠️ Secrets are intentionally excluded to prevent ServiceAccount credential access and privilege escalation.

Role assignments can be scoped to the entire cluster or to a specific namespace by appending /namespaces/ to the AKS resource ID in the scope.

Pros
  • Access assignments are fully visible in Azure IAM alongside all other Azure resources
  • Single plane of glass for access management and access reviews across your Azure estate
  • Integrates with Azure Privileged Identity Management (PIM) for just-in-time and time-limited access
  • Full Entra ID authentication including MFA and Conditional Access
  • Subscription-scoped role assignments can apply to all clusters in a subscription
  • Audit trail in Azure Activity Log — not just Kubernetes audit logs
  • Simplified onboarding: no cluster-internal manifest changes required to grant access
Cons
  • Fine-grained, custom permission sets require creating custom Azure role definitions — more complex than writing a Kubernetes Role manifest
  • Custom Resource Definitions (CRDs) have limited support: CRD-level permissions require the wildcard Microsoft.ContainerService/managedClusters/*/read action
  • Less GitOps-native: Azure role assignments are imperative Azure ARM operations rather than declarative Kubernetes manifests
  • Teams unfamiliar with Azure RBAC may find the permission model less intuitive than Kubernetes-native RBAC
CapabilityAvailable?
Entra ID / SSO integration✅ Yes
MFA enforcement✅ Yes
Conditional Access policies✅ Yes
Per-user audit trail✅ Yes (Azure Activity Log)
Kubernetes RBAC⚠️ Coexists, but Azure RBAC is authoritative
Azure RBAC✅ Yes
Access visible in Azure IAM✅ Yes
Just-in-time access via PIM✅ Yes
Subscription-scoped role assignments✅ Yes
✅ Recommended for Most Production Environments  Microsoft recommends this option for production AKS clusters where governance, access reviews, and integration with enterprise Azure IAM processes are priorities. PIM integration makes it particularly strong for privileged access management.

Side-by-Side Comparison

Option 2 is the right choice when your team manages cluster access through GitOps and Kubernetes manifests. Option 3 is the right choice when your organisation’s governance processes are built around Azure IAM, access reviews, and PIM.

Both Option 2 and 3 are production-appropriate — Option 1 is not.

ConsiderationOption 1: Local + K8s RBACOption 2: Entra + K8s RBACOption 3: Entra + Azure RBAC
AuthenticationStatic credentialsEntra ID (OIDC)Entra ID (OIDC)
AuthorizationKubernetes RBACKubernetes RBACAzure RBAC
MFA / Conditional Access❌ No✅ Yes✅ Yes
Audit trail❌ Limited✅ K8s audit logs✅ Azure Activity Log
Azure IAM visibility❌ No❌ No✅ Yes
PIM / JIT access❌ No❌ No✅ Yes
GitOps RBAC✅ Yes✅ Yes⚠️ Partial
Production ready?❌ No✅ Yes✅ Yes (recommended)

Azure AD Integration, Conditional Access & Disabling Local Accounts

Whether you choose Option 2 or 3, AKS-managed Entra ID integration handles the underlying configuration automatically — no manual app registration or service principal setup is required. AKS uses OpenID Connect to authenticate users, with the Azure CLI or kubelogin handling the token exchange transparently.

In production, always set –disable-local-accounts when creating or updating the cluster. Even with Entra ID integration enabled, the static admin kubeconfig remains available by default. Disabling local accounts removes that backdoor entirely, ensuring every access request is authenticated through Entra ID and appears in audit logs.

Entra ID Conditional Access policies can be applied to AKS cluster access. This allows organisations to enforce controls such as:

  • Requiring MFA for cluster access
  • Restricting access to compliant devices
  • Blocking access from specific locations or risk levels

Because AKS authentication flows through Entra ID, the full power of Conditional Access is available without any additional tooling.

Workload Identity: Pod-Level Authentication

User access to the cluster is one side of the identity problem. The other is how pods themselves authenticate to Azure services — Key Vault, Storage, Service Bus, SQL, and more. Storing credentials in environment variables or Kubernetes Secrets is the wrong answer: they require manual rotation, provide no audit trail, and a single breach grants indefinite access.

Microsoft Entra Workload ID solves this using OIDC federation. AKS acts as an OIDC issuer, and pods are given a cryptographically signed token that they exchange with Entra ID for a short-lived Azure access token. No secrets are stored anywhere.

How Workload Identity Works

AKS Workload Identity uses the OpenID Connect (OIDC) federation standard. Here is how the flow works:

  • Enable –enable-oidc-issuer and –enable-workload-identity on the cluster
  • Create a user-assigned managed identity in Azure to represent the workload
  • Create a Federated Identity Credential on that managed identity, trusting tokens from the AKS OIDC issuer for a specific namespace and service account name
  • Annotate the Kubernetes Service Account with azure.workload.identity/client-id pointing to the managed identity’s client ID
  • Pods using that service account automatically receive a signed OIDC token, exchange it with Entra ID, and receive an Azure access token — no secrets in the pod spec

Secrets Management in AKS

Kubernetes Secrets are base64-encoded and stored in etcd. While AKS encrypts etcd with a platform-managed key by default, any user or workload with RBAC read access to the Secret object can retrieve the value. For sensitive credentials, this is insufficient — Azure Key Vault provides the required isolation.

Azure Key Vault Integration with the Secrets Store CSI Driver

The recommended pattern for secrets management in AKS is to store secrets in Azure Key Vault and mount them into pods using the Secrets Store CSI Driver with the Azure Key Vault provider.

In this pattern:

  • Secrets, certificates, and keys live in Azure Key Vault
  • Workload Identity provides the pod with access to Key Vault
  • The CSI Driver mounts the secret values into the pod as files or environment variables at runtime
  • Pods never see static credentials — they receive the current value at mount time

Secrets Rotation and Expiry

Azure Key Vault supports versioning, rotation policies, and expiry for all secret types. Combined with the CSI Driver’s auto-rotation capability, secrets can be rotated without redeployment.

For certificates specifically, integration with Azure Certificate Authority or Let’s Encrypt allows automated renewal and rotation within Key Vault.

Encryption at Rest

AKS supports configuring Azure Key Vault as the KMS provider for Kubernetes secret encryption. This encrypts the secret data stored in etcd using a Key Vault-managed key, adding a layer of protection even for native Kubernetes Secrets.

For environments with strict compliance requirements, this is an important control to enable.

Zero Trust in AKS: Layered Controls

Zero Trust is not a single product or feature — it is a design philosophy applied consistently across every layer. The controls in this post work together to form that layered posture. The table below maps each layer to the appropriate control and its implementation.

LayerControlImplementation
Auth & Authz ModeWhich model at cluster creation?Option 3 (Entra + Azure RBAC) for most; Option 2 for GitOps-first teams
Control PlaneWho can reach the API server?Private cluster + Entra ID + Conditional Access + local accounts disabled
Workload IdentityHow do pods auth to Azure?User-assigned managed identity + Federated Credential + Workload Identity
SecretsWhere are secrets stored?Azure Key Vault + Secrets Store CSI Driver + autorotation
East–West TrafficCan all pods talk to all pods?Network Policies scoped by label selectors
Runtime SecurityDetection and responseDefender for Containers — eBPF sensor, 60+ analytics, Defender XDR

Microsoft Defender for Containers

Microsoft Defender for Containers provides runtime threat detection across the AKS cluster. It monitors for suspicious activity at the container and host level, including:

  • Privilege escalation attempts
  • Container escape activity
  • Unexpected network connections
  • Anomalous process execution

Defender for Containers integrates with Microsoft Sentinel for centralised alerting and investigation, supporting a complete detection and response workflow.

Aligning with the Azure Well-Architected Framework

The identity and security controls in this post align directly with the Azure Well-Architected Framework pillars:

  • Security: Entra ID, Workload Identity with managed identities, Key Vault, and Zero Trust controls reduce the attack surface and remove static credentials from every layer of the cluster.
  • Operational Excellence: Azure RBAC and Entra groups centralise access management. Assignments are visible and auditable in Azure Activity Logs, simplifying access reviews and reducing administrative overhead.
  • Reliability: Removing static credentials eliminates a class of failures caused by expired or unrotated secrets. CSI Driver autorotation further reduces the operational risk of secrets management.
  • Cost Optimisation: Managed identity controls reduce credential-rotation overhead and lower the risk of costly security incidents and the compliance consequences that can follow them.

What Comes Next

At this point in the series, we have designed the AKS architecture, networking models, control plane connectivity, traffic flow, and now identity and access control. The cluster is well-networked, well-secured, and access controlled.

In the next post we turn to observability and monitoring — because a secure, well-networked cluster that you cannot see into is a cluster you cannot operate confidently in production.

See you on the next post!

Top Highlights from Microsoft Ignite 2024: Key Azure Announcements

This year, Microsoft Ignite was held in Chigaco for in-person attendees as well as virtually with key sessions live streamed. As usual, the Book of News was released to show the key announcements and you can find that at this link.

From a personal standpoint, the Book of News was disappointing as at first glance there seemed to be very few key annoucements and enhancements being provided for core Azure Infrastructure and Networking.

However, there were some really great reveals that were announced at various sessions throughout Ignite, and I’ve picked out some of the ones that impressed me.

Azure Local

Azure Stack HCI is no more ….. this is now being renamed to Azure Local. Which makes a lot more sense as Azure managed appliances deployed locally but still managed from Azure via Arc.

So, its just a rename right? Wrong! The previous iteration was tied to specific hardware that had high costs. Azure Local now brings low spec and low cost options to the table. You can also use Azure Local in disconnected mode.

More info can be found in this blog post and in this YouTube video.

Azure Migrate Enhancements

Azure Migrate is product that has badly needed some improvements and enhancements given the capabilities that some of its competitors in the market offer.

The arrival of a Business case option enables customers to create a detailed comparison of the Total Cost of Ownership (TCO) for their on-premises estate versus the TCO on Azure, along with a year-on-year cash flow analysis as they transition their workloads to Azure. More details on that here.

There was also an announcement during the Ignite Session around a tool called “Azure Migrate Explore” which looked like it provides you with a ready-made Business case PPT template generator that can be used to present cases to C-level. Haven’t seen this released yet, but one to look out for.

Finally, one that may hae been missed a few months ago – given the current need for customers to migrate from VMware on-premises deployments to Azure VMware Solution (which is already built in to Azure Migrate via either Appliance or RVTools import), its good to see that there is a preview feature around a direct path from VMware to Azure Stack HCI (or Azure Local – see above). This is a step forward for customers who need to keep their workloads on-premises for things like Data Residency requirements, while also getting the power of Azure Management. More details on that one here.

Azure Network Security Perimeter

I must admit, this one confused me a little bit at first glance but makes sense now.

Network Security Perimeter allows organizations to define a logical network isolation boundary for PaaS resources (for example, Azure Storage acoount and SQL Database server) that are deployed outside your organization’s virtual networks.

So, we’re talking about services that are either deployed outside of a VNET (for whatever reason) or are using SKU’s that do not support VNET integration.

More info can be found here.

Azure Bastion Premium

This has been in preview for a while but is now GA – Azure Bastion Premium offers enhanced security features such as private connectivity and graphical recordings of virtual machines connected through Bastion.

Bastion offers enhanced security features that ensure customer virtual machines are connected securely and to monitor VMs for any anomalies that may arise.

More info can be found here.

Security Copilot integration with Azure Firewall

The intelligence of Security Copilot is being integrated with Azure Firewall, which will help analysts perform detailed investigations of the malicious traffic intercepted by the IDPS feature of their firewalls across their entire fleet using natural language questions. These capabilities were launched on the Security Copilot portal and now are being integrated even more closely with Azure Firewall.

The following capabilities can now be queried via the Copilot in Azure experience directly on the Azure portal where customers regularly interact with their Azure Firewalls: 

  • Generate recommendations to secure your environment using Azure Firewall’s IDPS feature
  • Retrieve the top IDPS signature hits for an Azure Firewall 
  • Enrich the threat profile of an IDPS signature beyond log information 
  • Look for a given IDPS signature across your tenant, subscription, or resource group 

More details on these features can be found here.

DNSSEC for Azure DNS

I was surprised by this annoucement – maybe I had assumed it was there as it had been available as an AD DNS feature for quite some time. Good to see that its made it up to Azure.

Key benefits are:

  • Enhanced Security: DNSSEC helps prevent attackers from manipulating or poisoning DNS responses, ensuring that users are directed to the correct websites. 
  • Data Integrity: By signing DNS data, DNSSEC ensures that the information received from a DNS query has not been altered in transit. 
  • Trust and Authenticity: DNSSEC provides a chain of trust from the root DNS servers down to your domain, verifying the authenticity of DNS data. 

More info on DNSSEC for Azure DNS can be found here.

Azure Confidential Clean Rooms

Some fella called Mark Russinovich was talking about this. And when that man talks, you listen.

Designed for secure multi-party data collaboration, with Confidential Clean Rooms, you can share privacy sensitive data such as personally identifiable information (PII), protected health information (PHI) and cryptographic secrets confidently, thanks to robust trust guarantees that safeguard your data throughout its lifecycle from other collaborators and from Azure operators.

This secure data sharing is powered by confidential computing, which protects data in-use by performing computations in hardware-based, attested Trusted Execution Environments (TEEs). These TEEs help prevent unauthorized access or modification of application code and data during use. 

More info can be found here.

Azure Extended Zones

Its good to see this feature going into GA and hopefully will provide a pathway for future AEZ’s in other locations.

Azure Extended Zones are small-footprint extensions of Azure placed in metros, industry centers, or a specific jurisdiction to serve low latency and data residency workloads. They support virtual machines (VMs), containers, storage, and a selected set of Azure services and can run latency-sensitive and throughput-intensive applications close to end users and within approved data residency boundaries. More details here.

.NET 9

Final one and slightly cheating here as this was announced at KubeCon the week before – .NET9 has been announced. Note that this is a STS release with an expiry of May 2026. .NET 8 is the current LTS version with an end-of-support date of November 2026 (details on lifecycles for .NET versions here).

Link to the full release announcement for .NET 9 (including a link to the KubeCon keynote) can be found here.

Conclusion

Its good to see that in the firehose of annoucements around AI and Copilot, there there are still some really good enhancements and improvements coming out for Azure services.

Microsoft Ignite 2022 – Highlights of the Announcements (with a few personal opinions thrown in)!

For this year’s Microsoft Ignite, in-person conferences were held in cities around the world after two years of being online and I was fortunate enough to attend the Manchester Spotlight event last week.

At the conference Microsoft had their usual presentations, ‘Ask the Expert’ sessions, exhibition areas and a Cloud Skills Challenge. But of course it’s the announcements that everyone looks forward to the most, where improvements, changes and updates to the various technologies in the Microsoft product portfolio are revealed.

I’ve picked out my top highlights below!

  • Azure Stack HCI

I’m on both sides of the fence about the Azure Stack HCI announcements.

I love the Azure Stack HCI product and have been using it since the days when it was called Storage Spaces Direct and ran on Hyper-Converged Infrastructure in on-premises datacenters. As it has evolved, Microsoft has invested heavily in the Azure Stack HCI product, which allows you to run Azure Managed Infrastructure in your own datacentres and combine on-premises infrastructure with Azure Cloud Services.

One of the big announcements was around licensing, and gives Enterprise Agreement customers with Software Assurance the ability to exchange their existing licensed cores of Windows Server Datacentre to get Azure Stack HCI at no additional cost. This includes the right to run unlimited Azure Kubernetes Service and unlimited Windows Server guest workloads on the Azure Stack HCI cluster.

Speaking of Kubernetes, support for Azure Kubernetes Service on Azure Stack HCI is now available, meaning you can deploy and manage containerised apps side-by-side with your VMs on the same physical server or cluster. You can also now make provisioning for hybrid AKS clusters directly from Azure onto your Azure Stack HCI using Azure Arc

On the hardware side, you could previously purchase validated hardware for multiple vendors but in early 2023, Microsoft will begin offering an Azure Stack HCI integrated system based on hardware that’s designed, shipped, and supported by Microsoft (in partnership with Dell). 

This will be available in several configurations:

I mentioned both sides of the fence above, and the licensing announcement is one of the worrying ones, because like the recent announcements that Defender for Servers requires an Azure Subscription (Microsoft Defender for Endpoint (Server Version) is no longer available on the EA price list), we’re now potentially going down the route of Microsoft only allowing Windows Server Datacenter to run on Azure Stack HCI accredited hardware. Or potentially getting rid of the Windows Server Datacenter SKU entirely and having it as a “cloud-connected only” product. Only time will tell.

  • Azure Savings Plan for Compute

Azure Savings Plan for Compute is based on consumption, and allows you to by a one- or three-year savings plan and commit to a spend of $5 per hour per virtual machine (VM). This is based on Azure Advisor Recommendations in the Cost Management and Billing section of the Azure Portal.

Once purchased, this is applied on a hourly basis based on consumption and even if you go above the $5 spend, the initial commitment is still billed at the lower rate and any additional consumption is billed at a Pay-As-You-Go rate.

The main difference between this and Reserved Instances is that Reserved Instances is an up-front commitment whether the VM is powered on or not. Azure Savings Plan for Compute unlocks those lower savings based on consumption.

You can find more details in this article on the Microsoft Community Hub.

  • Azure Virtual Machine Scale Sets – Mixing Standard and Spot instances

Staying on the Cost Savings topic, you can now specify a % of Spot Instance VMs that you wish to run in a VM Scale Set.

This feature (which is in Preview) allows you to reduce compute infrastructure costs by leveraging the deep discounts that Spot VMs can provide while maintaining the compute capacity your workload needs. 

More information can be found here.

  • Microsoft 365 updates

A huge number of announcements were made about Microsoft 365 at this year’s Ignite, most notably:

  • The release of the Microsoft 365 app, which will replace the Office Mobile and Office for Windows App for all Microsoft 365 customers who use this as part of their subscriptions.
  • Teams Premium, which will be available to E5 subscriptions and will bring enhanced meeting features such as insights and live translation in more than 40 languages so that participants can read captions in their own language.
  • Microsoft Places, which will assist with the hybrid working model and let everyone know who will be in the office at what times, where colleagues are sitting, what meetings to attend in person; and how to book space on the days your team is planning to go into the office.

The Teams announcements are great, in particular the live translation option. For us as a multi-national and multi-language organisation, this is a massive step in fostering the inclusion of all users. There is an assumption in the world that spoken English is the native language of Tech, but it’s not everyone’s first language.

  • Microsoft Intune

Microsoft Endpoint Manager is being renamed to Microsoft Intune, which is what it was called before it was renamed to Endpoint Manager. This effectively bundles all Endpoint Management tools under a single brand, including Microsoft Configuration Manager. Some of the main features announced were:

  • ServiceNow Integration
  • Cloud LAPS for Azure Virtual Machines
  • Update Policies or MacOS and Linux Support
  • Endpoint Privileged Management – no more permanent admin permissions on devices!

For me, Endpoint Privileged Management is huge addition which removes the need for any permanent administrative permissions on devices. Cloud LAPS is also a huge security step.

  • Security

Finally on to Security, which was a big focus this year. This year’s updates to the Microsoft Security portfolio coincided with the announcement that Microsoft is now recognised as a leader in the Gartner Magic Quadrant for Security Information and Event Management.

First and foremost is Microsoft’s announcement of a limited-time sale of 50% off Defender for Endpoint Plan 1 and Plan 2 licenses, allowing organisations to do more and spend less by modernising their security with a leading endpoint protection platform. The offer runs until June 2023.

Microsoft 365 Defender now automatically disrupts ransomware attacks. This is possible because Microsoft 365 Defender collects and correlates signals across endpoints, identities, emails, documents and cloud apps into unified incidents and uses the breadth of signal to identify attacks early with a high level of confidence. Microsoft 365 Defender can automatically contain affected assets, such as endpoints or user identities. This helps stop ransomware from spreading laterally.

A number of new capabilities have been announced for Defender for Cloud:

  • Microsoft Defender for DevOps: A new solution that will provide visibility across multiple DevOps environments to centrally manage DevOps security, strengthen cloud resource configurations in code and help prioritise remediation of critical issues in code across multi-pipeline and multicloud environments. With this preview, leading platforms like GitHub and Azure DevOps are supported and other major DevOps platforms will be supported shortly.
  • Microsoft Defender Cloud Security Posture Management (CSPM): This solution, available in preview, will build on existing capabilities to deliver integrated insights across cloud resources, including DevOps, runtime infrastructure and external attack surfaces, and will provide contextual risk-based information to security teams. Defender CSPM provides proactive attack path analysis, built on the new cloud security graph, to help identify the most exploitable resources across connected workloads to help reduce recommendation noise by 99%.
  • Microsoft cloud security benchmark: A comprehensive multicloud security framework is now generally available with Microsoft Defender for Cloud as part of the free Cloud Security Posture Management experience. This built-in benchmark maps best practices across clouds and industry frameworks, enabling security teams to drive multicloud security compliance.
  • Expanded workload protection capabilities: Microsoft Defender for Servers will support agentless scanning, in addition to an agent-based approach to VMs in Azure and AWS. Defender for Servers P2 will provide Microsoft Defender Vulnerability Management premium capabilities.

If you’d like to read more about Microsoft’s Ignite announcements from the conference, then go to Microsoft’s Book of News here.

Hope you enjoyed this post, until next time!

MFA and Conditional Access alone won’t save us from Threat Actors

In the end of a week where we have had 2 very different incidents at high profile organisations across the globe, its interesting to look at these and compare them from the perspective of incident response and the “What we could have done to prevent this from happening” question.

Image Credit – PinClipart

Lets analyze that very question – in the aftermath of the majority of cases, the “What could we have done to prevent this from happening” question invariably leads in to the next question of “What measures can we put in place to prevent this from happening in the future”.

The problem with the 2 questions is that they are reactive and come about only because the incident has happened. And it seems that in both incidents, the required security systems were in place.

Or were they?

A brief analysis of the attacks

  • Holiday Inn

If we take the Holiday Inn attack, the hackers (TeaPea) have said in a statement that:

"Our attack was originally planned to be a ransomware but the company's IT team kept isolating servers before we had a chance to deploy it, so we thought to have some funny [sic]. We did a wiper attack instead," one of the hackers said.

This is interesting because it suggests that the Holiday Inn IT team had a mechanism to isolate the servers in an attempt to contain the attack. The problem was that once the attackers were inside their systems and they realized that the initial scope that their attack was based on wasn’t going to work, their focus changed from Cybercriminals who were trying to make a profit to Terrorism, where they decided to just destroy as much data as they could.

Image Credit – Northern Ireland Cyber Security Centre

Essentially, the problem here is two-fold – firstly, you can have a Data Loss Prevention system in place but its not going to report on or block “Delete” actions until its too late or in some cases not at all.

Second, they managed to access the systems using a weak password. So (am I’m making assumptions here), while the necessary defences and intrusion-detection technologies may have been in place, that single crack in the foundations was all it took.

So the how did they get in? The 2 part of their statement shown below explains it all:

TeaPea say they gained access to IHG's internal IT network by tricking an employee into downloading a malicious piece of software through a booby-trapped email attachment.

The criminals then say they accessed the most sensitive parts of IHG's computer system after finding login details for the company's internal password vault. The password was Qwerty1234.

Ouch ….. so the attack originated as a Social Engineering attack.

  • Uber

We know a lot more about the Uber hack and again this is a case of an attack that originated with Social Engineering. Here’s what we know at this point:

  1. The attack started with a social engineering campaign on Uber employees, which yielded access to a VPN, in turn granting access to Uber’s internal network *.corp.uber.com.
  2. Once on the network, the attacker found some PowerShell scripts, one of which contained hardcoded credentials for a domain admin account for Uber’s Privileged Access Management (PAM) solution.
  3. Using admin access, the attacker was able to log in and take over multiple services and internal tools used at Uber: AWS, GCP, Google Drive, Slack workspace, SentinelOne, HackerOne admin console, Uber’s internal employee dashboards, and a few code repositories.

Again, we’re going to work off the assumption (and we need to make this assumption as Uber had been targeted in both 2014 and 2016) that the necessary defences and intrusion detection was in place.

Once the attackers gained access, the big problem here is the one thats highlighted above – hardcoded domain admin credentials. Once they had those, they could then move across the network doing whatever they pleased. And undetected as well, as its not unusual for a domain admin account to have multiple access across the network. And it looks like Uber haven’t learned from their previous mistakes, because as Mackenzie Jackson of GitGuardian reported:

“There have been three reported breaches involving Uber in 2014, 2016, and now 2022. It appears that all three incidents critically involve hardcoded credentials (secrets) inside code and scripts”

So what can we learn?

What these attacks teach us is that we can put as much technology, intrusion and anomaly detection into our ecosystem as we like, but the human element is always going to be the one that fails us. Because as humans, we are fallible. Its not a stick to beat us with (and like most, I do have a lot of sympathy for those users in Uber, Holiday Inn and all of the other companies who have been victim to attakcs that began with Social Engineering).

Do we need constant training and CyberSecurity programmes in our organisations to ensure that our users are aware of these sorts of attacks? Well, they do now at Uber and Holiday Inn but as I said at the start of the article, this will be a reactive measure for these companies.

The thing is though, most of these programmes are put in as “one-offs” in response to an audit where a checkbox is required to say that such user training has been put in place. And once the box has been checked, they’re forgotten about until the next audit is needed.

We can also say that the priveleged account management processes failed in both companies (weak passwords in one, hardcoded credentials in another).

Conclusion

Multi-Factor Authentication. Conditional Access. Microsoft Defender. Anomaly Detection. EDR and XDR. Information Protection. SOC. SIEM. Priveleged Identity Management. Strong Password Policies.

We can tech the absolute sh*t out of our systems and processes, but don’t forget to train and protect the humans in the chain. Because ultimately when they break, the whole system breaks down.

And the Threat Actors out there know this all too well. They know the systems are there, but they need a human to get them past those walls. MFA and Conditional Access can only save us for so long.

100 Days of Cloud – Day 70: Microsoft Defender for Cloud

Its Day 70 of my 100 Days of Cloud journey, and todays post is all about Azure Security Center! There’s one problem though, its not called that anymore ….

At Ignite 2021 Fall edition, Microsoft announced that the Azure Security Center and Azure Defender products were being rebranded and merged into Microsoft Defender for Cloud.

Overview

Defender for Cloud is a cloud-based tool for managing the security of your multi-vendor cloud and on-premises infrastructure. With Defender for Cloud, you can:

  • Assess: Understand your current security posture using Secure score which tells you your current security situation: the higher the score, the lower the identified risk level.
  • Secure: Harden all connected resources and services using either detailed remediation steps or an automated “Fix” button.
  • Defend: Detect and resolve threats to those resources and services, which can be sent as email alerts or streamed to SIEM (Security, Information and Event Management), SOAR (Security Orchestration, Automation, and Response) or IT Service Management solutions as required.
Image Credit: Microsoft

Pillars

Microsoft Defender for Cloud’s features cover the two broad pillars of cloud security:

  • Cloud security posture management

CSPM provides visibility to help you understand your current security situation, and hardening guidance to help improve your security.

Central to this is Secure Score, which continuously assesses your subscriptions and resources for security issues. It then presents the findings into a single score and provides recommended actions for improvement.

The guidance in Secure Score is provided by the Azure Security Benchmark, and you can also add other standards such as CIS, NIST or custom organization-specific requirements.

  • Cloud workload protection

Defender for Cloud offers security alerts that are powered by Microsoft Threat Intelligence. It also includes a range of advanced, intelligent, protections for your workloads. The workload protections are provided through Microsoft Defender plans specific to the types of resources in your subscriptions.

The Defender plans page of Microsoft Defender for Cloud offers the following plans for comprehensive defenses for the compute, data, and service layers of your environment:

Microsoft Defender for servers

Microsoft Defender for Storage

Microsoft Defender for SQL

Microsoft Defender for Containers

Microsoft Defender for App Service

Microsoft Defender for Key Vault

Microsoft Defender for Resource Manager

Microsoft Defender for DNS

Microsoft Defender for open-source relational databases

Microsoft Defender for Azure Cosmos DB (Preview)

Azure, Hybrid and Multi-Cloud Protection

Defender for Cloud is an Azure-native service, so many Azure services are monitored and protected without the need for agent deployment. If agent deployment is needed, Defender for Cloud can deploy Log Analytics agent to gather data. Azure-native protections include:

  • Azure PAAS: Detect threats targeting Azure services including Azure App Service, Azure SQL, Azure Storage Account, and more data services.
  • Azure Data Services: automatically classify your data in Azure SQL, and get assessments for potential vulnerabilities across Azure SQL and Storage services.
  • Networks: reducing access to virtual machine ports, using the just-in-time VM access, you can harden your network by preventing unnecessary access.

For hybrid environments and to protect your on-premise machines, these devices are registered with Azure Arc (which we touched on back on Day 44) and use Defender for Cloud’s advanced security features.

For other cloud providers such as AWS and GCP:

  • Defender for Cloud CSPM features assesses resources according to AWS or GCP’s according to their specific security requirements, and these are reflected in your secure score recommendations.
  • Microsoft Defender for servers brings threat detection and advanced defenses to your Windows and Linux EC2 instances. This plan includes the integrated license for Microsoft Defender for Endpoint amongst other features.
  • Microsoft Defender for Containers brings threat detection and advanced defenses to your Amazon EKS and Google’s Kubernetes Engine (GKE) clusters.

We can see in the screenshot below how the Defender for Cloud overview page in the Azure Portal gives a full view of resources across Azure and multi cloud sunscriptions, including combined Secure score, Workload protections, Regulatory compliance, Firewall manager and Inventory.

Image Credit: Microsoft

Conclusion

You can find more in-depth details on how Microsoft Defender for Cloud can protect your Azure, Hybrid and Multi-Cloud Workloads here.

Hope you enjoyed this post, until next time!

100 Days of Cloud – Day 57: Azure Conditional Access

Its Day 57 of my 100 Days of Cloud journey, and today I’m taking a look at Azure Conditional Access.

In the last post, we looked at the state of MFA adoption across Microsoft tenancies, and the different feature offerings that are available with the different types of Azure Active Directory License. We also saw that if your licences do not include Azure AD Premium P1 or P2, its recommended you upgrade to one of these tiers to include Conditional Access as part of your MFA deployment.

Lets take a deeper look at what Conditional Access is, and why its an important component in securing access to your Azure, Office365 or Hybrid environments.

Overview

Historically, IT Environments were located on-premise, and companies with multiple sites communicated with each other using VPNs between sites. So in that case, you needed to be inside one of your offices to access any Applications or Files, and a Firewall protected your perimeter against attacks. In vary rare cases, a VPN Client was provided to those users who needed remote access and this needed to be connected in order to access resources.

Thats was then. These days, the security perimeter now goes beyond the organization’s network to include user and device identity.

Conditional Access uses signals to make decisions and enforce organisational policies. The simplest way to describe them is as “if-then” statements:

  • If a user wants to access a resource,
  • Then they must complete an action.

It impotant to note that conditional access policies shouldn’t be used as a first line of defense and is only enforced after the first level of authentication has completed

How it works

Conditional Access uses signals that are taken into account when making a policy decision. The most common signals are:

  • User or group membership:
    • Policies can be targeted to specific users and groups giving administrators fine-grained control over access.
  • IP Location information:
    • Organizations can create trusted IP address ranges that can be used when making policy decisions.
    • Administrators can specify entire countries/regions IP ranges to block or allow traffic from.
  • Device:
    • Users with devices of specific platforms or marked with a specific state can be used when enforcing Conditional Access policies.
    • Use filters for devices to target policies to specific devices like privileged access workstations.
  • Application:
    • Users attempting to access specific applications can trigger different Conditional Access policies.
  • Real-time and calculated risk detection:
    • Signals integration with Azure AD Identity Protection allows Conditional Access policies to identify risky sign-in behavior. Policies can then force users to change their password, do multi-factor authentication to reduce their risk level, or block access until an administrator takes manual action.
  • Microsoft Defender for Cloud Apps:
    • Enables user application access and sessions to be monitored and controlled in real time, increasing visibility and control over access to and activities done within your cloud environment.

We then combine these signals with decisions based on the evaluation of the signal:

  • Block access
    • Most restrictive decision
  • Grant access
    • Least restrictive decision, can still require one or more of the following options:
      • Require multi-factor authentication
      • Require device to be marked as compliant
      • Require Hybrid Azure AD joined device
      • Require approved client app
      • Require app protection policy (preview)

When the above combinations of signals and decisions are made, the most commonly applied policies are:

  • Requiring multi-factor authentication for users with administrative roles
  • Requiring multi-factor authentication for Azure management tasks
  • Blocking sign-ins for users attempting to use legacy authentication protocols
  • Requiring trusted locations for Azure AD Multi-Factor Authentication registration
  • Blocking or granting access from specific locations
  • Blocking risky sign-in behaviors
  • Requiring organization-managed devices for specific applications

If we look at the Conditional Access blade under Security in Azure and select “Create New Policy”, we see the options avaiable for creating a policy. The first 3 options are under Assignments:

  • Users or workload identities – this defines users or groups that can have the policy applied, or who can be excluded from the policy.
  • Cloud Apps or Actions – here, you select the Apps that the policy applies to. Be careful with this option! Selecting “All cloud apps” also affects the Azure Portal and may potentially lock you out:
  • Conditions – here we assign the conditions sich as locations, device platforms (eg Operating Systems)

The last 2 options are under Access Control:

  • Grant – controls the enforcement to block or grant access

Session – this controls access such as time limited access, and browser session controls.

We can also see from the above screens that we can set the policy to “Report-only” mode – this is useful when you want to see how a policy affects your users or devices before it is fully enabled.

Conclusion

You can find more details on Conditional Access in the official Microsoft documentation here. Hope you enjoyed this post, until next time!

100 Days of Cloud – Day 44: Azure Arc

Its Day 44 of my 100 Days of Cloud Journey, and today I’m looking at Azure Arc.

Azure Arc is a service that provides you with a single management plane for services that run in Azure, On Premises, or in other Cloud Providers such as AWS or GCP.

The majority of companies have resources both in on-premise and in come cases multiple cloud environments. While monitoring solutions can provide an overview of uptime and performance over a period of time, control and governance of complex hybrid and multi-cloud environments is an issue. Because these environments span multiple cloud and data centers, each of these environments operate their own set of management tools that you need to learn and operate.

Azure Arc solves this problem by allowing you to manage the following resources that are hosted outside of Azure:

  • Servers – both physical and virtual machines running Windows or Linux in both on-premise and 3rd party Cloud providers such as AWS or GCP.
  • Kubernetes clusters – supporting multiple Kubernetes distributions across multiple providers.
  • Azure data services – Azure SQL Managed Instance and PostgreSQL Hyperscale services.
  • SQL Server – enroll SQL instances from any location with SQL Server on Azure Arc-enabled servers.
Azure Arc management control plane diagram
Image Credit: Microsoft

For this post, I’m going to focus on Azure Arc for Servers, however there are a number of articles relating to the 4 different Azure Arc supported resource types listed above – you can find all of the articles here.

Azure Arc currently supports the following Windows and Linux Operating Systems:

  • Windows Server 2012 R2 and later (including Windows Server Core)
  • Ubuntu 16.04 and 18.04 (x64)
  • CentOS Linux 7 (x64)
  • SUSE Linux Enterprise Server (SLES) 15 (x64)
  • Red Hat Enterprise Linux (RHEL) 7 (x64)
  • Amazon Linux 2 (x64)

In order to register a Physical Server or VM with Azure Arc, you need to install the Azure Connected Machine agent on each of the operating systems targeted for Azure Resource Manager-based management. This is an msi installer which is available from the Microsoft Download Center.

You can also generate a script directly from the Azure Portal which can be used on target computers to download the Azure Connected Machine Agent, install it and connect the server/VM into the Azure Region and Resource Group that you specify:

A screenshot of the Generate script page with the Subscription, Resource group, Region, and Operating system fields selected.
Image Credit: Microsoft
A screenshot of the Administrator: Windows PowerShell window with the installation script running. The administrator is entering a security code to confirm their intention to onboard the machine.
Image Credit: Microsoft

The server then gets registered in Azure Arc as a connected machine:

Azure Arc for Servers: Getting started - Microsoft Tech Community
Image Credit: Microsoft

OK, so now we’ve got all of our servers connected into Azure Arc, what can we do with them? Is it just about visibility?

No. When your machine is connected to Azure Arc, you then have the following capabilities:

  • Protect Servers using Microsoft Defender for Endpoint, which is part of Microsoft Defender for Cloud
  • Collect security-related events in Microsoft Sentinel
  • Automate tasks using PowerShell and Python
  • Use Change Tracking and Inventory to assess configuration changes in installed software and operating system changes such as registry or services
  • Manage operating system updates
  • Monitor system performance using Azure Monitor and and collect data which can be stored in a Log Analytics Workspace.
  • Assign policy baselines using Azure Policy to report on compliance of these connected servers.

Conclusion

We can see how useful Azure Arc can be in gaining oversight on all of your resources that are spread across multiple Cloud providers and On Premise environments. You can check out the links provided above for a full list of capabilities, or else this excellent post by Thomas Maurer is a great starting point in your Azure Arc leaning journey.

Hope you enjoyed this post, until next time!

100 Days of Cloud – Day 43: Azure JIT VM Access using Microsoft Defender for Cloud

Its Day 43 of my 100 Days of Cloud Journey, and today I’m looking at Just-In-Time (JIT) VM access and how it can provide further security for your VMs.

JIT is part of Microsoft Defender for Cloud – during the Autumn Ignite 2021, it was announced that Azure Security Center and Azure Defender would be rebranded as Microsoft Defender for Cloud.

There are 3 important points you need to know before configuring JIT:

  • JIT does not support VMs protected by Azure Firewalls which are controlled by Azure Firewall Manager (at time of writing). You must use Rules and cannot use Firewall policies.
  • JIT only supports VMs that have deployed using Azure Resource Manager – Classic deployments are not supported.
  • You need to have Defender for Servers enabled in your subscription.

JIT enables you to lock down inbound traffic to your Azure VMs, which reduces exposure to attacks while also providing easy access if you need to connect to a VM.

Defender for Cloud uses the following flow to decide how to categorize VMs:

Just-in-time (JIT) virtual machine (VM) logic flow.
Image Credit: Microsoft

Once Defender for Cloud finds a VM that can benefit from JIT, its add the VM to the “Unhealthy resources” tab under Recommendations:

Just-in-time (JIT) virtual machine (VM) access recommendation.
Image Credit: Microsoft

You can use the steps below to enable JIT:

  • From the list of VMs displaying on the Unhealthy resources tab, select any that you want to enable for JIT, and then select Remediate.
    • On the JIT VM access configuration blade, for each of the ports listed:
      • Select and configure the port using one of the following ports:
        • 22
        • 3389
        • 5985
        • 5986
      • Configure the protocol Port, which is the protocol number.
      • Configure the Protocol:
        • Any
        • TCP
        • UDP
      • Configure the Allowed source IPs by choosing between:
        • Per request
        • Classless Interdomain Routing (CIDR) block
      • Choose the Max request time. The default duration is 3 hours.
    • If you made changes, select OK.
    • When you’ve finished configuring all ports, select Save.

When a user requests access to a VM, Defender for Cloud checks if the user has the correct Azure RBAC permissions for the VM. If approved, Defender for Cloud configures the Azure Firewall and Network Security Groups with the specified ports in order to give the user access for the time period requested, and from the source IP that the user makes the request from.

You can request this access through either Defender for Cloud, the Virtual Machine blade in the Azure Portal, or by using PowerShell or REST API. You can also audit JIT VM access in Defender for Cloud.

For a full understanding of JIT and its benefits, you can check out this article, and also this article shows how to manage JIT VM access. To test out JIT yourself, this link brings you to the official Microsoft Learn exercise to create a VM and enable JIT.

Hope you enjoyed this post, until next time!

100 Days of Cloud – Day 42: Azure Bastion

Its Day 42 of my 100 Days of Cloud Journey, and today I’m taking a look at Azure Bastion.

Azure Bastion is a PaaS VM that you provision inside your virtual network, providing secure and seamless RDP or SSH connectivity to your IAAS VMs directly from the Azure portal over TLS. When you connect via Azure Bastion, your virtual machines do not need a public IP address, agent, or special client software.

We saw in previous posts that when we create a VM in Azure, it automatically creates a Public IP Address, access to which we then need to control using Network Security Groups. Azure Bastion does away with the need for controlling access – all you need to do is create rules to allow RDP/SSH access from the subnet where Bastion is deployed to the subnet where your IAAS VMs are deployed.

Deployment

Image Credit – Microsoft
  • We can see in the diagram a typical Azure Bastion deployment. In this diagram:
    • The bastion host is deployed in the VNet.
      • Note – The protected VMs and the bastion host are connected to the same VNet, although in different subnets.
    • A user connects to the Azure portal using any HTML5 browser over TLS.
    • The user selects the VM to connect to.
    • The RDP/SSH session opens in the browser.
  • To deploy an Azure Bastion host by using the Azure portal, start by creating a subnet in the appropriate VNet. This subnet must:
    • Be named AzureBastionSubnet
    • Have a prefix of at least /27
    • Be in the VNet you intend to protect with Azure Bastion

Cross-VNET Connectivity

Bastion can also take advantage of VNET Peering rules in order to connect to VMs in Multiple VNETs that are peered with the VNET where the Bastion host is located. This negates the need for having multiple Bastion hosts deployed in all of your VNETs. This works best in a “Hub and Spoke” configuration, where the Bastion is the Hub and the peered VNETs are the spokes. The diagram below shows how this would work:

Design and Architecture diagram
Image Credit – Microsoft
  • To connect to a VM through Azure Bastion, you’ll require:
    • Reader role on the VM.
    • Reader role on the network information center (NIC) with the private IP of the VM.
    • Reader role on the Azure Bastion resource.
    • The VM to support an inbound connection over TCP port 3389 (RDP).
    • Reader role on the virtual network (for peered virtual networks).

Security

One of the key benefits of Azure Bastion is that its a PAAS Service – this means it is managed and hardened by the Azure Platform and protects againsts zero-day exploits. Because your IAAS VMs are not exposed to the Internet via a Public IP Address, your VMs are protected against port scanning by rogue and malicious users located outside your virtual network.

Conclusion

We can see how useful Bastion can be in protecting our IAAS Resources. You can run through a deployment of Azure Bastion using the “How-to” guides on Microsoft Docs, which you will find here.

Hope you enjoyed this post, until next time!