Monitoring with Grafana and InfluxDB using Docker Containers — Part 4: Install and Use Telegraf with PowerShell, send data to InfluxDB, and get the Dashboard working!

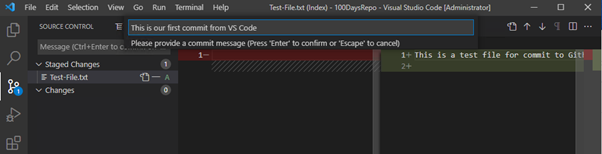
This post originally appeared on Medium on May 14th 2021

Welcome to Part 4 and the final part of my series on setting up Monitoring for your Infrastructure using Grafana and InfluxDB.

This image has an empty alt attribute; its file name is 0*gj-SHaUJ-slesruN

Last time, we set up InfluxDB as our Datasource for the data and metrics we’re going to use in Grafana. We also download the JSON for our Dashboard from the Grafana Dashboards Site and import this into Grafana instance. This finished off the groundwork of getting our Monitoring System built and ready for use.

In the final part, I’ll show you how to install the Telegraf Data collector agent on our WSUS Server. I’ll then configure the telgraf.conf file to query a PowerShell script, which will in turn send all collected metrics back to our InfluxDB instance. Finally, I’ll show you how to get the data from InfluxDB to display in our Dashboard.

Telegraf Install and Configuration on Windows

Telegraf is a plugin-driven server agent for collecting and sending metrics and events from databases, systems, and IoT sensors. It can be downloaded directly from the InfluxData website, and comes in version for all OS’s (OS X, Ubuntu/Debian, RHEL/CentOS, Windows). There is also a Docker image available for each version!

To download for Windows, we use the following command in Powershell:

wget https://dl.influxdata.com/telegraf/releases/telegraf-1.18.2_windows_amd64.zip -UseBasicParsing -OutFile telegraf-1.18.2_windows_amd64.zip

This downloads the file locally, you then use this command to extract the archive to the default destination:

Expand-Archive .\telegraf-1.18.2_windows_amd64.zip -DestinationPath 'C:\Program Files\InfluxData\telegraf\'

Once the archive gets extracted, we have 2 files in the folder: telegraf.exe, and telegraf.conf:

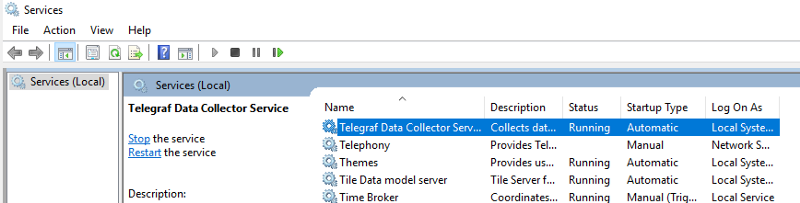
Telegraf.exe is the Data Collector Service file and is natively supported running as a Windows Service. To install the service, run the following command from PowerShell:

C:\"Program Files"\InfluxData\Telegraf\Telegraf-1.18.2\telegraf.exe --service install

This will install the Telegraf Service, as shown here under services.msc:

Telegraf.conf is the parameter file, and telegraf.conf reads that to see what metrics it needs to collect and send to the specified destination. The download I did above contains a template telegraf.conf file which will return the recommended Windows system metrics.

To test that the telgraf is working, we’ll run this command from the directory where telegraf.exe is located:

.\telegraf.exe --config telegraf.conf --test

As we can see, this is running telgraf.exe and specifying telgraf.conf as its config file. This will return this output:

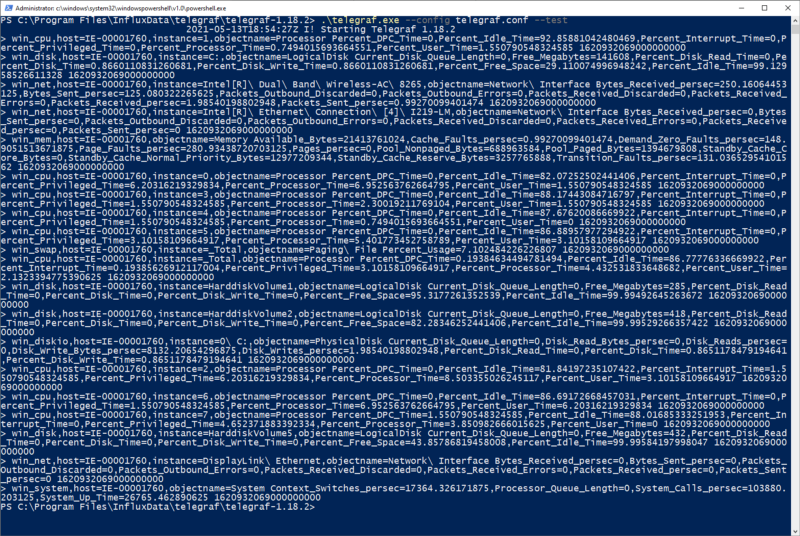
This shows that telegraf can collect data from the system and is working correctly. Lets get it set up now to point at our InfluxDB. To do this, we open our telgraf.conf file and go to the [[outputs.influxdb]] section where we add this info:

[[outputs.influxdb]]
urls = ["http://10.210.239.186:8086"] 
database = "telegraf"
precision = "s"
timeout = "10s"

This is specifying the url/port and database where we want to send the data to. This is the basic setup for telegraf.exe, next up I’ll get it working with our PowerShell script so we can send our WSUS Metrics into InfluxDB.

Using Telegraf with PowerShell

As a prerequisite, we’ll need to install the PoshWSUS Module on our WSUS Server, which can be downloaded from here.

Once this is installed, we can download our WSUS PowerShell script. The link to the script can be found here. If we look at the script, its going to do the following:

  • Get a count of all machines per OS Version
  • Get the number of updates pending for the WSUS Server
  • Get a count of machines that need updates, have failed updates, or need a reboot
  • Return all of the above data to the telegraf data collector agent, which will send it to the InfluxDB.

Before doing any integration with Telegraf, modify the script to your needs using PowerShell ISE (on line 26, you need to specify the FQDN of your own WSUS Server), and then run the script to make sure it returns the data you expect. The result will look something like this

This tells us that the script works. Now we can integrate the script into our telegraf.conf file. Underneath the “Inputs” section of the file, add the following lines:

####################################################################
# INPUTS #
####################################################################
[[inputs.exec]]
commands = ["powershell C:/temp/wsus-stats.ps1"]
name_override = "wsusstats"
interval = "300s"
timeout = "300s"
data_format = "influx"

This is telling our telegraf.exe service to call PowerShell to run our script at an interval of 300 seconds, and return the data in “influx” format.

Now once we save the changes, we can test our telegraf.conf file again to see if it returns the data from the PowerShell script as well as the default Windows metrics. Again, we run:

.\telegraf.exe --config telegraf.conf --test

And this time, we should see the WSUS results as well as the Windows Metrics:

And we do! Great, and at this point, we can now change our Telegraf Service that we installed earlier to “Running” by running this command:

net start telegraf

Now that we have this done, lets get back into Grafana and see if we can get some of this data to show in the Dashboard!

Configuring Dashboards

In the last post, we imported our blank dashboard using our json file.

Now that we have our Telegraf Agent and PowerShell script working and sending data back to InfluxDB, we can now start configuring the panels on our dashboard to show some data.

For each of the panels on our dashboard, clicking on the title at the top reveals a dropdown list of actions.

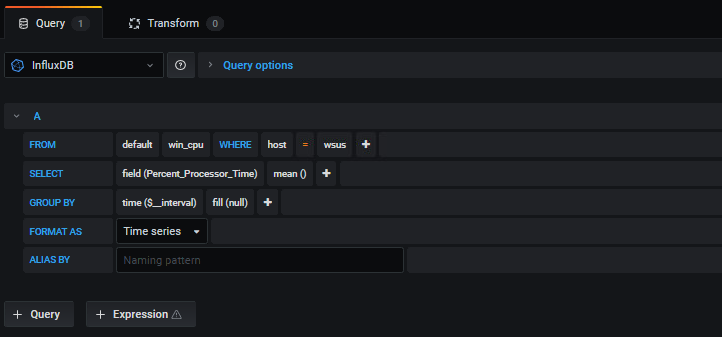
As you can see, there are a number of actions you can take (including removing a panel if you don’t need it), however we’re going to click on “Edit”. This brings us into a view where we get access to modify the properties of the Query, and also can modify some Dashboard settings including the Title and color’s to show based on the data that is being returned:

The most important thing for use in this screen is the query

As you can see, in the “FROM” portion of the query, you can change the values for “host” to match the hostname of your server. Also, from the “SELECT” portion, you can change the field() to match the data that you need to have represented on your panel. If we take a look at this field and click, it brings us a dropdown:

Remember where these values came from? These are the values that we defined in our PowerShell script above. When we select the value we want to display, we click “Apply” at the top right of the screen to save the value and return to the Main Dashboard:

And there’s our value displayed! Lets take a look at one of the default Windows OS Metrics as well, such as CPU Usage. For this panel, you just need to select the “host” where you want the data to be displayed from:

And as we can see, its gets displayed:

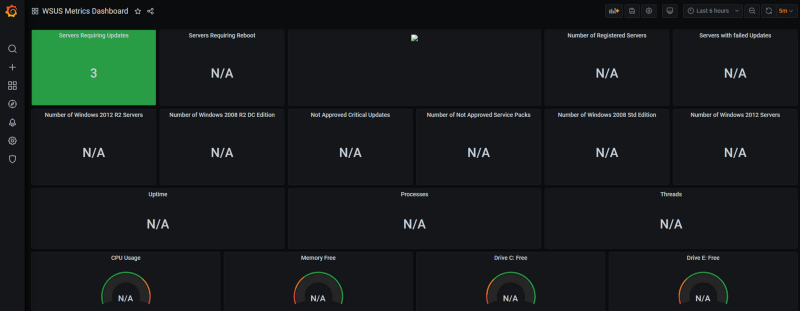
There’s a bit of work to do in order to get the dashboard to display all of the values on each panel, but eventually you’ll end up with something looking like this:

As you can see, the data on the graph panels is timed (as this is a time series database), and you can adjust the times shown on the screen by using the time period selector at the top right of the Dashboard:

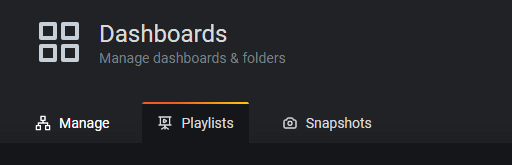
The final thing I’ll show you is if you have multiple Dashboards that you are looking to display on a screen, Grafana can do this by using the “Playlists” option under Dashboards.

You can also create Alerts to go to multiple sources such as Email, Teams Discord, Slack, Hangouts, PagerDuty or a webhook.

Conclusion

As you have seen over this post, Grafana is a powerful and useful tool for visualizing data. The reason for using this is conjunction with InfluxDB and Telegraf is that it had native support for Windows which was what we needed to monitor.

You can use multiple data sources (eg Prometheus, Zabbix) within the same Grafana instance depending on what data you want to visualize and display. The Grafana Dashboards site has thousands of community and official Dashboards for multiple systems such as AWS, Azure, Kubernetes etc.

While Grafana is a wonderful tool, its should be used as part of your monitoring infrastructure. Dashboards provide a great “birds-eye” view of the status of your Infrastructure, but you should use these in conjunction with other tools and processes, such as using alerts to generate tickets or self-healing alerts based on thresholds.

Thanks again for reading, I hope you have enjoyed the series and I’ll see you on the next one!

100 Days of Cloud – Day 40: Linux Cloud Engineer Bootcamp, Day 3


Its Day 40 of my 100 Days of Cloud Journey, and today I’m back taking Day 3 of the Cloudskills.io Linux Cloud Engineer Bootcamp

This image has an empty alt attribute; its file name is image-11.png

This is being run over 4 Fridays by Mike Pfieffer and the folks over at Cloudskills.io, and is focused on the following topics:

  • Scripting
  • Administration
  • Networking
  • Web Hosting
  • Containers

If you recall, on Day 26 I did Day 1 of the bootcamp, and completed Day 2 on Day 33 after coming back from my AWS studies. Having completed my Terraform learning journey for now, I’m back to look at Day 3.

The bootcamp livestream started on November 12th, continued on Friday November 19th and December 3rd, and completed on December 10th. So I’m a wee bit behind! However, you can sign up for this at any time to watch the lectures to your own pace (which I’m doing here) and get access to the Lab Exercises on demand at this link:

https://cloudskills.io/courses/linux

Week 3 consisted of Mike going through the steps to create a website hosted on Azure using the LAMP Stack:

A stack of Lamps

No, not that type of lamp stack. I had heard the LAMP Stack before but never really paid much attention to it because in reality, it sounded too much like programming and web development to me. The LAMP Stack refers to the following:

  • L – Linux Operating System
  • A – Apache Web Server
  • M -MySQL Database
  • P – PHP

The LAMP Stack is used in some of the most popular websites in used on the internet today, as its an OpenSource and low cost alternative to commercial software packages.

At the time of writing this post, the world is in the grip of responding to the Log4j vulnerability, so the word “Apache” might scream out to you as something that we shouldn’t be doing. Follow the advice from your software or hardware vendor, and patch as much as you can and as quickly as you can. There is an excellent GitHub Repository here with full details and updates from all major vendors, its a good one to bookmark to check and see if you or your Customers infrastructure may be affected.

The alternative to the LAMP Stack is the MEAN Stack (I could go for another funny meme here but that would be too predicatable!). MEAN stands for:

  • M – MongoDB (data storage)
  • E – Express.js (server-side application framework)
  • A – AngularJS (client-side application framework)
  • N – Node.js (server-side language environment although Express implies Node.js)

Different components, but still open source so essentially trying to achieve the same thing. There is a Microsoft Learn path covering Linux on Azure, which contains a full module on building and running a Web Application with the MEAN Stack on an Azure Linux VM – this is well worth a look.

Conclusion

That’s all for this post – I’ll update as I go through the remaining weeks of the Bootcamp, but to learn more and go through the full content of lectures and labs, sign up at the link above.

I’ll leave you with a quote I heard during the bootcamp that came from the AWS re:Invent 2021 conference – every day there are 60 million EC2 instances spun up around the world. Thats 60 million VMs! And if we look at the Global Market Share across the Cloud providers, AWS has approx 32%. Azure has 21%, GCP has 8%, leaving the rest with 39%. So its safe to say over 100 million VMs daily across the world. It means VMs are still pretty important despite the push to go serverless.

Hope you enjoyed this post, until next time!

100 Days of Cloud — Day 1: Preparing the Environment

Welcome to Day 1 of my 100 Days of Cloud Journey.

I’ve always believed that good preparation is the key to success, and Day 1 is going to be about setting up the environment for use.

I’ve decided to split my 100 days across 3 disciplines:

  • Azure, because it’s what I know
  • AWS, because its what I want to know more about
  • And the rest of it …. This could mean anything: GitOps, CI/CD, Python, Ansible, Terraform, and maybe even a bit of Google Cloud thrown in for good measure. There might even be some Office365 Stuff!

It’s not exactly going to be an exact 3-way split across the disciplines, but let’s see how it goes.

Let’s start the prep. The goal of the 100 Days for me is to try and show how things can be done/created/deleted/modified etc. using both GUI and Command Line. For the former, we’ll be going what it says on the tin and go clicking around the screen of whatever Cloud Portal we are using. For the latter, it’s going to be done in Visual Studio Code:

To download, we go to https://code.visualstudio.com/download , and choose to download the System Installer:

Once the download completes, run the installer (Select all options). Once it completes, launch Visual Studio Code:

After selecting what color theme you want, the first place to go is click on the Source Control button. This is important, we’re going to use Source Control to manage and track any changes we make, while also storing our code centrally in GitHub. You’ll need a GitHub account (or if you’re using Azure GitOps or AWS Code Commit, you can use this instead). For the duration of the 100 Days, I’ll be using GitHub. Once your account is created, you can create a new repository (I’m calling mine 100DaysRepo)

So now, let’s click on the “install git” option. This will redirect us to https://git-scm.com, where we can download the Git installer. When running the setup, we can do defaults for everything EXCEPT this screen, where we say we want Git to use Visual Studio Code as its default editor:

Once the Git install is complete, close and re-open Visual Studio Code. Now, we see we have the option to “Open Folder” or “Clone Repository”. Click the latter option, at the top of the screen we are prompted to provide the URL of the GitHub Repository we just created. Enter the URL, and click “Clone from GitHub”:

We get a prompt to say the extension wants to sign into GitHub — click “Allow”:

Clicking “Allow” redirects us to this page, click “Continue”:

This brings us to the logon prompt for GitHub:

This brings up “Success” message and an Auth Token:

Click on the “Signing in to github.com” message at the bottom of the screen, and then Paste the token from the screen above into the “Uri” at the top:

Once this is done, you will be prompted to select the local location to clone the Repository to. Once this has completed, click “Open Folder” and browse to the local location of the repository to open the repository in Visual Studio Code.

Now, let’s create a new file. It can be anything, we just want to test the commit and make sure it’s working. So let’s click on “File-New File”. Put some text in (it can be anything) and then save the file with whatever name you choose:

My file is now saved. And we can see that we now have an alert over in Source Control:

When we go to Source Control, we see the file is under “Changes”. Right-click on the file for options:

We can choose to do the following:

– Discard Changes — reverts to previous saved state

– Stage Changes — saves a copy in preparation for commit

When we click “Stage Changes”, we can see the file moves from “Changes” to “Staged Changes”. If we click on the file, we can see the editor brings up the file in both states — before and after changes:

From here, click on the menu option (3 dots), and click “Commit”. We can also use the tick mark to Commit:

This then prompts to provide a commit message. Enter something relevant to the changes you’ve made here and hit enter:

And it fails!!!

OK, so we need to configure a Name and Email ID in GitBash. So open GitBash and run the following:

git config — global user.name “your_name”
git config — global user.email “your_email_id”

So let’s try that again. We’ll commit first:

Looks better, so now we’ll do a Push:

And check to see if our file is in VS Code? Yes it is!

OK, so that’s our Repository done and Source Control and cloning with GitHub configured.

That’s the end of Day 1! As we progress along the journey and as we need them, I’ll add some Visual Studio Code extensions which will give us invaluable help along the journey. You can browse these by clicking on the “Extensions” button on the right:

Extensions add languages, tools and debuggers to VS Code which auto-recognize file types and code to enhance the experience.

Hope you enjoyed this post, until next time!!