
Its Day 87 of my 100 Days of Cloud journey and as promised, in todays post I’m going to install and configure Kubernetes locally using Minikube.
In the last post, we listed out all of the components that make up Kubernetes, tools used to manage the environment and also some considerations you need to be aware of when using Kubernetes.
Local Kubernetes – Minikube
We’re going to install Minikube on my Windows Laptop, however you can also install for both Linux and MacOS if thats your preference. These are the requirements to install Minikube:
- 2 CPUs or more
- 2GB of free memory
- 20GB of free disk space
- Internet connection
- Container or virtual machine manager, such as: Docker, Hyperkit, Hyper-V, KVM, Parallels, Podman, VirtualBox, or VMware Fusion/Workstation
So we download the latest stable release of Minikube from here. The installer is a simple install, and will display this screen once completed:

Now, we run an administrative PowerShell session, and run minikube start in order to start our cluster. Note that because I’m running on this on Windows 10, minikube automatically tried to create the cluster in Hyper-V. Therefore, I needed to run minikube start --driver=docker in order to force minikube to use docker to create the cluster.
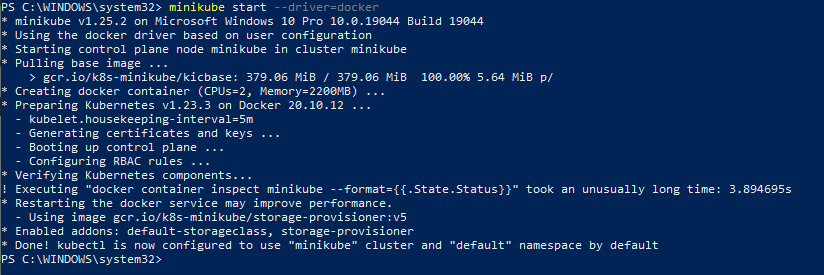
So we can see from the output above that the cluster has been created successfully. And the eagle-eyed will also notice that we are using Kubernetes version 1.23.3, which is not the latest version. This is because Kubernetes no longer supports Docker as of version 1.24. Full support will be provided up to April 2023 for all versions up to 1.23 that run Docker. I’ve decided to base this build around Docker as I know it, but you can read more about the changes here and how they affect existing deployments here.
So we move on, and the first thing we need to do is install kubectl. You can download this directly by running minikube kubectl -- get po -A which will go off and install the appropriate version for your OS.

We can see that this has listed all of the Cluster services. We can also run minikube dashboard to launch a graphical view of all aspects of our Cluster:


Now that we’re up and running, lets do a sample webserver deployment. So we run the following commands (as we can see, the image is coming from gcr.io which is the Google Container Registry):
kubectl create deployment hello-minikube --image=k8s.gcr.io/echoserver:1.4
kubectl expose deployment hello-minikube --type=NodePort --port=8080

Now lets run kubectl get services hello-minikube to check if the deployment is running:

And if we now look in the Dashboard, we can see that the deployment is running:

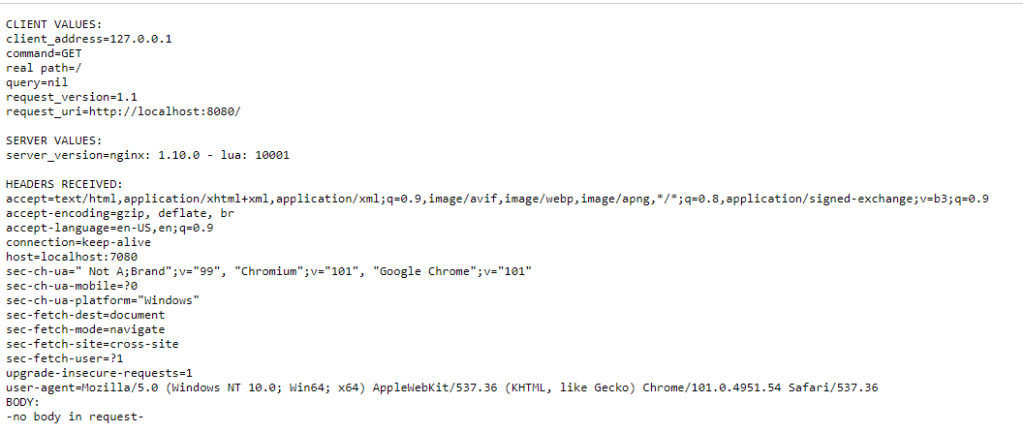
Now we can use kubectl port-forward service/hello-minikube 7080:8080 to expose the service on http://localhost:7080/, and when we browse to that we can see the metadata values returned:
And thats effectively it – your local cluster is running. You can try running another image from the Google Container Registry also, the full list of images can be found at the link here.
There are also a number of useful commands listed below that are useful to know when running minikube:
minikube pause – Pause Kubernetes without impacting deployed applicationsminikube unpause – Unpause a paused instanceminikube stop – Halt the clusterminikube config set memory 16384 – Increase the default memory limit (requires a restart)minikube addons list – Browse the catalog of easily installed Kubernetes servicesminikube start -p aged --kubernetes-version=v1.16.1 – Create a second cluster running an older Kubernetes release (this is potentially useful given Docker is no longer supported)minikube delete --all – Delete all of the minikube clusters
You can find all of the information you need on Minikube including documentation and tutorials here at the official site.
Conclusion
So thats how we can run Kubernetes locally using Minikube. Slight change of plan, I’m going to do the Azure Kubernetes Service install in the next post, as we’ll go in-depth with that and look at the differences in architecture between running Kubernetes locally and in a Cloud Service.
Hope you enjoyed this post, until next time!

One thought on “100 Days of Cloud – Day 87: Installing and Configuring Kubernetes”