
Its Day 93 of my 100 Days of Cloud journey and in todays post we’ll take a quick look at both FSLogix and creating your own Custom Images for your Azure Virtual Desktop environment!

So after yesterdays disappointing end to the demo build of the AVD environment, I’ve decided to tear down the entire environment and start again from scratch in the hope of finding either the solution or where I went wrong in the process.
I’ll update the Day 92 post and update my social channels once that happens, but for now lets move on to look at 2 of the more interesting concepts of Azure Virtual Desktop, and we’ll kick off with FSLogix.
FSLogix Overview
In its simplest form, FSLogix is designed to abstract the user profile from the underying operating system and provide roaming profiles in Azure Virtual Desktop and other remote computing environments. Its stores the complete user profile in a single container that is dynamically attached to the Session Host at user sign-in.
A remote or roaming user profile provides an abstraction between user data and the operating system, and allows the operating system to be replaced or changed without affecting the user data. This may happen for the following reasons:
- An upgrade of the operating system
- A replacement of an existing Session Host
- A user being part of a pooled (non-persistent) AVD environment
So what is FSLogix – effectively its software that is installed on the Session Host to allow the profile data to be abstracted off to a file share that is hosted on an Azure Storage Account.
The steps involved in getting this set up are:
- Create Storage Account with Private Endpoint
- Create a File Share
- Enable Active Directory authentication on the Storage account
- Configure Storage account Access control (IAM)
- Configure NTFS rights on the Azure File Share
- Install FSLogix Profile Container in your WVD Host pool
- Configure FSLogix Profile Container via GPO
Robin Hobo has written an excellent blog post on the process for implementing FSLogix and you can find that here.
There are a few best practises that are recommended to follow when implementing Azure Storage Accounts and Azure Files for FSLogix Containers:
- Azure Files storage account must be in the same region as the session host VMs.
- Azure Files permissions should match permissions described in Requirements – Profile Containers.
- For optimal performance, the storage solution and the FSLogix profile container should be in the same data center location.
You can find full detail in the official FSLogix Documentation here.
Custom Images
For anyone who deploys images either on VDI or via SCCM or WSUS to Desktop/Laptop devices, a custom image is something that the majority of us have built on one platform or another over time.
The process is the same as its always been:
- Create a base image using a VM.
- Install all OS updates and require software.
- Sysprep the image to generalize it for multi-deployment use.
- Capture the image to your deployment software.
Creating a Custom Image for Azure Virtual Desktop is no different to the above, except for a few additional steps using a really cool script available on GitHub.
So the steps are as follows:
- Create your VM in the Azure Portal – make sure the OS is Windows 10/11 Enterprise multi-session.
- RDP to the VM and run all of your Windows Updates.
- Now this is where things get interesting and cool! Shawn Meyer has created a customization script with a UI that allows you to quickly install the required applications, along with necessary policies and settings for and optimized user experience. The script and supporting folders can be downloaded via this link.
- Once this is downloaded, extract the Customizations.Zip file, and then run
.\Prepare-WVDImage.ps1 -DisplayFormwhich will display this:
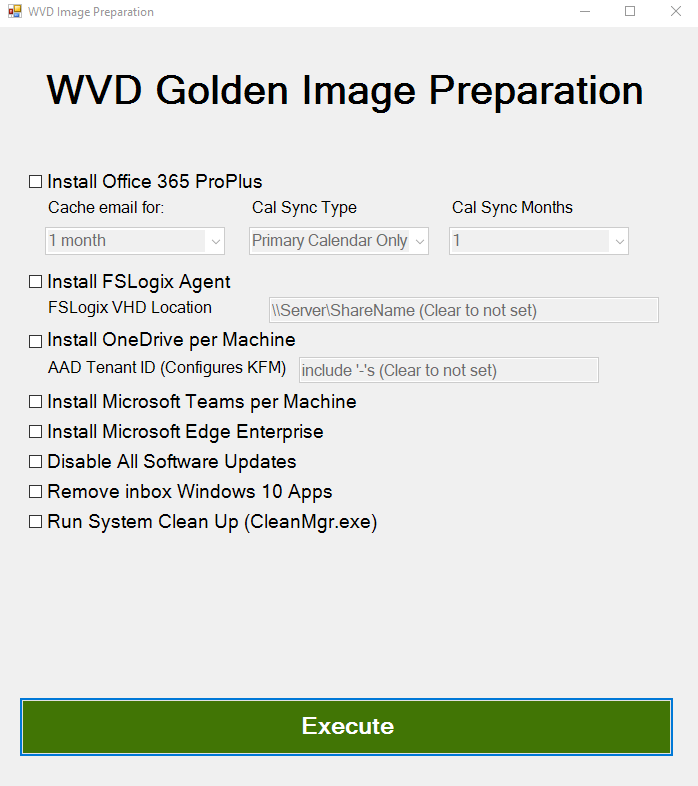
- As we can see, this contains all that we need to prepare our image. When you select your desired options and click “Execute”, this will run a PowerShell script.
- Once the script completes, you can now run Sysprep to generalize the image. The command to run is
sysprep.exe /oobe /generalize /shutdown. - Once the sysprep is complete, go back to the VM in the Portal, ensure it is stopped, and then click “Capture”

- Ensure that the option “No, capture only a managed image” is selected, and this will create the image.
Now, when you go to create the Session Hosts in your Host Pool, you will have the option to select your image from the Gallery and browse to select the Custom Image you have just created.

Conclusion
So thats a brief rundown of how FSLogix works and also how you can create your own Custom Images for your Azure Virtual Desktop Session Hosts.
Hope you enjoyed this post, until next time!

One thought on “100 Days of Cloud – Day 93: Azure Virtual Desktop – FSLogix and Custom Images”