Azure Container Hosting – which service should you use?

Its Christmas time, and that means its time for another month of the always fantastic Festive Tech Calendar. This was one of the first events that I participated in when I was trying to break into blogging and public speaking and I’m delighted to be involved again this year.

This year, the team are raising funds for Beatson Cancer Charity who raise funds to transform the way cancer care is funded and delivered by funding specialists, research and education to invest in a better future for cancer patients. You can make donations via the Just Giving page.

In this post, I’ll walk through the extensive list of Container hosting options that are available on Azure. I’ll take a look at the Azure-native offerings, include some third-party platforms that run on Azure, and then compare them on performance, scalability, costs, and service limits.

What counts as “Container Hosting” on Azure?

For this post I’m treating a “container hosting option” as:

A service where you can run your own Docker images as workloads, with Azure (or a partner) running the infrastructure.

There are an extensive list of options (and I will exclude a few off the list below, but the main “go-to” options that I’ve seen in architecture discussions are:

  • Azure Container Apps
  • Azure Kubernetes Service (AKS)
  • Azure Container Instances (ACI)
  • Azure App Service (Web Apps for Containers)
  • Azure Service Fabric (with containers)
  • Azure Red Hat OpenShift (ARO) – OpenShift on Azure
  • Kubernetes platforms on Azure VMs or Azure VMware Solution (VMware Tanzu, Rancher, etc.)

But what about the humble reliable Virtual Machine?

OK yes, its still out there as an option – the Virtual Machine with Docker installed to run containers. And its the place where most of us have started on this journey (you can check out a blog series I wrote a few years ago here on the subject of getting started with running Docker on VM’s).

There are still some situations where you will see a need for Virtual Machines to run containers, but as we’ll see in the options below, this has been superseded by the range of offerings available on Azure who can run containers from single instances right up to enterprise level offerings.

Azure Container Instances (ACI)

Lets start with the smallest available form of hosting which is Azure Container Instances. ACI is the “run a container right now without VMs or an orchestrator” service – there are no virtual machines or orchestrators to manage, and containers start within seconds on Azure’s infrastructure. ACI provides a single container or small group of containers (called a container group) on-demand. This simplicity makes it essentially “containers-as-a-service”.

You can run a container by issuing a single Azure CLI command. It’s completely managed by Azure: patching, underlying host OS, and other maintenance are invisible to the user. ACI also supports both Linux and Windows containers.

Its great for short-lived tasks and simple container groups, good examples of this would be Cron-style jobs, build workers, data processing pipelines, and dev/test experiments where you just want a container to run for a bit and then disappear.

Azure App Service (Web Apps for Containers)

Azure App Service (Web App for Containers) is a Platform-as-a-Service offering that lets you deploy web applications or APIs packaged as Docker containers, without managing the underlying servers.

This uses all of the features that you would normally see with App Service – you get deployment slots, auto-scaling, traffic routing, and integrated monitoring with Azure Monitor. The benefit of this is that it abstracts away the container management and focuses on developer productivity for web applications.

The use case of using App Service is the familiarity with the product. Its gives you predictable, reserved capacity and can be used to host HTTP APIs or websites where you don’t want to have the overhead of using Kubernetes, but want to utilise features like deployment slots, built-in auth, easy custom domains, built-in backup & integration.

Azure Container Apps

Azure Container Apps is a fully managed container execution environment, designed specifically for microservices, APIs, and event-driven processing.

It abstracts away the Kubernetes infrastructure and provides a serverless experience for running containers – meaning you can run many containers that automatically scale in response to demand and even scale down to zero when idle.

Container Apps sits on top of Kubernetes (it runs on Azure’s internal K8s with open technologies like KEDA, Dapr, and Envoy) but as a developer you do not directly interact with Kubernetes objects. Instead, you define Container Apps and Azure handles placement, scaling, and routing.

Container Apps is an ideal place for running Microservices, APIs and event-driven jobs where you don’t want to manage Kubernetes, and want to scale-to-zero and only pay when there’s traffic. Its a nice “middle ground” between App Service and full AKS.

Azure Kubernetes Service (AKS)

We’re finally getting to the good stuff!!

Image Source – Microsoft

Azure Kubernetes Service (AKS) is Azure’s flagship container orchestration service, offering a fully managed Kubernetes cluster.

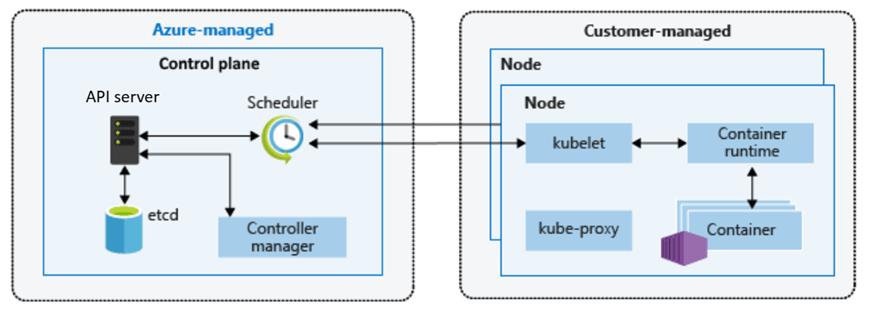
With AKS, you get the standard open-source Kubernetes experience (API, kubectl, and all) without having to run your own Kubernetes control plane – Azure manages the K8s master nodes (API servers, etc.) as a service.

You do manage the worker nodes (agent nodes) in terms of deciding their VM sizes, how many, and when to scale (though Azure can automate scaling).

In terms of ease-of-use, AKS has a steep learning curve if you’re new to containers, because Kubernetes itself is a complex system. Provisioning a cluster is quite easy (via Azure CLI or portal), but operating an AKS cluster effectively requires knowledge of Kubernetes concepts (pods, services, deployments, ingress controllers, config maps, etc.).

It’s less turn-key than the earlier services – you are stepping into the world of container orchestration with maximum flexibility. One of the main benefits of AKS is that it’s not an opinionated PaaS – it’s Kubernetes, so you can run any containerized workload with any configuration that Kubernetes allows.

Another reason for choosing AKS is that you can run it locally in your environment on an Azure Local cluster managed by Azure Arc.

The main reason for choosing AKS is running enterprise or large-scale workloads that need:

  • Full Kubernetes API control
  • Custom controllers, CRDs, service meshes, operators
  • Multi-tenant clusters or complex networking

If you’re already familiar with Kubernetes, this is usually the default choice.

Azure Red Hat OpenShift (ARO)

Azure Red Hat OpenShift (ARO) is a jointly managed offering by Microsoft and Red Hat that provides a fully managed OpenShift cluster on Azure.

OpenShift is Red Hat’s enterprise Kubernetes distribution that comes with additional tools and an opinionated setup (built on Kubernetes but including components for developers and operations). With ARO, Azure handles provisioning the OpenShift cluster (masters and workers) and critical management tasks, while Red Hat’s tooling is layered on top.

It’s a first-class Azure service, but under the covers, it’s Red Hat OpenShift Container Platform. In terms of ease-of-use: for teams already familiar with OpenShift, this is much easier than running OpenShift manually on Azure VMs. The service is managed, so tasks like patching the underlying OS, upgrading OpenShift versions, etc., are handled in coordination with Red Hat.

The use case for ARO comes down to whether you’re an OpenShift customer already, or need OpenShift’s enterprise features (built-in pipelines, operators, advanced multi-tenancy).

Azure Service Fabric

Service Fabric predates AKS and was Azure’s first container orchestrator. I’ve not seen this ever out in the wild but it deserves a mention here as its still available as a container hosting platform on Azure.

Its a mature distributed systems platform from Microsoft, used internally for many Azure services (e.g., SQL DB, Event Hubs). It can orchestrate containers as well as traditional processes (called “guest executables”) and also supports a unique microservices programming model with stateful services and actors where high-throughput is required.

I’m not going to dive too deep into this topic, but the use case for this really is if you already have significant investment in Service Fabric APIs.

Third-party Kubernetes & container platforms on Azure

Beyond the native services above, you can also run a variety of third-party platforms on Azure:

  • Kubernetes distributions on Azure VMs: VMware Tanzu Kubernetes Grid, Rancher, Canonical Kubernetes, etc., deployed directly onto Azure VMs.
  • Azure VMware Solution + Tanzu: run vSphere with Tanzu or Tanzu Kubernetes Grid on Azure VMware Solution (AVS) and integrate with Azure native services.

There are a number of reasons for ignoring the native Azure services and going for a “self-managed” model:

  • If you need a feature that AKS/ARO doesn’t provide (e.g., custom Kubernetes version or different orchestrator, or multi-cloud control plane).
  • If you want to avoid cloud vendor lock-in at the orchestration layer (some companies choose BYO Kubernetes to not depend on AKS specifics).
  • If your organization already invested in those tools (e.g., they use Rancher to manage clusters across AWS, on-prem and also want to include Azure).
  • If you have an on-prem extension scenario: e.g., using VMware Tanzu in private cloud and replicating environment in Azure via AVS to have consistency and easy migration of workloads.
  • Or if you require extreme custom control: e.g., specialized network plugins or kernel settings that AKS might not allow.

Comparison Summary

Lets take a quick comparison summary where you can see at a glance the ease of use, hosting, cost model and use cases of each service:

OptionEase of UseHosting ModelCost ModelBest For
Azure Container InstancesVery High Serverless Pay per second of CPU/Memory, no idle cost.Quick tasks, burst workloads, dev/test, simple APIs.
Azure App Service High PaaSFixed cost per VM instance (scaled-out). Always-on cost (one or more instances).Web apps & APIs needing zero cluster mgmt, CI/CD integration, and auto-scaling.
Azure Container AppsModerate ServerlessPay for resources per execution (consumption model) + optional reserved capacity. Idle = zero cost.Microservice architectures, event-driven processing, varying workloads where automatic scale and cost-efficiency are key.
Azure Kubernetes Service (AKS)Low (for beginners).  Moderate (for K8s proficient teams).Managed Kubernetes (IaaS+PaaS mix)Pay for VMs (nodes) only. Control plane free (standard tier) Complex, large, or custom container deployments
Azure Red Hat OpenShift (ARO)Moderate/Low – easy for OpenShift experts, but more complex than AKS for pure K8s users. Managed OpenShift (enterprise K8s)Pay for VMs + Red Hat surcharge. Higher baseline cost than AKS.Organizations requiring OpenShift’s features (built-in CI, catalog, stricter multi-tenancy) or who have OpenShift on-prem and want cloud parity.
Azure Service FabricLow – steep learning curve IaaS (user-managed VMs) with PaaS runtimePay for VMs No automatic scaling – you manage cluster size.Stateful, low-latency microservices, or mixed workloads (containers + processes). Teams already leveraging SF’s unique capabilities.

Conclusion

As we can see above, Azure offers a rich spectrum of container hosting options.
Serverless and PaaS options cover most workloads with minimal ops overhead, while managed Kubernetes and third-party platforms unlock maximum flexibility at higher complexity.

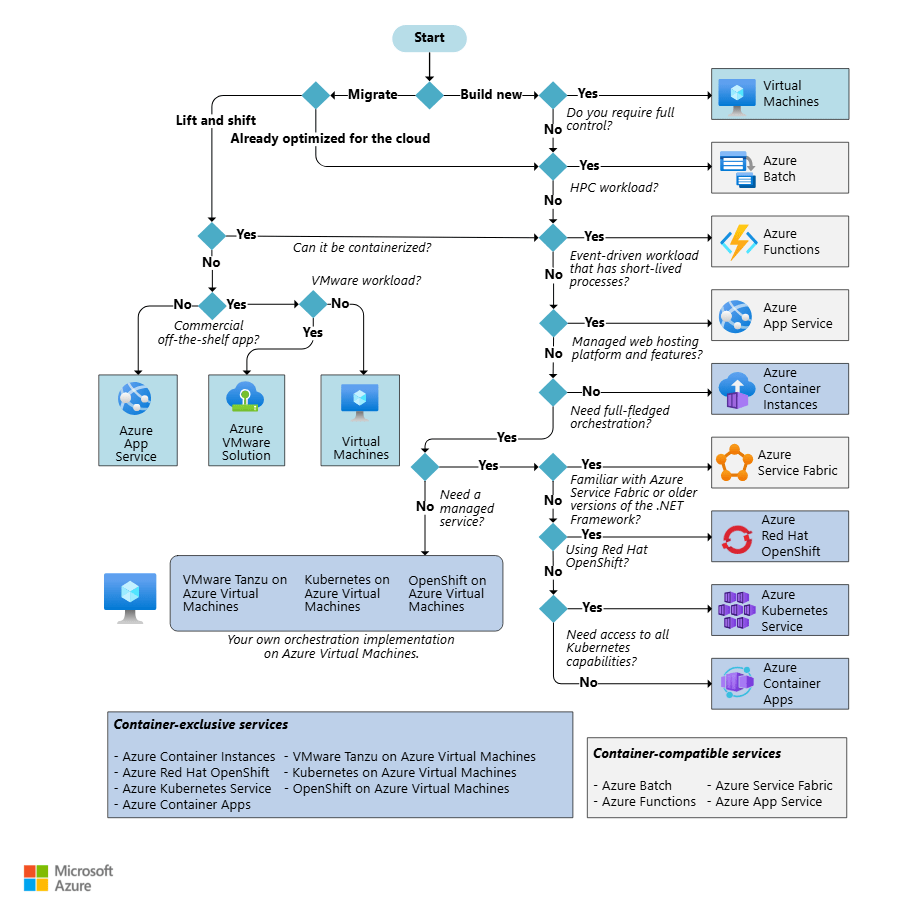
In my own opinion, the best way to go is to make the decision based on business needs and the core knowledge that exists within your team. Use managed and/or serverless options by default; move to Kubernetes only when needed.

You can use the decision tree shown below as an easy reference to make the decision based on the workload you wish to run.

Image Source – Microsoft

I hope this blog post was useful! For a deeper dive, you can find the official Microsoft guide for choosing a Container hosting service at this link.

100 Days of Cloud – Day 54: Azure App Service Advanced Settings

Its Day 54 of my 100 Days of Cloud journey, and today I’m going to attempt to understand and explain some of the Advanced Settings and Service Limits in Azure App Service.

In previous posts, we looked at the fundamentals of Azure App Service:

  • It can use multiple programming languages to run your Web Apps or Services.
  • Benefits of using App Service over on-premise hosting.
  • The various App Service plans available.
  • Manual or Automated deployment options using familiar tools.
  • Integrate directly with multiple providers for authentication.

We then looked at how to deploy a Web App using both the manual deployment method and automated deployment using GitHub actions.

Deployment Slots

Let take a look at the concept of deployment slots based on our Web App deployment. You want to make changes to your application, but want to ensure that it is full tested before publishing the changes into production. Because we are using the free tier, we only have the “production” instance available to us and our default URL was this:

https://myday53webapp.azurewebsites.net/

Upgrading our App Service plan to a Standard or Premium tier allows us to introduce separate deployment slots for testing changes to our Web App before publishing into Production. For reference, the following is the number of slots available in each plan:

  • Standard – 5 Slots
  • Premium – 20 Slots
  • Isolated – 20 Slots

We can upgrade our plan from the “Deployment Slots” menu within the Web App:

Based on the limits above, we could have slots for Production, Development and Testing for a single Web App. What this will do is create staging environments that have their own dedicated URLs in order for us to test the changes. So for example if we called our new slot “development”, we would get the following URL:

https://myday53webapp-development.azurewebsites.net/

Once we have our staging environment in place, we can now do our testing and avail of swap operations. This allows us to swap the production and development slots. In effect, this is exactly what happens – the old “production” slot becomes the “development” slot, and any changes that have been made in the development slot is pushed into production. The advantage of this approach is that if there are any errors found that were not discovered during testing, you can quickly roll back to the old version by performing another swap operation.

One of the other big advantages of slots is that you can route a portion of your production traffic to different slots. A good example of a use case for this would be to allow a portion of your users access to beta apps or features that have been published.

By default, new slots are given a 0% weighting, so if you wanted 10% of your users to access beta features that are in staging or development slots, you need to specify this on the Deployment Slots blade:

Scaling

There are 2 options for scaling and app in App Service:

  • Scale up – this is where more compute resources such as CPU, memory, disk space. We can see the options available for Scale up from the menu blade in our Web App in the portal:
  • Scale out – this increases the number of VM instances that run your app or service. As with Deployment Slots, there are maximum limits set on Scale out based on the pricing tier that is in use:
  • Free – Single shared instance, so no scaling
  • Standard – 10 Dedicated instances
  • Premium – 20 Dedicated instances
  • Isolated – 100 Dedicated instances

If using a Web App, we can also use autoscaling based on a number of criteria and triggers:

Enabling autoscale
The scale rule settings pane.

Full details can be found in this Microsoft Learn article. However, note that we must upgrade from the Free tier to use either manual or auto scaling options.

Conclusion

So thats an overview of Deployment Slots and Scaling options in Azure App Service. Hope you enjoyed this post, until next time!

100 Days of Cloud – Day 53: Deploy Web App using Azure App Service

Its Day 53 of my 100 Days of Cloud journey, and today I’m going to deploy a Web App using Azure App Service using both manual and automated deployment methods.

In the previous post, we looked at the fundamentals of Azure App Service:

  • It can use multiple programming languages to run your Web Apps or Services.
  • Benefits of using App Service over on-premise hosting.
  • The various App Service plans available.
  • Manual or Automated deployment options using familiar tools.
  • Integrate directly with multiple providers for authentication.

Manual Deployment

So with all the theory out of the way, lets dive in and deploy a Web App. We’ll start with the manual deployment method. Login to the Azure portal and open the Cloud Shell from the menu bar.

The location of Cloud Shell launch button.

After the shell opens be sure to select the Bash environment:

Next up, we need to create a htmlapp directory to store the files and code for our Web App:

Next, we’ll run this command in order to clone a sample Web App from the Azure Samples respository on GitHub, There are over two thousand code samples available in multiple languages, and you can browse the site here to find what you’re looking for.

git clone https://github.com/Azure-Samples/html-docs-hello-world.git

Now, change to the directory that contains the sample code and run the following command:

az webapp up --location <MyLocation> --name <MyAppName> --html

Replace <myLocation> with the Azure region that you want to deploy the Web App to, and <myAppName> with a name for your WebApp. So in my case, I’ll be running this command:

az webapp up --location northeurope --name MyDay53WebApp --html

Running this command does a number of things:

  • Creates a resource group
  • Creates an App Service Plan
  • Creates the Web App
  • Configures default logging for the app

We can see all of this info in the output from the command. We need to make a note of the Resource Group as we’ll need this later for both re-deployment and removal.

So now if we browse to the URL provided in the output:

We can see that the sample website is available. So now lets change the heading – from our bash shell we’ll run code index.html to open the editor.

We can see in Line 10 the title that we saw when we browsed to the site, and on line 19 the header at the top of the page. Lets change this to something different:

We use ctrl-s to save and ctrl-q to quit the editor. Now, we;ll run the same command we ran earlier to redeploy the Web App:

az webapp up --location northeurope --name MyDay53WebApp --html

As we can see from the command output, it detects that the WebApp name specified already exists so will deploy the new content to this app.

And now when we refresh the page, we see that both the header and the title have changed as expected:

Automated Deployment using GitHub

So now lets take a look at one of ways to automate deployment and update of our Web App – we’ll demonstrate this using GitHub.

The first thing we need to do it locate our sample Web App respository in GitHub. Once we locate this, we’ll click on the “Fork” button:

What this does is takes a copy of the repository into our own GitHub account, so now I can see it here:

Now we can use this repository in a CI/CD Deployment model where changes to the App are pushed into production every time we make changes to the code.

So back into the Azure Portal we go, and we need to locate our existing Web App, and click on “Deployment Center”. We can see there is warning that we are in the Production Slot – this is because we are using the Free Tier for this deployment – we’ll look at deployment slots in the next post. So we start by clicking on “Source*” to select the code source, and we select “GitHub”

Now, we need to Authorise Github as the provider:

And now we click “Authorize App Service”

Once we’re loged into Github, we can select the Repository and Branch that we wish to use in our deployment. One thing that I changed here was the Build Provider – where we see “Building with GitHub Actions”, I changed this to “App Service Build Service”

Once all of the options are selected, click on “Save” and a page will appear confirming the settings selected:

So this is now effectively live, if we click on “Logs”, we can see that this created an update to our deployment. And because we are now using the base respository files, we can browse to the site and see we are back to the default title and heading on the site:

So now, we can edit the index.html file directly on GitHub to make changes:

So we’ll do a commit of the changes in GitHub. And if we check our logs again, we can see another deployment has happened:

And if we refresh the website, we can see our changes automatically got published!

Conclusion

So thats an overview of deploying to Azure App Service using manual and automated deployment methods. In the next post, we’ll look at more advanced options like auto-scaling and deployment slots.

Hope you enjoyed this post, until next time!

100 Days of Cloud – Day 52: Azure App Service

Its Day 52 of my 100 Days of Cloud journey, and today I’m taking a look at Azure App Service.

How to Create a Serverless Meme-as-a-Service

After all my promises on Day 49 around doing further blogs on services such as AKS, Azure Monitor, Azure Security Center or Azure File Sync, I’m sure you weren’t expecting me to head off into another direction. The truth is dear reader that I have a rather embarrassing admission to make – I failed to follow my own advice….lets set the scene.

We go back in time to Day 17 where I spoke about the then upcoming Microsoft Ignite Cloud Skills Challenge, which enabled you to obtain a free exam voucher for completing an MS Learn Module. The exam voucher needs to be used by March 15th, and from the list of exams that were on the eligibility list, below were the ones that were of interest to me:

But of course Michael jumped ahead and booked the betas for AZ-800 and AZ-801 (as described in Day 47 and Day 51). So those 2 get scratched off the list and I get left with a choice of 3. And my own advice from Day 17 is ringing in my head:

Its not worth doing it if the only reason is for a free voucher and you don’t really know what to use it for, and then just take an exam for the sake of it because you have the voucher.

So what do I do? I could let the exam expire, or I could pick one of the 3 remaining and give it a go. And as this 100 Days journey is learning experience, I decide to go for the one that I will freely admit I know the least about, and thats AZ-204. Loading up the Microsoft Learn modules from the official exam page, the first thing I see is Azure App Service! A-ha! This looks familiar, and it should as the content was covered briefly on AZ-104.

Overview of Azure App Service

Azure App Service is a Platform as a Service (PaaS) offering that is used to host web applications, REST APIs and mobile back end services.

Because this is a PaaS offering, the underlying infrastructure is fully managed and patched by Azure. You can choose to run App Service on either Windows or Linux platforms depending on your application requirements. Because of this, you can use any programming language to run your Web Applications or Service, and these can the be hosted on App Service. This list includes but is not limited to:

  • .NET
  • Java
  • Node.js
  • Ruby
  • PHP
  • Python

Benefits of App Service

Because Azure App Service is a PaaS offering, it means that you are only responsible for managing the application/service and the data. Everything else is managed by Azure.

As well as the range of programming languages that are supported, you can also run scripts or executables as background services.

You can also scale in/out (adds/removes additional VMs as required) or scale up/down (adds/removes CPU or memory resources as required).

Lets compare this to hosting on your own on-premise servers. You are responsible for the following:

  • Procurement of Physical Servers, Storage, Networking equipment
  • Power and Cooling
  • Networking setup and security
  • Virtualization, Operating System (Installation, Patching, System Upgrades)
  • Middleware Components
  • Configuration of Web Services such as Apache, IIS or Nginx

App Service Plans

As with all Azure Services, there are different pricing tiers that define the compute resources that are allocated to your App Service. There are 4 different tiers to choose from:

  • Shared compute: Both Free and Shared share the resource pools of your apps with the apps of other customers. These tiers allocate CPU quotas to each app that runs on the shared resources, and the resources can’t scale out.
  • Dedicated compute: The Basic, Standard, Premium, PremiumV2, and PremiumV3 tiers run apps on dedicated Azure VMs. Only apps in the same App Service plan share the same compute resources. The higher the tier, the more VM instances are available to you for scale-out.
  • Isolated: This tier runs dedicated Azure VMs on dedicated Azure Virtual Networks. It provides network isolation on top of compute isolation, and maximum scale-out capabilities. You should run in Isolated if your app is resource intensive or needs to scale independently of other apps.
  • Consumption: This tier is only available to Azure Function apps. It scales the functions dynamically depending on workload.

Deployment Options for App Service

You have multiple options for deployment of your App Service. Automated deployment options are:

  • Azure DevOps
  • GitHub
  • Bitbucket

All of these options allow you to build your code, test and generate releases, and push the code changes to Azure. You also can maintain version control with these options.

Manual deployment options are:

  • Git – Web Apps have a Git URL that you can use a remote repository to deploy your Web App.
  • Azure CLI – you can package Web Apps and deploy them using CLI.
  • ZIP Deploy – Use curl or similar http to send a zip of your deployment files to App Service.
  • FTP/S – you can push your code directly to App Service over FTP or FTPS.

Authentication

Azure App Service allows you to integrate directly with multiple providers such as Azure AD, Facebook, Google or Twitter. This feature is built directly into the platform and doesn’t require any coding, language or security expertise to implement.

Conclusion

So thats an overview of the foundations of Azure App Service. In the next post, we’ll go through a demo of deploying a Web App using both manual and automated methods, and look at more advanced options like configuring diagnostic settings, auto-scaling and deployment slots.

Hope you enjoyed this intro to Azure App Service, until next time!