Its Christmas time, and that means its time for another month of the always fantastic Festive Tech Calendar. This was one of the first events that I participated in when I was trying to break into blogging and public speaking and I’m delighted to be involved again this year.
This year, the team are raising funds for Beatson Cancer Charity, and you can make donations via the Just Giving page.
In this post, we’ll dive into Azure FinOps, explore tools and practices available to help you manage costs, look at real-world savings examples, and discuss how to integrate alerts into Service Management solutions for proactive monitoring.
But before we dive in, lets set the scene with a real world example!
The problem with wanting more …..
We live in a world and a time in society where we all want more. We want it bigger and better. Bigger houses, bigger SUV’s, the highest performing laptop, the newest model phone.
And of course because its Christmas, the biggest turkey you can find ….

This is “Irish Mammy” syndrome, where we over cater to make sure there is enough for everyone at Christmas (and for my American readers, the same rules apply at Thanksgiving).
And its not just Turkey – making sure there are lots of different vegetables as a supplement including multiple types of potatoes (roast, mashed, boiled with both skin on and off, chipped, gratin, croquette….). And don’t forget the Nut Roasts! You then get into Selection Boxes, Mince Pies, Puddings….. The list goes on.
So aside from making you hungry, what has this got to do with Azure?

Yes yes, I know I’ve been rambling on but I was getting to to the point.
All of that food costs money and inevitably there is going to be some (or a lot of) wastage there. We can use the term “over-provisioning” to describe it.
The same principle applies to Azure or any cloud provider when migrating new workloads into the cloud. No matter how much you try to “right-size”, there is a temptation to over-provision to make sure you have enough wiggle room due to increased demand.
In my session for last years Festive Tech Calendar, I spoke about Azure Load Testing and how that can be used to not only “right-size” your environments, but also to test based on different patterns and unpredicatable spikes in demand that may happen.
May happen …. or may not happen. You can only go so far in the science of predicting what might happen because there is always going to be a use case or usage pattern that you either didn’t consider.
Regardless of all that you need to deploy your resources, but now comes the challenge – how do you monitor costs to ensure that there isn’t overspend? This is not just about Cost Management or Scaling, this is where the power of the entire suite of Azure FinOps can help.
What is Azure FinOps?
FinOps combines financial management practices with operations to ensure that cloud spending is transparent, accountable, and optimized. In the Azure ecosystem, FinOps helps businesses manage their cloud resources by giving visibility into spending patterns, offering optimization recommendations, and enabling financial governance.
The FinOps lifecycle consists of three main phases:
- Inform: Understand and track cloud costs to ensure transparency.
- Optimize: Use insights to reduce unnecessary costs and improve efficiency.
- Operate: Continuously manage cloud costs to ensure ongoing financial efficiency.
Azure provides a set of native tools designed to support FinOps practices and help organizations maximize cloud efficiency. Let’s look at each of these tools in detail:
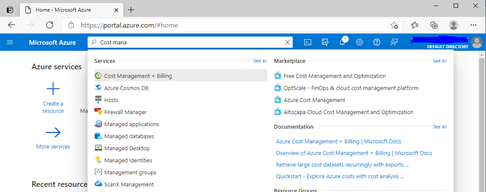
1. Azure Cost Management
Azure Cost Management is the cornerstone of FinOps on Azure. It provides deep insights into cloud costs, allowing you to track, allocate, and analyze spend across your Azure resources.
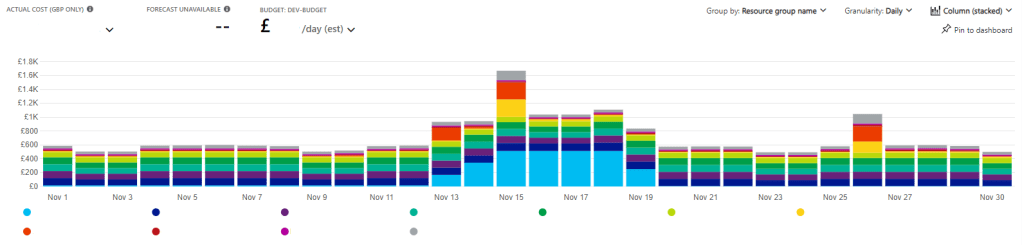
- Cost Analysis: Allows you to visualize and analyze costs over time by service, resource group, subscription, or department. This helps identify cost trends and usage patterns.
- Budgets and Alerts: Set budgets for specific subscriptions or resources, and receive alerts if you’re approaching or exceeding budget limits.
To give you a real world scenario, you can use Azure Cost Management to identify unnecessary resources running during off-peak hours, resulting in a significant cost reduction. By analyzing spending patterns, you can schedule workloads to scale down or shut down entirely during low-use periods.
2. Azure Advisor
Azure Advisor provides personalized recommendations to help optimize your Azure resources based on best practices. The Cost category of Azure Advisor focuses specifically on identifying opportunities to reduce spend by suggesting actions like right-sizing VMs, using Reserved Instances, and removing idle resources.
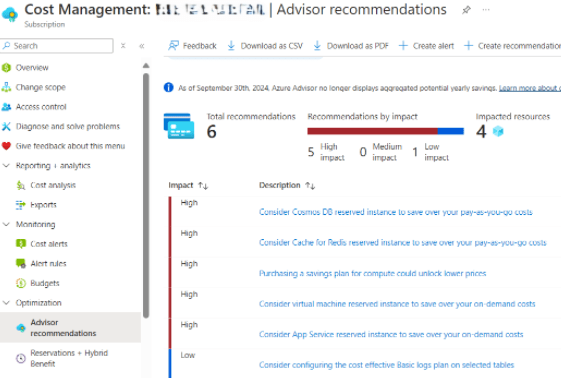

In a real world scenario, you can use Advisor’s recommendations to optimize virtual machines , such as resizing underutilized VMs or applying Reserved Instances to resources that are in constant use, which can save thousands in annual costs.
3. Azure Reservations
Speaking of Azure Reservations, committing to reservations can provide significant cost savings by committing to a one or three-year terms for certain Azure resources, such as VMs, SQL Databases, and Cosmos DB.
Reservations allow you to prepay for resources at a discounted rate, which is especially beneficial for predictable, long-term workloads. Depending on the Azure service, you can save up to 72% on reserved VMs and other services.
4. Azure Spot Instances
Azure Spot Instances allow you to purchase unused Azure compute capacity at a discount of up to 90%. These instances are ideal for workloads that are not time-sensitive and can tolerate interruptions, such as batch processing, development, and testing.
An example would be running non-critical data processing workloads on Spot Instances during low-traffic hours, which drastically reduces operational expenses without impacting service.
5. Azure Policy for Cost Management
Azure Policy enforces rules and standards to keep resources compliant, including cost-related policies. You can set policies to control which resources can be deployed, prevent the use of expensive SKUs, and enforce resource tagging for accurate cost tracking.
Using Alerts for Proactive Monitoring
Setting up cost-related alerts is essential for proactive cost management. These alerts can notify relevant teams when spending thresholds are reached, helping prevent unexpected overspend. Here’s some examples and use cases for how you can configure alerts in Azure and integrate them into your Service Management solutions.
1. Setting Budgets and Alerts
With Azure Budgets, you can easily define the budgets in line with your predicted cloud spend based on amount, time period, and reset schedule to keep everything aligned.
Once your budget is in place. Azure Budgets sends alerts the moment you hit a predefined threshold. Alerts can be customized to be sent via email or push notifications, ensuring you’re always in control of your cloud costs and never caught off guard.
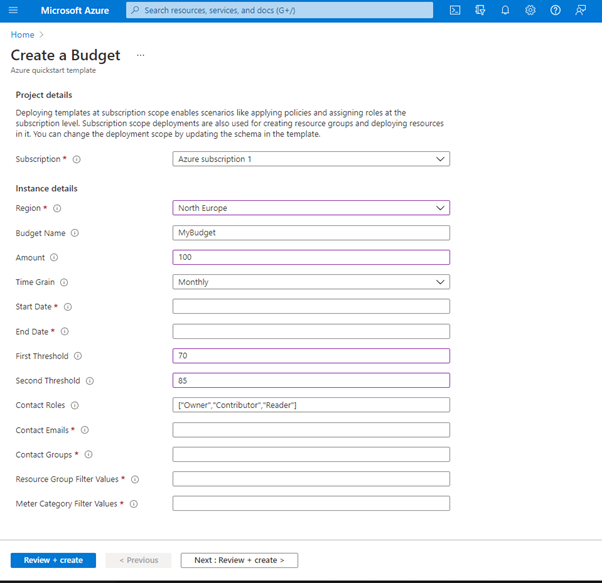
To create a budget:
- In Azure Cost Management + Billing, navigate to Budgets, select your subscription, and create a new budget.
- Set Thresholds: Define a monthly or quarterly budget and set alert thresholds (e.g., 50%, 75%, and 100% of the budget).
- Configure Notifications: Specify recipients (e.g., Finance and Operations teams) for notifications via email or SMS.
2. Integrating Alerts into Service Management Solutions
For comprehensive monitoring, you can integrate Azure alerts with Service Management platforms like ServiceNow or Microsoft Teams.
Azure Monitor allows you to create alerts based on various metrics, including cost. When this is integrated with Logic Apps, you can automate workflows to forward these alerts to a Service Management solution.
An example would be generating an alert when spending hits 75% of the monthly budget. A Logic App workflow is triggered, creating a ServiceNow ticket for review and notifying the relevant team in Microsoft Teams.
3. Real-Time Cost Alerts with Azure Monitor
Azure Monitor’s integration with Azure Cost Management lets you create real-time alerts when costs increase unexpectedly. You can set up alerts based on specific metrics or thresholds for VM utilization, storage usage, and other cost-driving metrics.
An example would be to use Azure Monitor to track VM utilization and generates alerts when the utilization exceeds a set threshold. The alert triggers a workflow to reduce resource allocation, leading to cost savings during non-peak hours.
Real-World Savings with Azure FinOps
Lets do a quick recap of some real-world examples where you can leverage Azure FinOps best practices to drive cost savings:
- Optimizing VM Costs
- Challenge: High costs due to underutilized VMs during non-business hours.
- Solution: Use Azure Advisor to right-size VMs and Azure Automation to shut down non-critical VMs during off-peak hours.
- Result: In majority of cases, achieve between 20-30% reduction in monthly VM costs.
- Using Reserved Instances for Savings
- Challenge: High costs from on-demand compute resources.
- Solution: Purchase Azure Reserved Instances to lock in lower rates for long-term workloads.
- Result: Depending on company size and size of cloud footprint, potential to save tens of thousands on your annual Azure bill by taking advantage of commitment-based discounts.
- Enhanced Governance with Azure Policy
- Challenge: High operational costs and lack of visibility into resource usage.
- Solution: Implement Azure Policy to enforce tagging and restrict expensive resources.
- Result: Improved accountability and achieve savings on cloud spend by ensuring only necessary and approved resources were deployed.
Best Practices
Lets recap on the best practices for implementing Azure FinOps in your organization:
- Enforce Tagging: Use tags to categorize resources by cost center, department, or project, making it easier to track and allocate costs.
- Review Usage Regularly: Analyze reports from Azure Cost Management regularly to identify trends and patterns.
- Use Automation: Implement automation to shut down or scale down resources during low-usage periods.
- Educate Teams: Ensure that Finance, Operations, and Engineering teams understand FinOps principles and tools for more collaborative cost management.
Conclusion
Azure FinOps provides powerful tools and practices to optimize cloud spending, maximize efficiency, and achieve financial accountability across departments. Companies can not only achieve significant cost savings but also ensure their cloud environments are scalable, sustainable, and financially efficient.
By combining Azure Cost Management, Azure Advisor, Reserved Instances, Spot Instances, and Azure Policy, you can effectively control and reduce your company’s Azure expenses. Integrating cost alerts into Service Management solutions allows for proactive cost management, ensuring that cloud spending remains transparent and aligned with organizational budgets.