
Its Day 35 of 100 Days of Cloud, and I’m continuing my learning journey on Infrastructure as Code (IaC) by using Terraform.

In the previous post, I described the definition of Infrastructure as Code, how you don’t need to be a developer or have a development background to use IaC services, and how Terraform is a declarative programming language (instead of telling the code how to do something, we define the results that we expect to see and tell the program to go and do it).
I also gave the steps of how to install Terraform on your own device and adding it into Visual Studio Code. However, because Terraform is built into the Azure Cloud Shell, I’m going to use it directly from there.
Using Terraform in Azure Cloud Shell
We need to browse to shell.azure.com from any browser and log on using our Azure credentials. This will open the Cloud Shell, adn we have the option to use either Bash or PowerShell. I’ve selected Bash for this session, and when I run terraform version it will give me the version of Terraform available to me in the shell.
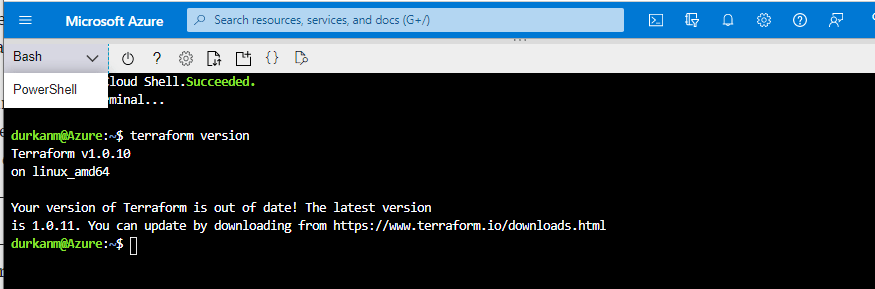
Now, we can see that the latest version is not installed – this is not something we need to worry about as Cloud Shell automatically updates to the latest version of Terraform within a couple of weeks of its release.
Now, we need to create a directory to store our Terraform configuration files and code. A default directory called “clouddrive” is available by default in each Cloud Shell session. I’ll cd into that directory, and create a directory structure using the mkdir command

Now we need to create 3 files called main.tf, variables.tf and outputs.tf. Lets quickly describe what these files are for:
- main.tf: This is our main configuration file where we are going to define our resource definition.
- variables.tf: This is the file where we are going to define our variables.
- outputs.tf: This file contains output definitions for our resources.
The name of each file doesn’t need to be the above as we’ll see in the examples – terraform can interpret each of the the files as long as it ends with .tf extension,however the above is a standard naming convention followed in terraform community and make it easier when working in teams on terraform projects.
To create the files, we use the vim command. In main.tf, we’ll add the following code:

Lets step through this block of code.
Firstly, we see the word terraform defined at the top, this is telling us that this is the main configuration file. The required_providers is telling us that Azure is the provider that is required to create the infrastructure (more on providers in a minute). The first resource block is creating the name of the resource group, but also pointing at a var string which will be located in the variables.tf file. The second resource block is again pointing to a var string which will give us the location of the resource group as defined in the variables.tf file.
One thing to note here – both resource blocks contain the code "random_pet" – this is used to generate random pet names that are intended to be used as unique identifiers for resources. Terraform can also use random ids, integers, passwords, strings etc. You can find full documentation here.
Now, back to our files – we’ll now create variables.tf and add the following code:

We can see that this is giving us descrptions of the variables – if we compare the main.tf file above we can now see what is being called from the resource blocks.
Now, back in the shell we need to run terraform init – this is going to initialise the terraform environment for this project and download the required providers as specified in the main.tf file. Once that runs, we get this output:

I we run an ll now, we can see there is a .terraform directory available, and if we drill down we can see that this has downloaded the providers for us:

So now, we need to run terraform plan-out md101.tfplan – this creates and execution plan so we can see what is going to happen, but it doesn’t create anything. The -out parameter just outputs the plan to a file. This is useful if you are creating multiple plans and need to apply or destroy them at a later stage. We can see there are “2 to add, 0 to change, 0 to destroy”:
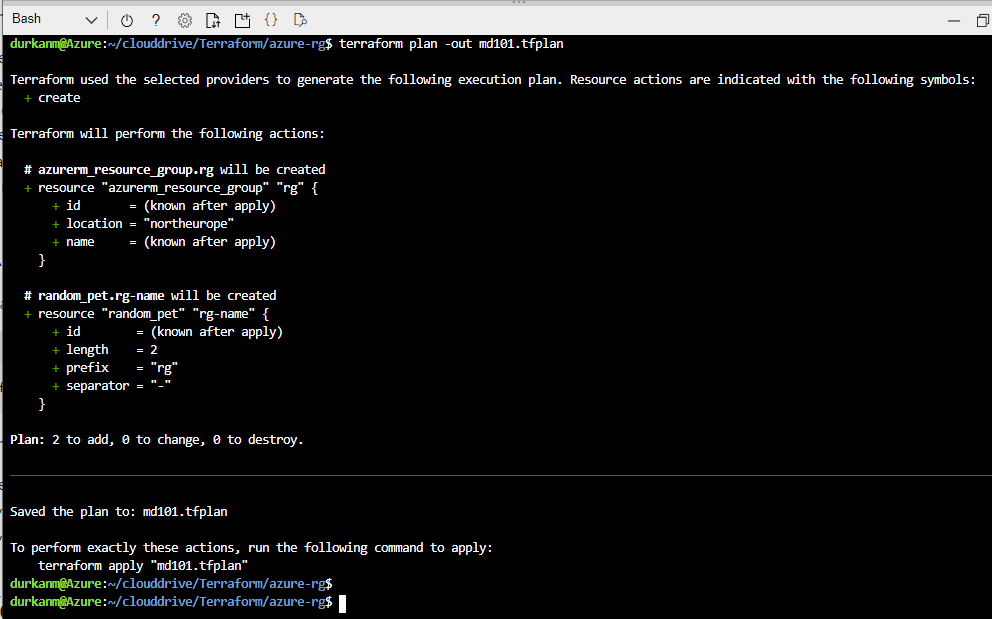
We can also this that this has been saved to out outfile:
Now lets run terraform apply md101.tfplan to execute and create our Resource Group:
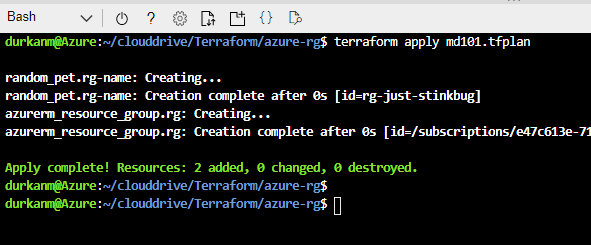
And if we check in the portal, we can see that we have created rg-just-stinkbug:

If we wanted to destroy the resources, the command to run would be terraform destroy md101.tfplan.
But we’re not going to do that – because in the next post, I’ll look at adding resources to that existing resourge group we’ve created. I’ll also look at the Terraform State file, and look at why its important to manage resources that have been deployed with Terraform only with Terraform and not manually within the Portal, ARM or PowerShell. Until next time!

2 thoughts on “100 Days of Cloud – Day 35: Terraform on Azure Cloud Shell Part 1”