

Its Day 6 of my 100 Days of Cloud journey, and today I’m going to do the same thing as I did yesterday ….. Except differently.
In Day 5, I deployed a Virtual Machine into Azure using the Portal, and tried to explain the process along the way. Today I’m going to follow the same process using PowerShell, meaning what took endless clicks (and scrolling on your part dear reader) can now be done with just one command.
That’s right Mr. Wonka, just one command will do it all. There’s a lot of options we need to be aware of though, so let’s jump into PowerShell and take a look.
I’ll open PowerShell and connect to my Azure Account using
Connect-AzAccount

The command I need to run here is
New-AzVM
Similarly, I can run
Get-AzVM
to see what VM’s are in our Subscription, so let’s run that first:

That shows me the VM I created yesterday in the Portal. This gives me a clue about parameters I need to use in order to create my new VM. As with all PowerShell Modules, there is extensive help available, so I’ll run the
get-help New-AzVM
command to see the options and parameters I can use:

Good lord …. That’s a lot of information. And when it flashes up on the screen like that in a wall of text, it can seem a bit intimidating. However, some key things to look for here.
Firstly, under “SYNTAX”, I can see the list of parameters we can feed into “New-AzVM”. These will look familiar to us as it’s exactly what I used to create the VM in the Portal. If I take the first 2 parameters alone, these are familiar to me:

I know what my Resource Group name is, as I created that using PowerShell during Day 3. I also know that my location is “northeurope”, as if I scroll up I see that outputted in “Get-AzVM”.
So effectively, the command I would use here for this portion of the PowerShell Command is this:

Secondly, if I look at the “REMARKS” section there are other commands I can run, one of which will give me examples! Lets run that and see what it returns:

I can see there are a number of examples there, but the first one is just asking for a Name parameter for the VM, and my credentials? Surely it can’t be that easy? Lets try — I’m going to run this with a “-Verbose” switch so we can get some output:
New-AzVM -Name MYPSTestVM -Credential (Get-Credential) -Verbose

I get a prompt for credentials — what I need to provide here is the Local Admin credentials I want to use on the VM. I provide this and click OK:

Hold on a second, I didn’t tell it to do any of this! But eventually after a few minutes it finishes:

The reason this created without any parameters or input is that Azure uses a set of default values when it doesn’t receive any input. Based on the name of the VM, Azure creates a Resource Group, Virtual Network, Disk, Network Interface and a Network Security Group. These are all created in the East US location, use the most Standard VM Size profile, the most Standard OS (which is Windows Server 2016 Datacenter), and a Premium Locally Redundant SSD. If I run
Get-AzVM

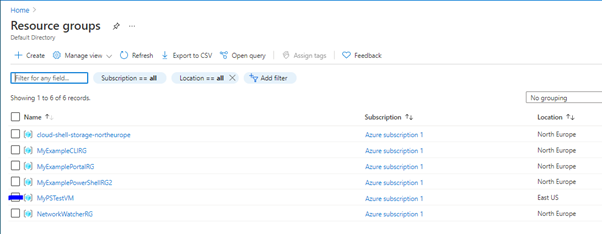
And check the Portal, there’s the new Resource Group:
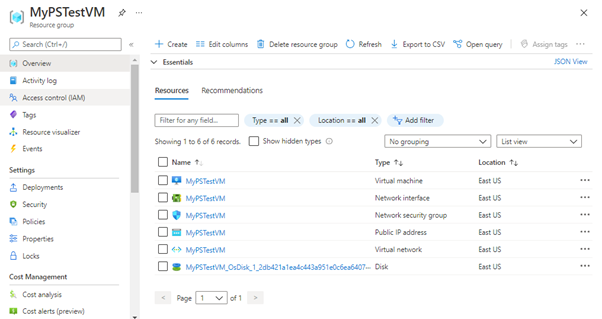
And if I click into that, there’s all my resources:
This is why it’s important to understand the parameters and provide them correctly so that the Virtual Machine we create is the one we want. If I check that machine in the Azure Pricing Calculator, along with a Windows License and the SSD, it’s going to cost me nearly €160 per month.
Thanks for the defaults Microsoft, but as this is for the purposes of testing, I’m going to dele ……
No, wait, I’m not. I’m going to leave it running for a few hours to see if it generates some data in Cost Management and some Budget Alerts (I’ll report back on this in the next post!).
So moving forward, what I now want to do is create my new VM in the correct Resource Group using the options that I want. And if I look at the “-Verbose” output that I received when I created the first VM, its gives me a guide as to what parameters and options I want to have. So, What I want to do is specify the following options:
- Resource Group — MyExamplePowerShellRG2
- Location — northeurope
- Name — MyPowerShellVM (This is the name of the VM in the portal, not the local Computer name)
- AddressPrefix — “10.30.0.0/16” (This is for the Virtual network)
- SubnetName — PSVMSubnet
- SubnetAddressPrefix — “10.30.30.0/24”
- PublicIPAddressName — PSPublicIP
- DomainNameLabel — psvm001md (This is the local
- SecurityGroupName — PSVMNSG
- OpenPorts — 3389 (We can change this in the NSG later, but this is for RDP Connectivity, or SSH for Linux)
- ImageName — “Win2016DataCenter”
- Size — “Standard_B2s” (This is the VM Size. A full list can be found here)
- OSDiskDeleteOption — Delete (This specifies whether the OS Disk is deleted or detached and retained when the VM is deleted. Options are Delete, Detach)
If I reference the “get-help” for the command again, or indeed the official Microsoft Docs article for the “New-AzVM” command, we can see these are only a few of the options available to use, but are probably the most common ones. So with those options, my PowerShell command should look like this:
New-AzVM -ResourceGroupName -MyExamplePowerShellRG2 -Location northeurope -Name MyPowerShellVM -AddressPrefix "10.30.0.0/16" -SubnetName PSVMSubnet -SubnetAddressPrefix "10.30.30.0/24" -PublicIPAddressName PSPublicIP -DomainNameLabel PSVM001MD - SecurityGroupName PSVMNSG -OpenPorts 3389 -ImageName Win2016Datacenter -Size Standard_B2s -OsDiskDeleteOption Delete -Credential (Get-Credential) -Verbose

Again, I’m adding a “-Verbose” and clicking enter:

And it’s done. So let’s run “Get-AzVM” to see if it created successfully:

Yep, all looking good there. So lets check the Portal now:

All looking good there! So now let’s get a connection to my VM:


And I’m in. Like yesterday, I’ll turn off RDP Access via the NSG just for extra security.
Now, let’s delete the VM. I’ll run
get-help Remove-AzVM
to check the options:

OK, so all I need is the Resource Group and the VM Name it seems. From the output to “Get-AzVM” above, the name of my VM is “MyPowerShellVM”. So I’ll run:
Remove-AzVM -ResourceGroupName MyExamplePowerShellRG2 -Name MyPowerShellVM

So I say yes to the prompt. And it fails!

And if we read the error, it’s because there’s a lock on the Resource Group which we put there on Day 3 when we created it! So we need to remove that first by running:
Remove-AzResourceLock -LockName LockPSGroup -ResourceGroupName MyExamplePowerShellRG2

And now, lets try running our “Remove-AzVM” command again:

And this time worked successfully. Let’s check the Portal:

And I see that both the Virtual Machine and the Disk have been deleted.
And that’s the PowerShell Method! For the next day, I’m going to delve into ARM Templates as promised to show how they can automate this process even further.
Hope you enjoyed this post, until next time!!

One thought on “100 Days of Cloud — Day 6: Deploy a Virtual Machine using Azure PowerShell”