

It’s Day 8 of 100 days of Cloud, and it’s time to briefly re-visit Azure Resource Locks and talk about Azure Policy.
A quick summary of Resource Locks
During Day 3 when I was creating Resource Groups, I demonstrated Locks and how they can be used to prevent users who have been assigned the correct RBAC Role to manage the Resource Group from deleting either the Resource Group or the resources contained within the group. When a Lock exists, a failure message is generated on screen when the user tries to delete the Resource.
I won’t delve too deep into Locks, as they are a very simple and quick tool that can prevent changes to your environment in an instant. They can be applied at different tiers of your environment. Depending on your governance model, you might want to apply at the subscription, resource group or resource level, all are possible. Locks have only two basic operations:
- CanNotDelete means authorized users can still read and modify a resource, but they can’t delete the resource.
- ReadOnly means authorized users can read a resource, but they can’t delete or update the resource. Applying this lock is similar to restricting all authorized users to the permissions granted by the Reader role.
Only the “Owner” and “User Access Administrator” roles have the ability to apply and remove locks. It’s generally recommended that all resources in a Production environment have a “CanNotDelete” lock applied.
A quick summary of Azure Policy
Policies define what you can and cannot do with your environment. They can be used individually or in conjunction with Locks to ensure granular control. Lets take a look at some examples where Policies can be applied:
- If you want to ensure resources are deployed only in a specific region.
- If you want to use only specific Virtual Machine or Storage SKUs.
- If you want to block any SQL installations.
One thing to be aware of when it comes to Policies — let’s say you have already deployed a Virtual Machine. It’s in the East US region in a resource group called “Prod_VMs”, size is Standard_D4_v3, and is running Windows Server 2019 Datacenter.
You then create a series of Azure Policies which state:
- You can only deploy resources in the North Europe region
- You can only deploy VMs of size Standard_D2_V2
You apply these policies to your “Prod_VMs” Resource Group. So what happens to the existing VM you have deployed in East US?
Nothing, that’s what. Azure Policy isn’t an enforcement tool in the sense that it will shut down any existing infrastructure that is not compliant with the policies. It will Audit and report it as a non-conformance, but that’s about it. However, it will prevent any further VMs being deployed that do not meet the policies that have been applied.
Let jump into the portal and take a look at how this works.
The Basics of Policies
I go into the Portal and type in “Policy” in the search bar.

The first thing I see when I go into the “Policy” windows is that I already have non-compliant resources!

This is the default Policy assigned to my subscription, so if I click into the “ASC Default” Policy name, it will show me what’s being reported

As I can see, this is the Default set of policies that are applied to the Subscription. Note that underneath the “ASC Default…” heading at the top of the page, it has the term “Initiative Compliance”. In Azure, a set of policies that are group together and applied to a single target is called an Initiative.
If I click into the first listed group “Enable threat detection for Azure resources”, it will give me an overview of the Actions required to remediate the non-compliance, a list of policies that we can apply to at different levels if required, and the overall resource compliance.

In effect, Azure Policy is constantly auditing and evaluating our environment to enforce organizational standards and assess compliance.
Applying a Policy
Firstly, I need to set up a Resource Group where I can apply the locks and policy. So following the naming scheme I’ve used as an example earlier, I run the following in PowerShell:
New-AzResourceGroup –Name Prod_VMs –Location NorthEurope

Next, I need to apply a lock at resource group level. So I run:
New-AzResourceLock — LockName Prod_VMs_Lock –LockLevel CanNotDelete –ResourceGroupName Prod_VMs

Now, back in the Portal on the Policy Homepage, I click on “Assignments”. This brings me into the list of Assigned Policies. At the top of the page, I click on “Assign policy”:
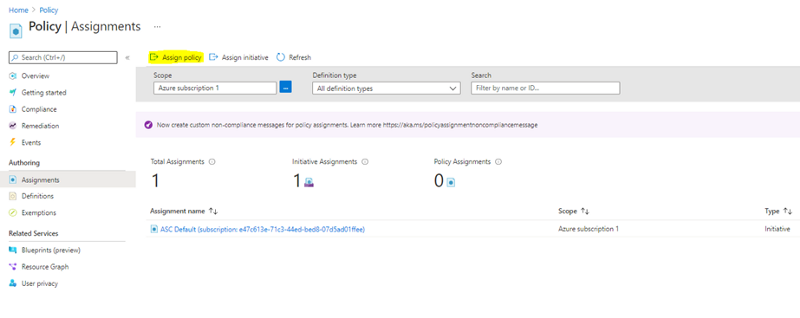
This open the “Assign Policy” window. On the “Basics” page, the first thing I need to do is click the “ellipses” on the Scope option. This will allow me to select where the Policy needs to be assigned. I select my “Prod_VMs” Resource Group and click select:

Next, I click the “ellipses” for “Policy Definition”. In this Window, I type in “locations” in the search bar. This gives me the “Allowed locations” Policy definition. I select this and move on to the “Parameters” tab:

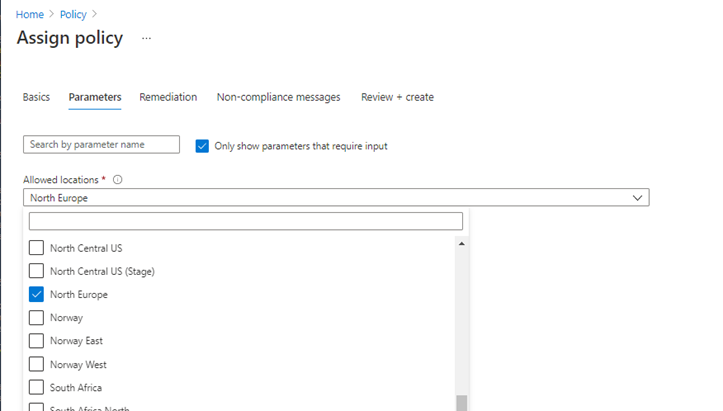
Based on the Policy Definition I just selected, this gives me a list of parameters to choose. I can either search or hit the drop-down to select from a list. I can select as many as I want here, but I’ll just pick “North Europe” and move on to the Remediation tab:
The Remediation tab shows that the assignment will only take effect on newly-created resources, not on existing ones. To create a remediation task, I would need to have “deployIfNotExists” policies already in place that would automatically fix the non-compliance. However, note that these can be powerful and therefore quite dangerous if not set up correctly. I would also need a managed identity to do this. There is a detailed article here on Microsoft Docs that gives full details of how Remediation works. I’m going to move on here to the “Non-Compliance messages” tab:

Non-compliance messages gives me a field where I can add custom messages to say why a resource is non-complaint:

And with that, I’ll click “Review + Create” tab to review my options, and then click “Create”:

And it creates. Note that it says it will take 30 minutes to take effect:


So while I was waiting, I created 1 more Policy to enforce a specific Virtual Machine SKU Size, and applied that to my Resource Group:

So now it’s time to see if the policies have taken effect. I’ll run the following command to try and create a Virtual Machine in East US region:
New-AzVM –Name ProdVM1 –ResourceGroupName Prod_VMs –Location eastus -Verbose
And it fails, because the “Allowed Locations” policy doesn’t allow it!

OK great, so now I’ll try to create the VM in the northeurope region:
New-AzVM –Name ProdVM1 –ResourceGroupName Prod_VMs –Location northeurope -Verbose
And this also fails! Because I didn’t specify a size value, its trying to create the VM using the Standard VM Size SKU, which I have disallowed via the other policy:

OK, so now lets prove that I can deploy the VM with the correct location and VM Size SKU specified. I’ll run:
New-AzVM –Name ProdVM1 –ResourceGroupName Prod_VMs –Location northeurope –Size Standard_B2s —Verbose
And this time, its successful!

And that is a very quick overview of how Azure Policy can help with both compliance, governance and costs in your Azure Subscription.
Hope you enjoyed this post, until next time!!
