
It’s Day 9, and today I’m delving into NSG’s, or Network Security Groups.
During previous posts when I was deploying Virtual Machines, you would have noticed that the deployment created a number of resources in the Resource Groups:
- Virtual Network
- Subnet
- Public IP Address
- Interface
- Virtual Machine
- NSG or Network Security Group
I’ve pretty much flogged Virtual Machines to death at this stage (I can hear the screams, NOOOOOO PLEASE, NO MORE VIRTUAL MACHINES!!!!). Fear not, I’m not going to return to Virtual Machines …. just yet. I’ll deal with Virtual Networks and Subnets in my next post, but today I want to give an overview of NSG’s, how important they are and how useful they can be.
Overview
Network Security Groups in Azure can be used to filter traffic to and from resources in an Azure Virtual Network. It contains Security Rules to allow or deny inbound/outbound traffic to/from several types of Azure Resources. NSG’s can be applied to either Subnets within a Virtual Network, or else directly to a Network Interface in a Virtual Machine.
When an NSG is created, it always has a default set of Security Rules that look like this:

The default Inbound rules allow the following:
- 65000 — All Hosts/Resources inside the Virtual Network to Communicate with each other
- 65001 — Allows Azure Load Balancer to communicate with the Hosts/resources
- 65500 — Deny all other Inbound traffic
The default Outbound rules allow the following:
- 65000 — All Hosts/Resources inside the Virtual Network to Communicate with each other
- 65001 — Allows all Internet Traffic outbound
- 65500 — Deny all other Outbound traffic
It’s pretty restrictive. This is because Azure NSG’s are created initially using a Zero-Trust model. The rules are processed in order of priority (lowest numbered rule is processed first). So you would need to build you rules on top of the default ones (for example, RDP and SSH access if not already in place).
Also, an important thing to remember. I mentioned that you can have an NSG associated with a Subnet or a NIC. You can also have both — a Subnet NSG will always be created automatically with the first Subnet that is created in a Resource Group, you can also create a dedicated NSG for a NIC in a VM that’s sitting in that subnet. In this instance, the NSG associated with the Subnet is always evaluated first for Inbound Traffic, before then moving on to the NSG associated with the NIC. For Outbound Traffic, it’s the other way around — the NSG on the NIC is evaluated first, and then the NSG on the Subnet is evaluated.
Example of an NSG in Action
I’ve created a VM in Azure (as promised, I won’t torture you with this process again 😉….

I click into the VM to look at the settings:

Let’s click on the “Connect” button — this will give us the option to use RDP, SSH or Bastion. I’ll choose RDP:

And this will give us a link to download an RDP File:

Click Connect:
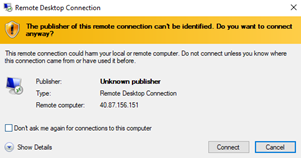
I get prompted for credentials:

And I’m in!!

Now, lets take a look “under the hood”. Back in the Portal, and on the side menu, I click “Networking”. This brings me into the Network Security Group for the VM:
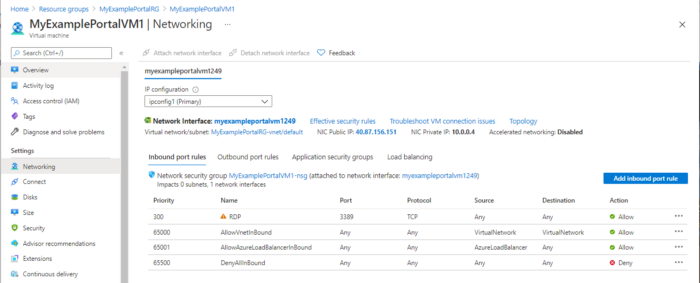
I can see that RDP is set to Allow, so I’m going to click on “Allow” in the Action Column, and set the RDP policy to “Deny”:

Now, I’ll try to connect to the VM again:

Exactly what I wanted to see. That’s shows an NSG in action and how you can allow or deny rules.
Some Important Considerations
There are a few things you need to be aware of when using Network Security Groups:
- You can use the same NSG on multiple Subnets and NICs
- You can only have 1000 Rules in an NSG by default. Previously, this was 200 and could be raised by logging a ticket with Microsoft, but the max (at time of writing) is 1000. This cannot be increased.
- Security Rules can affect Traffic between Resources in the same Subnet. So you recall our first default rules for both Inbound and Outbound are to do with “AllowVnetInBound” and “AllowVnetOutBound”. This is a default rule because it allows intra-subnet traffic. If you create a “Deny” Rule above either of these with a lower priority, it can cause communication issues. Of course, there may be a good reason to do this, but just be careful and understand the implications — the default rules exist for a reason!
Conclusion
Now you can use Network Security Groups to filter and manage incoming and outgoing traffic for your virtual network. Network Security Groups provide a simple and effective way to manage network traffic.
Hope you enjoyed this post, until next time!!
