
Its Day 74 of my 100 Days of Cloud journey, and today I’m jumping back into the Microsoft 365 ecosystem and taking a look at the steps needed to prepare your on-premise Active Directory environment.
We touched on Microsoft 365 briefly on Day 72 when we looked at whether migrating your on-premise File Server to Azure Files or SharePoint was the best option for your business. We also commented that a migration to Microsoft 365 hosted email was traditionally the first step that the majority of companies have taken or will take in their journey to Public Cloud environemnts.
I’ve decided to step back and look at Microsoft 365 as a whole and the services offered in the next few posts where we can see how each service can provide a benefit to your business. But before we do that, lets take a look at the preparation needed to decide on which identity models to use, and the preparation needed on your on-premise Active Directory environment if using the Hybrid identity model.
Authentication Methods
But before that happens or you decide on any migration strategy, you need to decide how your users will authenticate to those Cloud Services. For this we have 2 options
- Cloud-only identity: A cloud-only identity uses user accounts that exist only in Azure AD. Cloud-only identity is typically used by small organizations that do not have on-premises servers or do not use AD DS to manage local identities. All management of these identities is performed using the Microsoft 365 admin center and Windows PowerShell with the Microsoft Azure Active Directory Module.
- Hybrid identity: Hybrid identity uses accounts that originate in an on-premises AD DS and have a copy in the Azure AD tenant of a Microsoft 365 subscription. Most changes, with the exception of specific account attributes, only flow one way. Changes that you make to AD DS user accounts are synchronized to their copy in Azure AD. Azure AD Connect runs on an on-premises server, provides ongoing account synchronization, checks for changes in the AD DS, and forwards those changes to Azure AD
So that all makes sense! Now lets introduce another layer of complexity and choice. If you choose a Cloud-only identity model, things are straightforward. However, if you choose a Hybrid model, you have 2 authentication options:
- Managed Authentication: this is where Azure AD handles the authentication process. And nested within this, you have 2 options:
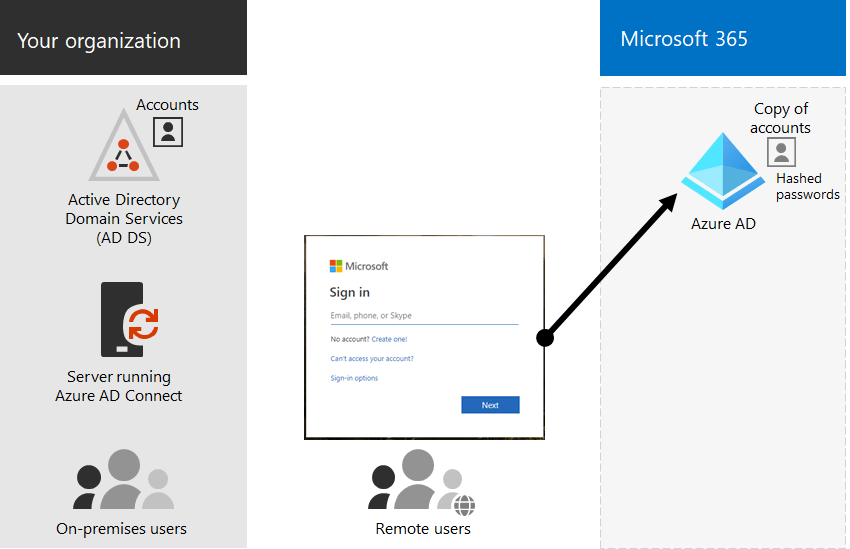
- Password hash synchronization (PHS): this is where Azure AD performs the authentication using a hash of the password that has been syncronized from your on-premise Active Directory.
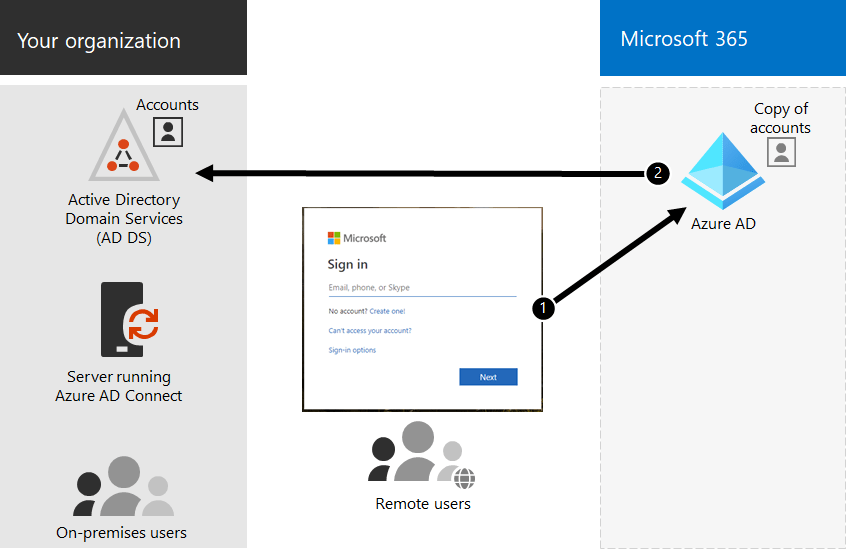
- Pass-through authentication (PTA): this is where Azure AD redirects the authentication request back to your on-premise Active Directory.
2. Federated authentication: this is is primarily for large enterprise organizations with more complex authentication requirements. AD DS identities are synchronized with Microsoft 365 and users accounts are managed on-premises. With federated authentication, users have the same password on-premises and in the cloud and they do not have to sign in again to use Microsoft 365.
Managing and Protecting Privileged Accounts and Administrator Roles
The general rule of thumb is that we should never assign administrator roles to everyday user accounts, especially accounts that have been synchronized from on-premise.
You should assign dedicated Cloud-only identities for administrator roles, and protects these accounts with Multi-Factor Authentication, and/or Azure AD Priveleged Identity Management for on-demand, just-in-time assignment of adminstrator roles. You should also consider using a privileged access workstation (PAW). A PAW is a dedicated computer that is only used for sensitive configuration tasks, such as Microsoft 365 configuration that requires a privileged account.
Managing and Protecting User Accounts
While administrator accounts are the first ones to get protected, sometimes we forget about protecting our user accounts. While we have recommended MFA for administrator accounts, we need to be enabling and enforcing MFA for all users.
We can also enabled other advanced features (depending on our license levels):
- Security Defaults: this feature requires all of your users to use MFA with the Microsoft Authenticator app. Users have 14 days to register for MFA with the Microsoft Authenticator app from their smart phones, which begins from the first time they sign in after security defaults has been enabled. After 14 days have passed, the user won’t be able to sign in until MFA registration is completed.
- Azure AD Password Protection: detects and blocks known weak passwords and their variants and can also block additional weak terms that are specific to your organization. Default global banned password lists are automatically applied to all users in an Azure AD tenant. You can define additional entries in a custom banned password list. When users change or reset their passwords, these banned password lists are checked to enforce the use of strong passwords.
- Conditional Access policies: a set of rules that specify the conditions under which sign-ins are evaluated and access is granted. We looked at this in detail on Day 57.
Keep the following in mind:
- You cannot enable security defaults if you have any Conditional Access policies enabled.
- You cannot enable any Conditional Access policies if you have security defaults enabled.
Active Directory Domain Services Preparation
Before you synchronize your AD DS to your Azure AD tenant, you need to clean up your AD DS. This is an important step as if its not performed correctly, it can lead to a significant negative impact on the deployment process. It might take days, or even weeks, to go through the cycle of directory synchronization, identifying errors, and re-synchronization.
While there are a number of attributes you need to prepare for synchronization, the most important ones are:
- userPrincipalName (UPN): this needs to be a valid and unique value for each user object, as the AD DS UPN matches the Azure AD UPN. This is what users will use to authenticate, and is required to be in the Internet-style sign-in format, for example “firstname.lastname@yourdomain.com”.
- A note on this – Active Directory use the sAMAccountName attribute to authenticate. It recommended that prior to syncing your identities, this should match the userPrincipalName to avoid confustion for both users and administrators, however this is not necessary.
- Another note – if you are using multiple mail domains, you can add multiple UPN suffixes. The article here shows how to add these and also how to change the UPN for each or multiple users.
- mail: This is the users Primary email address, and needs to be unique for each user. This can only contain a single value.
- proxyAddress: This is the users email addresses, again it needs to be unique for each user object. It cannot contain any spaces or invalid characters. This can have multiple entries if you have multiple mail domains in use.
- A note here – The Primary address will be same as the mail attribute, and will be in the format “SMTP:name@domain1.com”. Additional addresses will be in the format “smtp:name@domain2.com” (note the uppercase and lowercase).
- displayName: This is how your name will be displayed in the Global Address list, and is a combination of the givenName and surname attributes. Its not necessary to be unique, however it is recommended to avoid confusion.
For optimal use of the Global Address List, its recommended that these attributes are populated and correct for each account:
- givenName
- surname
- displayName
- Job Title
- Department
- Office
- Office Phone
- Mobile Phone
- Fax Number
- Street Address
- City
- State or Province
- Zip or Postal Code
- Country or Region
Conclusion
In this post, we looked at the steps required to prepare for synchronization for choosing an identity model, administrator and user security, and finally user account and attribute preparation.
In the next post, we’ll look at the steps to install Azure AD Connect to synchroniuze your identities. Hope you enjoyed this post, until next time!
