A few weeks ago, I posted a Wired.com article on my LinkedIn feed entitled “Your Microsoft Exchange Server Is a Security Liability” by Andy Greenburg.

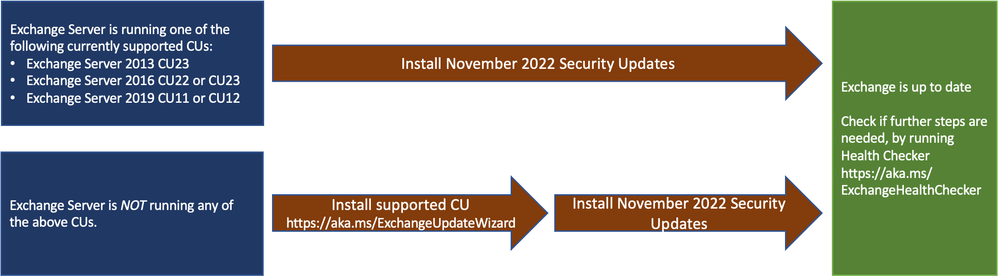
It was a great article that was released on the back of the most recent Exchange security vulnerability: this time the ProxyNotShell Zero-Day which oddly enough took almost 2 months to patch correctly. This has been released as part of the November Patch Tuesday release, and there are a few pre-requisites required (basically, be at the latest CU version for your Exchange environments and then apply the patch).
Its the latest in a long line of Exchange Server vulnerabilities. And its interesting to note this line in the Microsoft Tech Community Article that states:
These vulnerabilities affect Exchange Server. Exchange Online customers are already protected from the vulnerabilities addressed in these SUs and do not need to take any action other than updating any Exchange servers in their environment.
Well, of course Exchange Online isn’t affected. And in his Wired article, Andy Greenburg makes the point that Microsoft are happy to put all of their security efforts into protecting their Exchange Online services and customers as that makes up the majority of their customer base.
A brief history of Exchange Online
If we look back on the history of Exchange Online, it all started with BPOS way back in 2008. At the time of release, Microsoft had been privately offering customers a hosted email service since early 2007. That was around the time that Exchange Server 2007 was released, and it was also the time when Exchange started to get really complicated as regards the amount of different server roles involved and the overhead involved in maintaining them.
Now lets just put one thing on record. I would never dream of believing that Microsoft would conspire to over-complicate an on-premises solution with the intention of pushing more customers towards a cloud offering. I mean, they wouldn’t, would they?
There was always an option for having a Front-End sever separate, and the solution could sometimes be integrated with the long gone but not forgotten ISA Server.
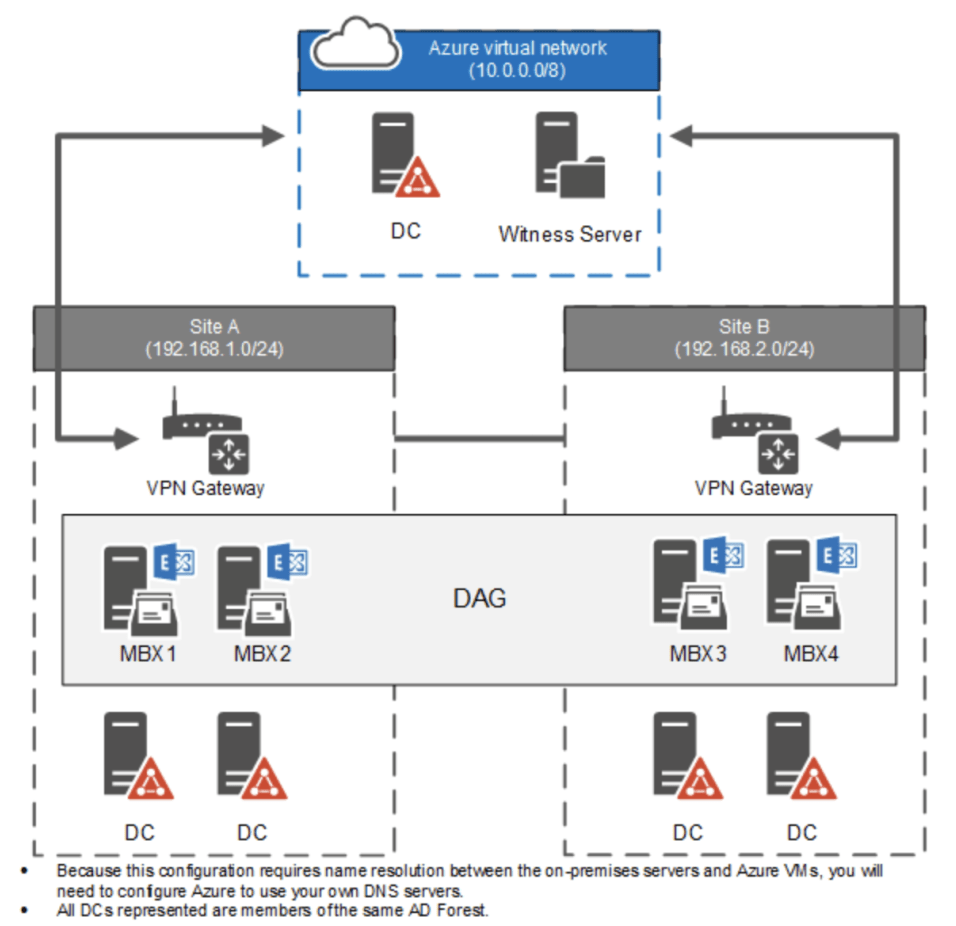
A look at the diagram below shows us the evolution of how Exchange roles have changed since 2000/2003 versions, and have pretty much rolled back into less complicated instances with the release of 2016/2019 versions:

Whether Microsoft intended to make Exchange Server more complicated or not, segregation of those roles was was needed due to the evolution of security threats and the rate of attacks that were happening on Exchange Server installations. What it did though was make Exchange a monster to manage from an adminstration perspective. Almost to the point that it made the decision to migrate to Exchange Online easier, as it offset the cost for some organisations of hiring a full time Exchange Administrator to manage that environment.
So I should Migrate?
The easy answer to that is yes, you should migrate. There’s a number of factors to take into consideration in answering that question:
- As we saw in the recent ProxyNotShell Zero-Day and the length of time it took to remediate, Microsoft really doesn’t care about on-premises Exchange anymore. From Andy’s Wired article, the quote from Microsoft states that:
"We strongly recommend customers migrate to the cloud to take advantage of real-time security and instant updates to help keep their systems protected from the latest threats". - The recent announcement that the next CU release will only be for Exchange Server 2019 (CU13). Because 2013 (which goes EOL in April 2023) and 2016 are now in Extened support, there will only be Security Updates released as required (such as the patch for the Zero-Day). But in order to install that and to get support from Microsoft, you must be in the most recent (and last) CU version.
- There hasn’t been an Exchange Server 2022 release yet. This was touted as being released in late 2021, and early indication were that this would be a subscription based service. The latest update on this was released in this post in June 2022, where the updated roadmap is to release the next Exchange Server version in 2025. Are we really prepared to wait that long if the vulnerabilities continue at this rate? Again, the interesting quote to take ouit of this release is:
The next version will require Server and CAL licenses and will be accessible only to customers with Software Assurance, similar to the SharePoint Server and Project Server Subscription Editions. - If you decide to migrate to Exchange Online, what does your business want to get out of the migration? Its the question thats rarely asked but its the most important one for any migration scenario. Because unlike 15 years ago when it was hosted Email and SharePoint with Live Meetings thrown in, Microsoft 365 is an extensive offering of Apps, Services and Licencing options and can open a gateway to a full cloud migration if planned correctly.
- You can go for the Basic plans such as Business Basic or Office 365 E1 and “just” have Email, Sharepoint and Teams if you want. But go a little further, you take Office licensing into the equation, and maybe Defender, and then maybe Azure Virtual Desktop rights. The opportunities are there, it’s not just about lifting and shifting the tech anymore. You can check out my previous post on the different licensing options here.
Why can’t everyone just migrate to Exchange Online?
The majority of companies have already migrated to Exchange – nearly 350 million Office365 users running over 7 billion (yes, billion) mailboxes running on 300,000 Exchange Online instances on servers running in Microsoft Datacenters across the world.
There are those special cases who still need Exchange Servers On-Premises, and those servers need to be hardened or have specialist teams supporting them.
Then there are those companies that have specific Data Residency requirements. And thats really all they say ….. "We're not moving our data into the Cloud". It shows a lack of understanding of how Data Residency in Exchange Online works. Depending on where you are in the world, you can find out on this site the different options for where your Microsoft 365 data would be stored post migration, depending on the options you select at tenant creation and also in what datacenters the services are available around the world (for example, Forms is not available in all datacenters, only some US ones).
Conclusion
Having your data secured by Microsoft is better than having your data potentially exposed because of a mistrust or misunderstanding of what the cloud can offer as regards data residency. You also have the admin overhead of managing and securing your Exchange environment.
I think its the end of the road for Exchange Server – while a migration amy sound painful to some, a compromised server is much worse.
Hope you enjoyed this post, until next time!