
It’s Day 10 of 100 Days of Cloud, and as promised in the last post, I’m going to talk about Azure Virtual Networks in today’s post and also the next post, so there will be 2 parts dedicated to Virtual Networks.
You’ll have seen Virtual Networks created as I was going through the Virtual Machine creating posts. So, what more is there to know about Virtual Networks? I mean, it’s just a private network in Azure for your resources with block of Subnets and IP Addresses that can be used to provide network connectivity, right?
Well yes, but that’s not all. Let’s dive into Virtual Networks and learn how they are the fundamental building block for your networks in Azure.
Overview
An Azure Virtual Network (VNet) is a network or environment that can be used to run VMs and applications in the cloud. When it is created, the services and Virtual Machines within the Azure network interact securely with each other. This is what we saw in the Default NSG Rules — any resources within the Virtual Network can talk to each other by default.
Virtual networks also provide the following key functionality:
- Communication with the Internet: Outbound Internet connectivity is enabled by default for all resources in the VNet.
- Communication between Azure resources: This is achieved in 3 ways, within the Virtual Network, through Service Endpoints, and through Vnet Peering.
- Communication with On-Premise resources, using VPN (Site-to-Site or Point-to-Site) or Azure Express Route.
- Filter Network Traffic: Using either NSG’s or Virtual Appliances such as Firewalls.
- Route Network Traffic: You can control where traffic is routed for each subnet using route tables, or use BGP (Border gateway protocol) to learn your On-Premise routes when using VPN or Azure Express Route.
A Virtual Network contains the following components:
- Subnets, which allow you to break the Vnet into one or more segments.
- Routing, which routes traffic and creates a routing table. This means data is delivered using the most suitable and shortest available path from source to destination
- Network Security Groups, which I covered in detail in Day 9.
One Vnet, Multiple Subnets
So I talked above about having multiple Subnets in a Vnet. This isn’t a new concept for anyone who has ever managed an On-Premise environment with multiple subnets — chances are at some point you would have expanded the network from good old “192.168.1.0/24”.
We’ve seen how a Virtual network and Subnet are created automatically when you create a Virtual Machine using default settings. Let’s expand on that and create a second VM on a new subnet in an existing Vnet to see how it behaves.
Referring quickly back to Day 8, I created a “Prod_VMs” resource group and Virtual machine. This used the default settings as I ran this PowerShell command to create:
New-AzVM –Name ProdVM1 –ResourceGroupName Prod_VMs –Location northeurope -Verbose
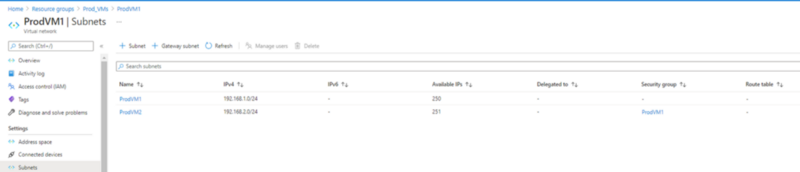
This in turn created a ProdVM1 Vnet which contained the following subnet:

So now, I’m going to create a second subnet called “ProdVM2” within this Vnet. And seeing as I’m in the Portal already, I’ll add it from there! So I click on the “+ Subnet” button to begin the process. As I can see below, it asks me for the following information:
- Name of the new Subnet
- Subnet Address range (this needs to be within the address range of the Vnet). I can also add a IPv6 range if required.
- NAT Gateway — this is needed to specify a Public IP Address to use for Outbound connectivity. I’ll leave this blank for now
- Network Security Group — this associates the Subnet with an NSG. I’ll choose the resource group NSG here.
- Route Table — needed for routing traffic for our subnet. Again, I’ll leave this blank.
- Service Endpoints — this option allows secure and direct access to the endpoint of an Azure Service without needing a Public IP Address on the Vnet. You can read more about Service Endpoints here.
- Subnet Delegation — this option means to can delegate the subnet specifically for a specified Azure resource, such as SQL, Web Hosting or Containers.
Once I have all options filled in, this is what I see:

And when I click save, this is what I see in the Portal under my Virtual Network:
Now I have a new subnet, I’m going to deploy a new Virtual Machine to that Subnet. I’m going to open PowerShell to do this, and I’ll enter this command to create the VM, specifying the Vnet, subnet and NSG I want to deploy it to:
New-AzVM -ResourceGroupName “Prod_VMs” -Location northeurope -Name “ProdVM2” -VirtualNetworkName “ProdVM1” -SubnetName ProdVM2 -SubnetAddressPrefix “192.168.2.0/24” -SecurityGroupName “ProdVM1” -OpenPorts 3389 -ImageName Win2016Datacenter -Size Standard_B2s -OsDiskDeleteOption Delete -Credential (Get-Credential) –Verbose
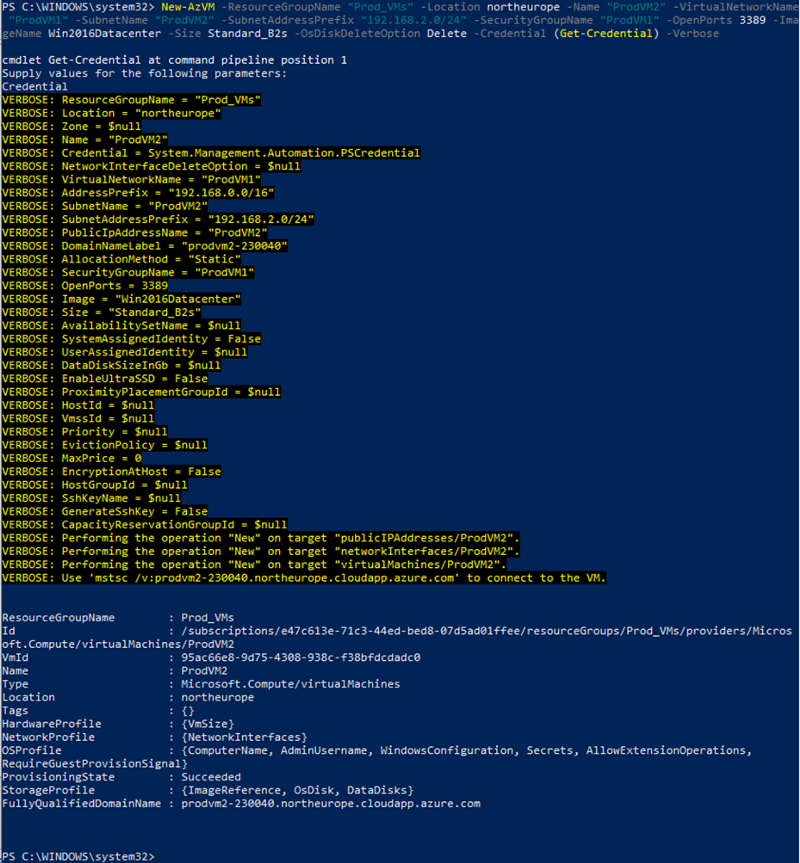
And if I check the Resource group, I can see my 2 VM’s with all resources present. Note that I don’t have a Virtual network or NSG dedicated to VM2:

Now, before I go any further. We can now see from the above how important it is to define your naming convention correctly in Azure when creating resources. This is indeed a lab environment which I’ll deleting, but in a Production environment you’ll need to know how to identify machines correctly.
Testing using NSGs
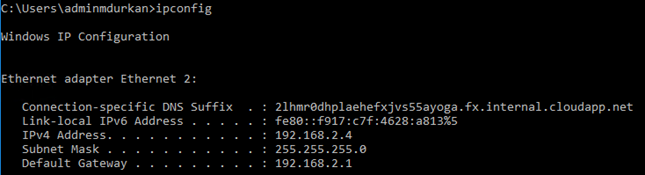
What I want to test now is connectivity between resources in the same Vnet to prove this works. I RDP into the 2 machines (which are on different subnets). A quick “ipconfig” on both gives me the IP Addresses of both, and they do indeed correspond to the subnets I created:

Now I’ll ping the machines from each other:

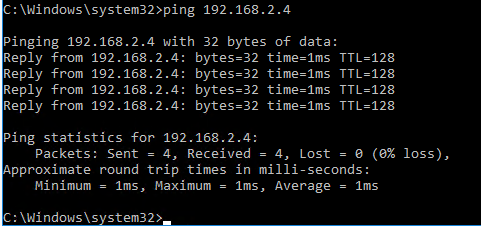
And it’s successful, so this proves that even though the 2 machines are in different subnets, they can communicate as the NSG Rules for traffic inside the Vnet allow this.
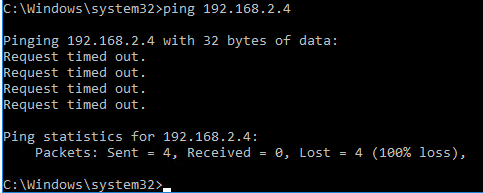
Now let’s mess this up a little! I’ll go into my NSG and add a rule denying Ping/ICMP from ProdVM1 to ProdVM2:

And if I try again to ping, it times out:
Conclusion
So as we can see, Virtual Networks are the building blocks of building your Azure Networks and resources from the ground up. They need to be planned properly to ensure the network design both meets your needs from a functionality and security standpoint. You also need to ensure the networks you create in Azure does not overlap with any of your On-Premise networks in the event you are operating in a Hybrid environment.
I did say that this was Part 1 of Virtual Networks — the next post is Part 2 where I’ll be delving into Vnet Peering, which allows you to connect to resources across Virtual Networks located either in the same region or across regions. and showing how that works.
Hope you enjoyed this post, until next time!!

One thought on “100 Days of Cloud — Day 10: Azure Virtual Networks (Part 1)”