100 Days of Cloud — Day 4: Azure Active Directory and RBAC Roles

In today’s post on my 100 days of Cloud journey, I’m going to talk about Azure Active Directory and RBAC Roles.

Anyone who has followed me so far on the journey is probably asking why I haven’t deployed or built anything yet. Isn’t that what the whole “100 Days” challenge is all about? I’m getting there, I will be deploying something in the coming days! But its important to firstly prepare our environment for use and understand the different layers and base level requirements before we build anything.

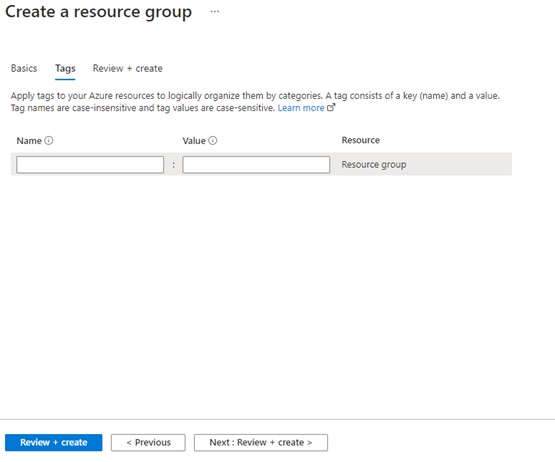
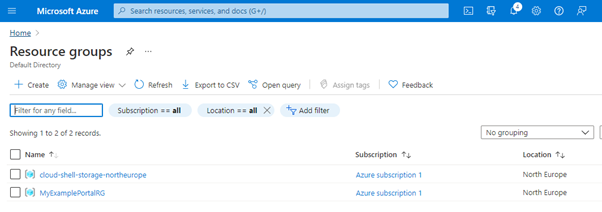
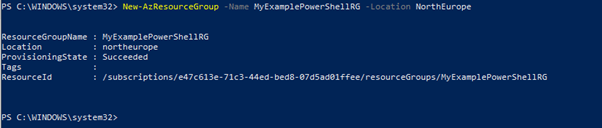
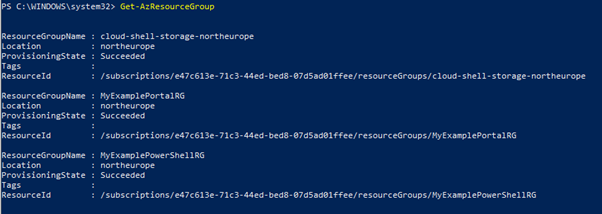
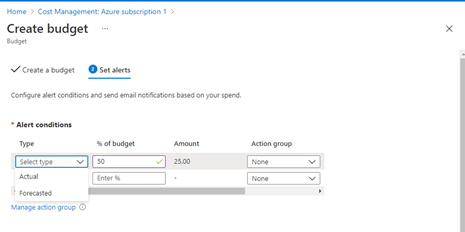
In Day 2, I created an Azure Account on the Portal and set up Cost Management and Budget Alerts. Day 3 talked about Resource Groups where we can group resources that are relevant to Project Teams, Departments or Locations.

Azure Active Directory

Every Azure environment is built on top of an Azure Active Directory
(Azure AD) tenant. Azure AD is Microsoft’s cloud-based identity and access management service, and when you sign up for an Azure Subscription, you automatically get an Azure Active Directory instance.

Now lets stop here for a minute because something sounds familiar here …. Active Directory! I know all about that! Domains, Hierarchy, GPO’s!

No. Its not the same as the Active Directory that on-premise admins would be used to managing. Active Directory has a Hierarchical Structure, where you can create OU’s relevant to Locations or Jobs Roles, add users, groups or computers to those OUs and manage those elements using Permissions Assignments or Group Policy Objects.

Azure Active Directory still has Users, Groups, Authentication and Authorization, but it uses the concept of Role Based Access Control (RBAC). There are a large number of predefined RBAC Roles defined, and I’ll try to explain how those work in the last section.

A quick note first — even though Active Directory and Azure Active Directory are distinctly different from an architecture perspective, they can talk to each other. The best real world example of this is in a Hybrid Office 365 deployment, where you use Azure AD Connect to sync on-premise users to Azure Active Directory for use with services such as Exchange Online, SharePoint and Teams.

Use Case

RBAC allows you to grant users the exact roles they need to do their jobs while striking the right balance between autonomy and corporate governance.

Lets get our use case for this — like Day 3, I want to run a Virtual Machine and its needs to run in a specific region (eg East US). I would create a Resource Group in East US, then create the resources required for the Virtual Machine (Storage Account, Virtual Network, and the Virtual Machine itself) within that Resource Group. However, the machine is running an Application, so it needs both a Website at the Front End, and an SQL Database at the back end to store the application data.

As you can see, we have a large number of responsibilities and different technologies in play here. What RBAC will allow us to do with this scenario is as follows:

  • Allow one user to manage virtual machines and another user to manage virtual networks in the entire subscription.
  • Allow a database administrator group to manage SQL databases in the resource group only.
  • Allow a user to manage all resources in a resource group, such as virtual machines, websites, and subnets
  • Allow an application to access all resources in a resource group

How RBAC works

RBAC works using the concept of Role Assignments, which controls how permissions are enforced. This uses 3 elements, which are:

  1. Security Principal (Who) — a user, group or application that you want to grant access to.
  2. Role Definition (What) — this is a collection of permissions. Roles can be high level (eg Owner) or specific (eg Virtual Machine Contributor).

Azure includes several built-in roles that you can use. The following lists four fundamental built-in roles:

  • Owner — Has full access to all resources, including the right to delegate access to others.
  • Contributor — Can create and manage all types of Azure resources, but can’t grant access to others.
  • Reader — Can view existing Azure resources.
  • User Access Administrator — Lets you manage user access to Azure resources.

If the built-in roles don’t meet the specific needs of your organization, you can create your own custom roles. A full list of built-in roles can be found here.

3. Scope (Where) — Scope is where the access applies to. You can apply the scope at multiple levels:

  • Management Group
  • Subscription
  • Resource Group
  • Resource

When you grant access at a parent scope, this is inherited by all child scopes.

RBAC is an allow-based model — this means that if you apply “Virtual Machine Reader” at Subscription Level and “Virtual Machine Contributor” at Resource Group Level, you will have Contributor rights at the Resource Group level

Conclusion

And that my friends is a very high level overview of how Azure Active Directory and RBAC works. In the coming days, I’ll be using RBAC to control access to the items I deploy along the cloud journey. Yes, we’re close to deploying something! Maybe next time — come back and find out!

Hope you enjoyed this post, until next time!!

100 Days of Cloud — Day 3: Azure Resource Groups

In today’s post on my 100 days of Cloud journey, I’m going to talk about Resource Groups in Azure and why they’re important.

Resource Groups are containers that hold related resources in an Azure Solution. Let’s say I want to run a Virtual Machine and its needs to run in a specific region (eg East US). I would create a Resource Group in East US, then create the resources required for the Virtual Machine (Storage Account, Virtual Network, and the Virtual Machine itself) within that Resource Group. This can be used to identify resources for a department or location for Billing Purposes.

I touched briefly on Resource Groups in yesterday’s post on Costs Management when I talked about assigning a budget to a resource group.

Sample Use Case

Let’s use an example to make this a bit clearer from a Cost Management perspective — your company has an Azure Subscription and has allocated a budget of $50000 a month. So, they set up a Budget Alert for that total against the Subscription. The company has 4 Departments — Accounts, Manufacturing, R&D and Sales.

The R&D Section is allocated its own Resources, and therefore gets its own R&D Resource Group with resources such as Virtual Machines within that. A budget of $10000 is allocated, and a Budget Alert Condition is set up in Azure against the R&D resource Group.

You can set up Resource groups in 3 ways — Azure Portal, Azure PowerShell and Azure CLI

Azure Portal Method

In the Azure Portal, search for Resource Groups in the Search Bar:

Click “Create”

On the “Basics” tab, select the Subscription you wish to place the Resource Group in, the Name for the Resource Group and the Region you wish to place the Resource Group in:

Click on the “Tags” tab — you can choose to create Tags on your resources. These will show up on your Billing Invoice meaning you can have multiple departments in the same Resource Group and bill them separately. We’ll leave this blank for now and discuss Tags in a future post. Click “Review and Create”:

And after less than a minute, the Resource Group shows as created:

What we’ll see in later posts is when we create Azure resources such as Virtual Networks and Machines, we have to place these in a Resource Group during creation.

And that’s the Portal way to do it! Onwards to PowerShell!

Azure PowerShell Method

In Day 2, we installed the Azure PowerShell Modules. So we need to run our

Connect-AzAccount 

command again to load the login prompt and sign into our Azure Account:

We can see we’re getting a warning about MFA (we’ll deal with that in a later post on Security), but this has connected us to the Tenant:

If we run

Get-AzResourceGroup

it shows all of the existing Resource groups in our subscription, including the one we created above in the Portal:

To create a Resource Group, its one command:

New-AzResourceGroup -Name MyExamplePowerShellRG -Location NorthEurope

And if we run the “Get” command again, we can see it there:

And also visible in the Portal:

To delete a Resource Group using PowerShell, its simply

Remove-AzResourceGroup

with the name of the group. And again we’ll run “Get” to confirm its gone:

Pretty slick, isn’t it. This needs to come with a warning though — deleting a Resource Group also deletes all resources contained within the Group. Permanently.

Luckily, we can apply “Locks” to Resource Groups or Resources to prevent them being deleted. We can specify 2 levels of locks:

  • CanNotDelete — means users can read and modify the resource, but cannot delete it
  • ReadOnly — means users can read the resource, but cannot modify or delete it

Locks can be used in conjunction with Azure RBAC (Role-Based Access Control) — again, we’ll cover that in a future post on Security.

So, lets create another Resource Group, and if we run

Get-AzResourceLock

we see there are no locks associated:

And lets run the following command to create the lock:

New-AzResourceLock -LockName LockPSGroup -LockLevel CanNotDelete -ResourceGroupName MyExamplePowerShellRG2

If we run

Get-AzResourceLock

It gives us the same info as above:

So now, lets try and delete the Resource Group. I’ll run

Remove-AzResourceGroup -Name MyExamplePowerShellRG2

And it fails because there is a lock on the resource group, which is exactly what we wanted to see!

Azure CLI Method

Azure CLI is a cross platform tool that can be used on Windows, Linux or macOS Systems to connect to Azure and execute commands on Azure resources. The link below gives instructions on how to Install Azure CLI for your system of choice:

https://docs.microsoft.com/en-us/cli/azure/install-azure-cli

Once we have Azure CLI Installed, we run

az login

in PowerShell or Command Prompt. This will redirect us as above to a browser asking us to login to the Portal. Once this is done, it returns us to the PowerShell Window:

So, in short, similar results as above, but different commands. To list the Resource Groups, run

az group list

To create a Resource Group, run

az group create

To create a lock, it

az lock create

And to delete a Resource Group (which should fail after creating the lock), the command is

az group delete --name MyExampleCLIRG

And as we can see it fails as expected.

Conclusion

As you noticed, I ran through the Azure CLI section as I’m using different commands to achieve the same result as the PowerShell section. I haven’t used Azure CLI a lot, as (like most people from a Microsoft System Admin background) I’m more of a PowerShell person traditionally. But as we’re using Azure resources in later posts, I’ll try to use it more as there will come a day when I’ll need it.

And that’s all for Day 3! Hope you enjoyed this post, until next time!!

100 Days of Cloud — Day 2: Azure Budgets and Cost Management

One of the most common concerns raised when any organization is planning a move to the Cloud is Cost. Unlike Microsoft 365 where you have set costs based on license consumption, there are a number of variables to be considered when moving to any Cloud Provider (be that Azure, AWS or others).

For example, let’s say we want to put a Virtual Machine in the Cloud. Its sounds easy — if this was on-premise, you would provision storage on your SAN, assign CPU and Memory, assign an IP Address, and if required purchase a license for the OS and other additional software that will be running on the Virtual Machine.

All of the above still holds true when creating a Virtual Machine in the Cloud, but there are also other considerations, such as:

  • What Storage Tier will the VM run on (Standard HDD, Standard SSD, Premium SSD)
  • How HA do we need the VM to be (Locally Redundant, Geographically Redundant)
  • Does the VM need to be scalable based on demand/local (Auto Scaling/Scale Sets)

In an on-premise environment, there needs to be an up-front investment (CAPEX) to make that feasible. When running with a Cloud Provider such as Azure, this uses an on-demand model (OPEX). This is where costs can mount.

There are a number of ways to tackle this. The Azure TCO (Total Cost of Ownership) Calculator gives an estimate of costs of moving infrastructure to the cloud. The important word there is “estimate”.

So you’ve created your VM with all of the settings you need, and the TCO has given you the estimate for what total “should” be on your monthly invoice. Azure Cost Management and Budgets can provide you with forecasting and alerts with real-time analysis of your projected monthly spend. That way, there are no nasty surprises when the invoice arrives!

Firstly, lets create our Azure Account. Browse the Azure Portal to sign up. You get:

  • 12 months of free services
  • $200 credit for 30 days
  • 25 always free services

Azure Portal Method

When your account is set up, go to https://portal.azure.com to sign in:

Once you’ve signed in, you can search for “Cost Management and Billing”

From the “Cost Management + Billing” page, select “Cost Management” from the menu:

This brings us into the Cost Management Page for our Azure Subscription:

One important thing to note here before we go any further. We can see at the top of the screen that the “Scope” for the Cost Management is the Azure Subscription. In Azure, Budgets can be applied to the following:

  • Management Group — these allow you to manage multiple subscriptions
  • Subscriptions — Default
  • Resource Groups — Logical groups of related resources that are deployed together. These can be assigned to Departments or Geographical Locations

Also, we can create monthly, quarterly or annual budgets. For the purposes of this demo (and the entire 100 Days), I’ll be using Subscriptions with a monthly budget.

Click on the “Budgets” menu option, and then click “Add”:

This brings us into the “Create Budget” menu. Fill in the required details and set a Budget Amount — I’m going to set €50 as my monthly budget:

Next, we need to set up Alert Conditions and email recipients. In Alert Conditions, we can see from the “Type” field that we can choose either Actual or Forecasted:

  • Actual Alerts are generated when the monthly spend reaches the alert condition.
  • Forecasted Alerts are generated in advance when Azure calculates that you are likely to exceed the alert condition based on the services you are using

Once you have your Alert Conditions configured, add one or more Alert Recipients who will receive alerts based on your conditions. Then click “Create”:

And now we see our budget was created successfully!

So, that’s the Azure Portal way to do it. There are 2 other ways, the first is using Azure PowerShell.

Azure PowerShell Method

Firstly, we need open Windows PowerShell, and install the Azure Module. To do this, run:

install-module -name Az

This will install all packages and modules we require to manage Azure from PowerShell.

We can then run the following commands to create our Budget:

Connect-AzAccount

will prompt us to log on to our subscription:

Once we are logged in, this will return details of our Subscription:

Run

Get-AzContext

to check what level we are at in the subscription:

Now, we can run the following command to create a new budget:

New-AzConsumptionBudget -Amount 100 -Name TestPSBudget -Category Cost -StartDate 2021–09–17 -TimeGrain Monthly -EndDate 2023–09–17 -ContactEmail durkanm@gmail.com -NotificationKey Key1 -NotificationThreshold 0.8 -NotificationEnabled

But it throws an error! Why?

It turns out that after a bit of digging, you can only set a budget using PowerShell if your subscription is part of an Enterprise Agreement. So I’m afraid because I’m using a free account here, its not going to work ☹.

Full documentation can be found at this link:

https://docs.microsoft.com/en-us/azure/cost-management-billing/costs/tutorial-acm-create-budgets#create-and-edit-budgets-with-powershell.

OK so lets move on to option 3, which is using Azure Resource Manager (ARM) Templates.

Azure Resource Manager (ARM) Templates Method

To do this, go to the following site:

https://docs.microsoft.com/en-us/azure/cost-management-billing/costs/quick-create-budget-template?tabs=CLI

And click on the “Deploy to Azure” button:

This will re-direct us into the Azure Portal and allow us to fill in the fields required to create our Budget:

And that is how we create a Budget (3 ways) in Azure. See you on Day 3!!

Hope you enjoyed this post, until next time!!

100 Days of Cloud — Day 1: Preparing the Environment

Welcome to Day 1 of my 100 Days of Cloud Journey.

I’ve always believed that good preparation is the key to success, and Day 1 is going to be about setting up the environment for use.

I’ve decided to split my 100 days across 3 disciplines:

  • Azure, because it’s what I know
  • AWS, because its what I want to know more about
  • And the rest of it …. This could mean anything: GitOps, CI/CD, Python, Ansible, Terraform, and maybe even a bit of Google Cloud thrown in for good measure. There might even be some Office365 Stuff!

It’s not exactly going to be an exact 3-way split across the disciplines, but let’s see how it goes.

Let’s start the prep. The goal of the 100 Days for me is to try and show how things can be done/created/deleted/modified etc. using both GUI and Command Line. For the former, we’ll be going what it says on the tin and go clicking around the screen of whatever Cloud Portal we are using. For the latter, it’s going to be done in Visual Studio Code:

To download, we go to https://code.visualstudio.com/download , and choose to download the System Installer:

Once the download completes, run the installer (Select all options). Once it completes, launch Visual Studio Code:

After selecting what color theme you want, the first place to go is click on the Source Control button. This is important, we’re going to use Source Control to manage and track any changes we make, while also storing our code centrally in GitHub. You’ll need a GitHub account (or if you’re using Azure GitOps or AWS Code Commit, you can use this instead). For the duration of the 100 Days, I’ll be using GitHub. Once your account is created, you can create a new repository (I’m calling mine 100DaysRepo)

So now, let’s click on the “install git” option. This will redirect us to https://git-scm.com, where we can download the Git installer. When running the setup, we can do defaults for everything EXCEPT this screen, where we say we want Git to use Visual Studio Code as its default editor:

Once the Git install is complete, close and re-open Visual Studio Code. Now, we see we have the option to “Open Folder” or “Clone Repository”. Click the latter option, at the top of the screen we are prompted to provide the URL of the GitHub Repository we just created. Enter the URL, and click “Clone from GitHub”:

We get a prompt to say the extension wants to sign into GitHub — click “Allow”:

Clicking “Allow” redirects us to this page, click “Continue”:

This brings us to the logon prompt for GitHub:

This brings up “Success” message and an Auth Token:

Click on the “Signing in to github.com” message at the bottom of the screen, and then Paste the token from the screen above into the “Uri” at the top:

Once this is done, you will be prompted to select the local location to clone the Repository to. Once this has completed, click “Open Folder” and browse to the local location of the repository to open the repository in Visual Studio Code.

Now, let’s create a new file. It can be anything, we just want to test the commit and make sure it’s working. So let’s click on “File-New File”. Put some text in (it can be anything) and then save the file with whatever name you choose:

My file is now saved. And we can see that we now have an alert over in Source Control:

When we go to Source Control, we see the file is under “Changes”. Right-click on the file for options:

We can choose to do the following:

– Discard Changes — reverts to previous saved state

– Stage Changes — saves a copy in preparation for commit

When we click “Stage Changes”, we can see the file moves from “Changes” to “Staged Changes”. If we click on the file, we can see the editor brings up the file in both states — before and after changes:

From here, click on the menu option (3 dots), and click “Commit”. We can also use the tick mark to Commit:

This then prompts to provide a commit message. Enter something relevant to the changes you’ve made here and hit enter:

And it fails!!!

OK, so we need to configure a Name and Email ID in GitBash. So open GitBash and run the following:

git config — global user.name “your_name”
git config — global user.email “your_email_id”

So let’s try that again. We’ll commit first:

Looks better, so now we’ll do a Push:

And check to see if our file is in VS Code? Yes it is!

OK, so that’s our Repository done and Source Control and cloning with GitHub configured.

That’s the end of Day 1! As we progress along the journey and as we need them, I’ll add some Visual Studio Code extensions which will give us invaluable help along the journey. You can browse these by clicking on the “Extensions” button on the right:

Extensions add languages, tools and debuggers to VS Code which auto-recognize file types and code to enhance the experience.

Hope you enjoyed this post, until next time!!