Azure Networking Zero to Hero – Network Security Groups

In this post, I’m going to stay within the boundaries of our Virtual Network and briefly talk about Network Security Groups, which filter network traffic between Azure resources in an Azure virtual network.

Overview

So, its a Firewall right?

NOOOOOOOOOO!!!!!!!!

While a Network Security Group (or NSG for short) contains Security Rules to allow or deny inbound/outbound traffic to/from several types of Azure Resources, it is not a Firewall (it may be what a Firewall looked like 25-30 years ago, but not now). NSG’s can be used in conjunction with Azure Firewall and other network security services in Azure to help secure and shape how your traffic flows between subnets and resources.

Default Rules

When you create a subnet in your Virtual Network, you have the option to create an NSG which will be automatically associated with the subnet. However, you can also create an NSG and manually associate it with either a subnet, or directly to a Network Interface in a Virtual Machine.

When an NSG is created, it always has a default set of Security Rules that look like this:

The default Inbound rules allow the following:

  • 65000 — All Hosts/Resources inside the Virtual Network to Communicate with each other
  • 65001 — Allows Azure Load Balancer to communicate with the Hosts/resources
  • 65500 — Deny all other Inbound traffic

The default Outbound rules allow the following:

  • 65000 — All Hosts/Resources inside the Virtual Network to Communicate with each other
  • 65001 — Allows all Internet Traffic outbound
  • 65500 — Deny all other Outbound traffic

The default rules cannot be edited or removed. NSG’s are created initially using a Zero-Trust model. The rules are processed in order of priority (lowest numbered rule is processed first). So you would need to build you rules on top of the default ones (for example, RDP and SSH access if not already in place).

Configuration and Traffic Flow

Some important things to note:

  • The default “65000” rules for both Inbound and Outbound – this allows all virtual network traffic. It means that if we have 2 subnets which each have a virtual machine, these would be able to communicate with each other without adding any additional rules.
  • As well as IP addresses and address ranges, we can use Service Tags which represents a group of IP address prefixes from a range of Azure services. These are managed and updated by Microsoft so you can use these instead of having to create and manage multiple Public IP’s for each service. You can find a full list of available Service Tags that can be used with NSG’s at this link. In the image above, “VirtualNetwork” and “AzureLoadBalancer” are Service Tags.
  • A virtual network subnet or interface can only have one NSG, but an NSG can be assigned to many subnets or interfaces. Tip from experience, this is not a good idea – if you have an application design that uses multiple Azure Services, split these services into dedicated subnets and apply NSG’s to each subnet.
  • When using a NSG associated with a subnet and a dedicated NSG associated with a network interface, the NSG associated with the Subnet is always evaluated first for Inbound Traffic, before then moving on to the NSG associated with the NIC. For Outbound Traffic, it’s the other way around — the NSG on the NIC is evaluated first, and then the NSG on the Subnet is evaluated. This process is explained in detail here.
  • If you don’t have a network security group associated to a subnet, all inbound traffic is blocked to the subnet/network interface. However, all outbound traffic is allowed.
  • You can only have 1000 Rules in an NSG by default. Previously, this was 200 and could be raised by logging a ticket with Microsoft, but the max (at time of writing) is 1000. This cannot be increased. Also, there is a max limit of 5000 NSG’s per subscription.

Logging and Visibility

  • Important – Turn on NSG Flow Logs. This is a feature of Azure Network Watcher that allows you to log information about IP traffic flowing through a network security group,  including details on source and destination IP addresses, ports, protocols, and whether traffic was permitted or denied. You can find more in-depth details on flow logging here, and a tutorial on how to turn it on here.
  • To enhance this, you can use Traffic Analytics, which analyzes Azure Network Watcher flow logs to provide insights into traffic flow in your Azure cloud.

Conclusion

NSGs are fundamental to securing inbound and outbound traffic for subnets within an Azure Virtual Network, and form one of the first layers of defense to protect application integrity and reduce the risk of data loss prevention.

However as I said at the start of this post, an NSG is not a Firewall. The layer 3 and layer 4 port-based protection that NSGs provide has significant limitations and cannot detect other forms of malicious attacks on protocols such as SSH and HTTPS that can go undetected by this type of protection.

And that’s one of the biggest mistakes I see people make – they assume that NSG’s will do the job because Firewalls and other network security sevices are too expensive.

Therefore, NSG’s should be used in conjunction with other network security tools, such as Azure Firewall and Web Application Firewall (WAF), for any devices presented externally to the internet or other private networks. I’ll cover these in detail in later posts.

Hope you enjoyed this post, until next time!!

Azure Networking Zero to Hero – Routing in Azure

In this post, I’m going to try and explain Routing in Azure. This is a topic that grows in complexity the more you expand your footprint in Azure in terms of both Virtual Networks, and also the services you use to both create your route tables and route your traffic.

Understanding Azure’s Default Routing

As we saw in the previous post when a virtual network is created, this also creates a route table. This contains a default set of routes known as System Routes, which are shown here:

SourceAddress prefixesNext hop type
DefaultVirtual Network Address SpaceVirtual network
Default0.0.0.0/0Internet
Default10.0.0.0/8None (Dropped)
Default172.16.0.0/12None (Dropped)
Default192.168.0.0/16None (Dropped)

Lets explain the “Next hop types” is in a bit more detail:

  • Virtual network: Routes traffic between address ranges within the address space of a virtual network. So lets say I have a Virtual Network with the 10.0.0.0/16 address space defined. I then have VM1 in a subnet with the 10.0.1.0/24 address range trying to reach VM2 in a subnet with the 10.0.2.0/24 address range. It know to keep this within the Virtual Network and routes the traffic successfully.
  • Internet: Routes traffic specified by the address prefix to the Internet. If the destination address range is not part of a Virtual Network address space, its gets routed to the Internet. The only exception to this rule is if trying to access an Azure Service – this goes across the Azure Backbone network no matter which region the service sits in.
  • None: Traffic routed to the None next hop type is dropped. This automatically includes all Private IP Addresses as defined by RFC1918, but the exception to this is your Virtual Network address space.

Simple, right? Well, its about to get more complicated …..

Additional Default Routes

Azure adds more default system routes for different Azure capabilities, but only if you enable the capabilities:

SourceAddress prefixesNext hop type
DefaultPeered Virtual Network Address SpaceVNet peering
Virtual network gatewayPrefixes advertised from on-premises via BGP, or configured in the local network gatewayVirtual network gateway
DefaultMultipleVirtualNetworkServiceEndpoint

So lets take a look at these:

  • Virtual network (VNet) peering: when a peering is created between 2 VNets, Azure adds the address spaces of each of the peered VNets to the Route tables of the source VNets.
  • Virtual network gateway: this happens when S2S VPN or Express Route connectivity is establised and adds address spaces that are advertised from either Local Network Gateways or On-Premises gateways via BGP (Border Gateway Protocol). These address spaces should be summarized to the largest address range coming from On-Premises, as there is a limit of 400 routes per route table.
  • VirtualNetworkServiceEndpoint: this happens when creating a direct service endpoint for an Azure Service, enables private IP addresses in the VNet to reach the endpoint of an Azure service without needing a public IP address on the VNet.

Custom Routes

The limitations of sticking with System Routes is that everything is done for you in the background – there is no way to make changes.

This is why if you need to make change to how your traffic gets routed, you should use Custom Routes, which is done by creating a Route Table. This is then used to override Azure’s default system routes, or to add more routes to a subnet’s route table.

You can specify the following “next hop types” when creating user-defined routes:

  • Virtual Appliance: This is typically Azure Firewall, Load Balancer or other virtual applicance from the Azure Marketplace. The appliance is typically deployed in a different subnet than the resources that you wish to route through the Virtual Appliance. You can define a route with 0.0.0.0/0 as the address prefix and a next hop type of virtual appliance, with the next hop address set as the internal IP Address of the virtual appliance, as shown below. This is useful if you want all outbound traffic to be inspected by the appliance:
  • Virtual network gateway: used when you want traffic destined for specific address prefixes routed to a virtual network gateway. This is useful if you have an On-Premises device that inspects traffic an determines whether to forward or drop the traffic.
  • None: used when you want to drop traffic to an address prefix, rather than forwarding the traffic to a destination.
  • Virtual network: used when you want to override the default routing within a virtual network.
  • Internet: used when you want to explicitly route traffic destined to an address prefix to the Internet

You can also use Service Tags as the address prefix instead of an IP Range.

How Azure selects which route to use?

When outbound traffic is sent from a subnet, Azure selects a route based on the destination IP address, using the longest prefix match algorithm. So if 2 routes exist with 10.0.0.0/16 and a 10.0.0.0/24, Azure will select the /24 as it has the longest prefix.

If multiple routes contain the same address prefix, Azure selects the route type, based on the following priority:

  • User-defined route
  • BGP route
  • System route

So, the initial System Routes are always the last ones to be checked.

Conclusion and Resources

I’ve put in some links already in the article. The main place to go for a more in-depth deep dive on Routing is this MS Learn Article on Virtual Network Traffic Routing.

As regards people to follow, there’s no one better than my fellow MVP Aidan Finn who writes extensively about networking over at his blog. He also delivered this excellent session at the Limerick Dot Net Azure User Group last year which is well worth a watch for gaining a deep understanding of routing in Azure.

Hope you enjoyed this post, until next time!!

Azure Networking Zero to Hero – Intro and Azure Virtual Networks

Welcome to another blog series!

This time out, I’m going to focus on Azure Networking, which covers a wide range of topics and services that make up the various networking capabilities available within both Azure cloud and hybrid environments. Yes I could have done something about AI, but for those of you who know me, I’m a fan of the classics!

The intention is to have this blog series serve as both a starting point for anyone new to Azure Networking who is looking to start a learning journey towards that AZ-700 certification, or as an easy reference point for anyone looking for a list of blogs specific to the wide scope of services available in the Azure Networking family.

There isn’t going to be a set number of blog posts or “days” – I’m just going to run with this one and see what happens! So with that, lets kick off with our first topic, which is Virtual Networks.

Azure Virtual Networks

So lets start with the elephant in the room. Yes, I have written a blog post about Azure Virtual Networks before – 2 of them actually as part of my “100 Days of Cloud” blog series, you’ll find Part 1 and Part 2 at these links.

Great, so thats todays blog post sorted!!! Until next ti …… OK, I’m joking – its always good to revise and revisit.

After a Resource Group, a virtual network is likely to be the first actual resource that you create. Create a VM, Database or Web App, the first piece of information it asks you for is what Virtual Network to your resource in.

But of course if you’ve done it that way, you’ve done it backwards because you really should have planned your virtual network and what was going to be in it first! A virtual network acts as a private address space for a specific set of resource groups or resources in Azure. As a reminder, a virtual network contains:

  • Subnets, which allow you to break the virtual network into one or more dedicated address spaces or segments, which can be different sizes based on the requirements of the resource type you’ll be placing in that subnet.
  • Routing, which routes traffic and creates a routing table. This means data is delivered using the most suitable and shortest available path from source to destination.
  • Network Security Groups, which can be used to filter traffic to and from resources in an Azure Virtual Network. Its not a Firewall, but it works like one in a more targeted sense in that you can manage traffic flow for individual virtual networks, subnets, and network interfaces to refine traffic.

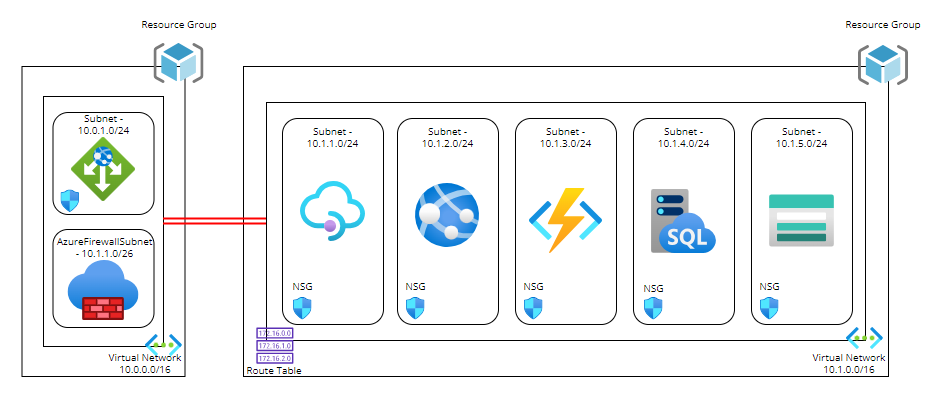
A lot of wordy goodness there, but the easiest way to illustrate this is using a good old diagram!

Lets do a quick overview:

  • We have 2 Resource Groups using a typical Hub and Spoke model where the Hub contains our Application Gateway and Firewall, and our Spoke contains our Application components. The red lines indicate peering between the virtual networks so that they can communicate with each other.
  • Lets focus on the Spoke resource group – The virtual network has an address space of 10.1.0.0/16 defined.
  • This is then split into different subnets where each of the components of the Application reside. Each subnet has an NSG attached which can control traffic flow to and from different subnets. So in this example, the ingress traffic coming into the Application Gateway would then be allows to pass into the API Management subnet by setting allow rules on the NSG.
  • The other thing we see attached to the virtual network is a Route Table – we can use this to define where traffic from specific sources is sent to. We can use System Routes which are automatically built into Azure, or Custom Routes which can be user defined or by using BGP routes across VPN or Express Route services. The idea in our diagram is that all traffic will be routed back to Azure Firewall for inspection before forwarding to the next destination, which can be another peered virtual network, across a VPN to an on-premises/hybrid location, or straight out to an internet destination.

Final thoughts

Some important things to note on Virtual Networks:

  • Planning is everything – before you even deploy your first resource group, make sure you have your virtual networks defined, sized and mapped out for what you’re going to use them for. Always include scaling, expansion and future planning in those decisions.
  • Virtual Networks reside in a single resource group, but you technically can assign addresses from subnets in your virtual network to resources that reside in different resource groups. Not really a good idea though – try to keep your networking and resources confined within resource group and location boundaries.
  • NSG’s are created using a Zero-Trust model, so nothing gets in or out unless you define the rules. The rules are processed in order of priority (lowest numbered rule is processed first), so you would need to build you rules on top of the default ones (for example, RDP and SSH access if not already in place).

Hope you enjoyed this post, until next time!!