100 Days of Cloud – Day 90: Azure Virtual Desktop Core Concepts

Its Day 90 of my 100 Days of Cloud journey and in this post I’ll be taking a looks at the benefits and architecture of Azure Virtual Desktop.

In the last post we touched briefly on Azure Virtual Desktop in comparison to Windows 365 Cloud PC. Both solutions allow you to easily support accessibility for users, on any device, from anywhere. However while Windows 365 Cloud PC can be easily deployed and managed, Azure Virtual Desktop has greater flexibility which leads to a greater management overhead for administrators.

In the next 2-3 posts after this one, we’ll demo how to set up an Azure Virtual Desktop deployment, but first let familiarize ourselves with the benefits, core concepts and architecture.

Benefits of Azure Virtual Desktop

With Azure Virtual Desktop you can:

  • Set up a multi-session Windows 10 deployment that delivers a full Windows 10 with scalability.
  • Virtualize Microsoft 365 Apps for enterprise and optimize it to run in multi-user virtual scenarios.
  • Provide Windows 7 virtual desktops with free Extended Security Updates.
  • Bring your existing Remote Desktop Services (RDS) and Windows Server desktops and apps to any computer.
  • Virtualize both desktops and apps.
  • Manage Windows 10, Windows Server, and Windows 7 desktops and apps with a unified management experience.
  • Bring your own image for production workloads.
  • Use autoscale to automatically increase or decrease capacity based on time of day, specific days of the week, or as demand changes, helping to manage cost.

Core Concepts and Hierarchy

Before we jump into the Demo, lets take a quick look at some of the key concepts of Azure Virtual Desktop and where they each sit in the hierarchy of an Azure Virtual Desktop architecture.

Host Pools

Host pools are a collection of one or more identical virtual machines within Azure Virtual Desktop tenant environments. Each host pool can be associated with multiple RemoteApp groups, one desktop app group, and multiple session hosts. Host Pools can be one of two types:

  • Personal, where each session host is assigned to individual users.
  • Pooled, where session hosts can accept connections from any user authorized to an application group within the host pool. You can set additional properties on the host pool to change its load-balancing behavior, how many sessions each session host can take, and what the user can do to session hosts in the host pool while signed in to their Azure Virtual Desktop sessions. You control the resources published to users through application groups.

There is no limit to the number of pools, and these can be easily scaled either manually or automatically allowing you to add or reduce capacity based on demand which can help manage costs.

Application Groups

An Application group is a logical grouping of applications installed on session hosts in the host pool. An application group can be one of two types:

  • RemoteApp, where users access the RemoteApps you individually select and publish to the application group.
  • Desktop, where users access the full desktop By default, a desktop application group (named “Desktop Application Group”) is automatically created whenever you create a host pool. You can remove this application group at any time. However, you can’t create another desktop application group in the host pool while a desktop application group already exists. To publish RemoteApps, you must create a RemoteApp application group. You can create multiple RemoteApp application groups to accommodate different worker scenarios. Different RemoteApp application groups can also contain overlapping RemoteApps.

Workspaces

A workspace is a logical grouping of application groups in Azure Virtual Desktop. Each Azure Virtual Desktop application group must be associated with a workspace for users to see the remote apps and desktops published to them.

End users

After you’ve assigned users to their application groups, they can connect to a Azure Virtual Desktop deployment with any of the Azure Virtual Desktop clients.

The diagram below is a typical Azure Virtual Desktop Architecture:

Image Credit – Microsoft

Components – Microsoft Managed versus Customer Managed

We’ve all seen the “as a service” model which is used sometimes to explain what services Microsoft manages versus what a customer managed across IAAS, PAAS and SAAS offerings.

Image Credit – Microsoft

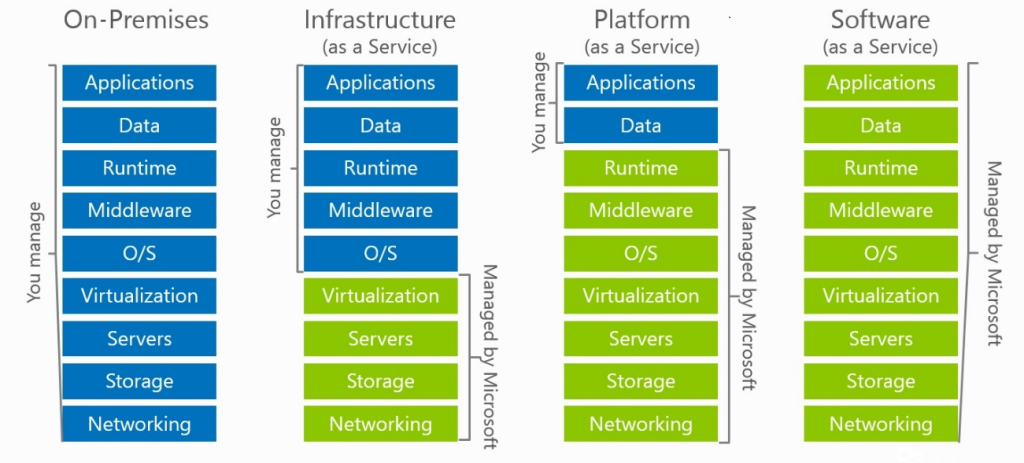
Azure Virtual Desktop is no different in that some of the components of the service are managed by Microsoft and some are required be be managed by the customer. Lets do a quick breakdown of these.

Microsoft Managed

Microsoft manages the following Azure Virtual Desktop services, as part of Azure:

  • Web Access Service: allows users access virtual desktops and remote apps through a web browser from anywhere on any device. You can secure Web Access using multifactor authentication in Azure Active Directory.
  • Remote Connection Gateway Service: allows remote users to connect to Azure Virtual Desktop apps and desktops from any internet-connected device that can run an Azure Virtual Desktop client. The client connects to a gateway, which then orchestrates a connection from a VM back to the same gateway.
  • Connection Broker Service: service manages user connections to virtual desktops and remote apps. The Connection Broker provides load balancing and reconnection to existing sessions.
  • Remote Desktop Diagnostics: event-based aggregator that marks each user or administrator action on the Azure Virtual Desktop deployment as a success or failure. Administrators can query the event aggregation to identify failing components.
  • Extensibility or Management: Azure Virtual Desktop includes several extensibility components. You can manage Azure Virtual Desktop using Windows PowerShell or with the provided REST APIs, which also enable support from third-party tools.

Customer Managed

Customers manage these components of Azure Virtual Desktop solutions:

  • Azure Virtual Network: allows Azure resources like VMs communicate privately with each other and with the internet. You can enforce your organizations policies by connecting Azure Virtual Desktop host pools to an Active Directory domain. You can connect an Azure Virtual Desktop to an on-premises network using a virtual private network (VPN), or use Azure ExpressRoute to extend the on-premises network into the Azure cloud over a private connection.
  • Identity – there are 2 options for authentication against Azure Virtual Desktop:
    • Azure Active Directory: Azure Virtual Desktop uses Azure AD for identity and access management. Azure AD integration applies Azure AD security features like conditional access, multi-factor authentication, and the Intelligent Security Graph, and helps maintain app compatibility in domain-joined VMs.
    • Active Directory Domain Services: Azure Virtual Desktop VMs must domain-join an AD DS service, and the AD DS must be in sync with Azure AD to associate users between the two services. You can use Azure AD Connect to associate AD DS with Azure AD.
  • Azure Virtual Desktop session hosts: A host pool can run the following operating systems:
    • Windows 7 Enterprise
    • Windows 10 Enterprise
    • Windows 10 Enterprise Multi-session
    • Windows Server 2012 R2 and above
    • Custom Windows system images with pre-loaded apps, group policies, or other customizations
  • Azure Virtual Desktop Workspace: this is used to manage and publish host pool resources.

As I also touched briefly on in the last post, you also have the option to host your Azure Virtual Desktop environment locally on an on-premises Azure Stack HCI infrastructure. This however is still in preview, and you can find more details here.

Conclusion

Thats a high-level overview of the benefits and concepts of Azure Virtual Desktop. You can find the full details of how it works in the official Microsoft Documentation here. In the next post, we’ll start our Demo build of an AVD environment!

Hope you enjoyed this post, until next time!

100 Days of Cloud – Day 89: Windows 365 Cloud PC or Azure Virtual Desktop?

Its Day 89 of my 100 Days of Cloud journey, and todays post is going to give a quick comparison between Windows 365 Cloud PC and Azure Virtual Desktop.

The global Covid-19 pandemic has accelerated the demand for cloud-based solutions. Businesses and Educational Institutions have needed to quickly adapt to remote work and distance learning in a hybrid world.

While we’ve all seen or heard of Windows Remote Desktop Services, Citrix would to most of us be more recognizable as the leader in the VDI and Remote Desktop space down through the years. However, Microsoft are playing catch-up and given the integration offerings that are available across the multitude of Cloud Services, they have 2 offerings in Windows 365 Cloud PC and Azure Virtual Desktop. Both solutions allow you to easily support accessibility for users, on any device, from anywhere.

So they both sound like they do the same thing, and when logging on both look the same, but they’re not really. Lets take a closer look at the differences between then, the difference in costs and licencing, and try to determine which one is the best fit for your business.

Windows 365 Cloud PC

Windows 365 is a cloud-based service that automatically creates a new type of Windows virtual machine (Cloud PCs) for your end users. Each Cloud PC is assigned to an individual user and is their dedicated Windows device. Licences are purchased either through the Microsoft 365 Admin center or through the Windows Products site (if you do not have a Microsoft 365 Subscription), and are assigned directly to the user. When you assign a licence, the Cloud PC is automatically provisioned for you.

There are 2 subscription levels to choose from which each have a number of size options:

  • Business: this is for smaller organizations (up to 300 users) that want a simple way to buy, deploy, and manage Cloud PCs. The 3 size options are:
    • Basic (approx €35 per month): Recommended for light productivity and web browsers. Comes with 2 vCPU, 4GB RAM and 128GB of Storage. Supports Desktop versions of Office Apps, Teams and OneDrive
    • Standard (approx $40 per month): Recommended for full productivity and line of business apps. Comes with 2 vCPU, 8GB RAM and 128GB of Storage. Supports Desktop versions of Office Apps, Teams and OneDrive
    • Premium (approx $65 per month): Recommended for high performance workloads and heavy data processing. Comes with 4 vCPU, 16GB RAM and 128GB of Storage. Supports Desktop versions of Office Apps, Teams and OneDrive and also Dynamics 365, PowerBI and Visual Studio.
  • Enterprise: this is for organizations that want to manage their Cloud PCs with Microsoft Endpoint Manager and take advantage of integrations with other Microsoft services. There is no user limit on the Enterprise tier. The 3 size options are:
    • Basic (approx €35 per month): Integrated with Microsoft Endpoint Manager. Recommended for light productivity and web browsers. Comes with 2 vCPU, 4GB RAM and 128GB of Storage. Supports Desktop versions of Office Apps, Teams and OneDrive
    • Standard (approx $40 per month): Integrated with Microsoft Endpoint Manager. Recommended for full productivity and line of business apps. Comes with 2 vCPU, 8GB RAM and 128GB of Storage. Supports Desktop versions of Office Apps, Teams and OneDrive
    • Premium (approx $65 per month): Integrated with Microsoft Endpoint Manager. Recommended for high performance workloads and heavy data processing. Comes with 4 vCPU, 16GB RAM and 128GB of Storage. Supports Desktop versions of Office Apps, Teams and OneDrive and also Dynamics 365, PowerBI and Visual Studio.

So as we can see, there is no difference in the performance levels between the tiers, the only difference is the Microsoft Endpoint Manager integration on the Enterprise tier.

The big differences and advantage that Enterprise offers is:

  • Cloud PCs can be joined to your enterprise Active Directory domain and synced to Azure AD, or Azure AD joined.
  • the ability to connect your Cloud PC to your on-premises resources.
  • allows you to use custom images that you can build yourself as the base images for your Cloud PCs.

If you are not sure which option is best for you, Microsoft provides a Cloud PC Chooser website where you can fill in a number of questions to determine which Windows 365 Cloud PC is the right option for your business.

Azure Virtual Desktop

While Azure Virtual Desktop is similar in many ways to Windows 365 Cloud PC, these are really only on the surface. It also provides a virtual desktop to the user, but there is more flexibility in how this is delivered. However that flexibility comes with a greater need for administration and a larger workload for IT professionals.

One of the major benefits of Azure Virtual Desktop is that it can be delivered as either a personal desktop in the same way as Windows 365 Cloud PC or a pooled desktop where multiple users can access a pool of desktops.

Personal Desktops functions in the same way as Windows 365 Cloud PC but runs in a “pay as you use” pricing model and also allows for multiple user sessions on a single Windows 10 or 11 desktop.

Pooled desktops or personal host pools are a collection of nodes that runs a “user to desktop” relationship. You can create a pool of nodes to whatever sizing specification you require and assign them to users, so for example you could create a pool of 8 nodes and assign 40 users to those nodes. The user settings, profile and data changes are still present after logout as these are abstracted away from the OS Drives of each node to an FSLogix Profile container which holds the user profiles and is mounted transparently at logon to integrate with the User Session.

There is no limit to the number of pools, and these can be easily scaled either manually or automatically allowing you to add or reduce capacity based on demand which can help manage costs.

There is also an option (currently in preview) to run Azure Virtual Desktop on your on-premises Azure Stack HCI infrastructure which can further reduce costs and meet data locality requirements.

Conclusion

So thats an in-depth look and Windows 365 Cloud PC and a brief look at the differences in Azure Virtual Desktop, which I’m going to cover in more detail in the next few posts.

So which is the right choice? Depends on your requirements, Windows 365 Cloud PC gives you recurring monthly costs with very little administration or overheads, while Azure Virtual Desktop gives you more flexibility and a “pay as you use” model, but the administration effort is higher. There are plenty of 3rd party integrators out there to help with this administration load, and Nerdio is premier player in the market at present.

Hope you enjoyed this post, until next time!

100 Days of Cloud – Day 88: Azure Kubernetes Service

Its Day 88 of my 100 Days of Cloud journey and as promised, in todays post I’ve finally gotten to Azure Kubernetes Service.

On Day 86, we introduced the components that make up Kubernetes, tools used to manage the environment and also some considerations you need to be aware of when using Kubernetes, and in the last post we installed a local Kubernetes Cluster using Minikube.

Today we move on to Azure Kubernetes Service and we’ll look first at how this differs in architecture from an on-premises installation of Kubernetes.

Azure Kubernetes Service

As always lets start with the definition – Azure Kubernetes Service (AKS) is a managed Kubernetes service that lets you quickly deploy and manage clusters. The operational overhead is offloaded to Azure, and it handles critical tasks such as health monitoring and maintenance.

When you create an AKS cluster, a control plane or master node is automatically created and configured, and provided at no cost as a managed Azure resource. You only pay for the nodes attached to the AKS cluster. The control plane and its resources reside only on the region where you created the cluster.

Image Credit: Microsoft

AKS Cluster Nodes are run on Azure Virtual Machines (which can be either Linux or Windows Server 2019), so you can size your nodes based on the storage, CPU, memory and type that you require for your workloads. These are billed as standard VMs so any discounts (including reservations) are automatically applied.

Its important to note though that VM sizes with less than 2 CPUs may not be used with AKS – this is to ensure that the required system required pods and applications can run reliably.

When you scale out the number of nodes, Azure automatically creates and configures the requested number of VMs. Nodes of the same configuration are known as Node Pools and you define the number of nodes required in a pool during initial setup (which we’ll see below).

Azure has the following limits:

  • Maximum of 5000 Clusters per subscription
  • Maximum of 100 Nodes per cluster with Virtual Machine Availability Sets and Basic Load Balancer SKU
  • Maximum of 1000 Nodes per cluster with Virtual Machine Scale Sets and Standard Load Balancer SKU
  • Maximum of 100 Node Pools per cluster
  • Maximum of 250 Pods per node

When you create a cluster using the Azure portal, you can choose a preset configuration to quickly customize based on your scenario. You can modify any of the preset values at any time.

  • Standard – Works well with most applications.
  • Dev/Test – Use this if experimenting with AKS or deploying a test application.
  • Cost-optimized – reduces costs on production workloads that can tolerate interruptions.
  • Batch processing – Best for machine learning, compute-intensive, and graphics-intensive workloads. Suited for applications requiring fast scale-up and scale-out of the cluster.
  • Hardened access – Best for large enterprises that need full control of security and stability.

If we go into the Portal and “Create a Resource”, select “Containers” frm the categories and click on “Create” under Kubernetes Service:

As we can see this throws us into our screen for creating our Cluster. As always, we need to select a Subscription and Resource Group. Down below this is where it gets interesting, and we can see the preset configurations that we described above:

We can see that “Standard ($$)” is selected by default, and if we click on “Learn more and compare presets”, we get a screen showing us details of each option:

I’m going to select “Dev/Test ($)” and click apply to come back to the Basics screen. I now give the Cluster a name and select a region. We can also see that I can select different Kubernetes versions from the dropdown:

Finally on this screen, we select the Node Pool options and can select Node size (you can change the size and select whatever VM size that you need to meet your needs), manual or auto scaling and the Node Count:

We click next and move on to the “Node Pools” screen, where we can add other Node Pools and select encryption options:

The next screen is “Access” where we can specify RBAC access and also AKS-managed Azure AD which controls access using Azure AD Group membership. Note that this option cannot be disabled after it is enabled:

The next screen is Networking and this is where things get interesting – we can use kubenet to create a VNet using default values, or Azure CNI (Container Networking Interface) which allows you to specify a subnet from your own managed Vnets. We can also specify Network policies to define rules for ingress and egress traffic in and out of the cluster.

The next screen is Integrations, where we can integrate with Azure Container Registry and also enable Azure Monitor and Azure Policy.

At this point, we can click Review and Create and go make a cup of tea while thats being created.

And once thats done (the deployment, not the tea….), we can see the Cluster has been created:

One interesting thing to note – the cluster has been created in my “MD-AKS-Test” Resource Group, however a second RG has been created that containes the NSG, Route Table, VNet, Load Balancer, Managed Identity and Scale Set, so its separating the underlying management components from the main cluster resource.

So at thsi point, we need to jump into Cloud Shell and manage the cluster from there. When we launch Cloud Shell and the prompt appears, run:

az aks get-credentials --resource-group MD-AKS-Test --name MD-AKS-Test-Cluster

This sets our cluster as the current context in the Cloud Shell and allows us to run kubectl commands against it. We can now run kubectl get nodes to show us the status of the nodes in our node pool:

At this point, you are ready to deploy an application into your Cluster! You can use the process as described here to create your YAML file and deploy and test the sample Azure Voting App. Once this is deployed, you can check the “Workloads” menu from your cluster in the Portal to see that this is running:

If we click into either of the “azure-vote” deployments, we can see the underlying Pod in place with its internal IP and the node its assigned to:

To delete the cluster, run az aks delete --resource-group MD-AKS-Test --name MD-AKS-Test-Cluster --yes --no-wait.

Azure Kubernetes Service or run your own Kubernetes Cluster?

So this is the million dollar question and there really is no correct answer – it really does depend on your own particular use case.

Lets try to break it down this way – Deploying and operating your own Kubernetes cluster is complex and will require more work to get the underlying technology set up, such as networking, monitoring, identity management and storage.

The flip side is that if you go with AKS its a much faster way to get up and running with Kubernetes and you have full access to technologies such as Azure AD and Azure Key Vault, but you don’t have access to your control plane or master nodes. There is also the cost element to think of as Kubernets can get expensive running in the cloud depending on how much you decide to scale.

Conclusion

So thats a look at Azure Kubernetes Service and also the benefits of running Kubernetes in Azure versus On-Premises.

The last few posts have only really scratched the surface on Kubernetes – there is a lot to learn about the technology and a steep learning curve. One thing for sure is that Kubernetes is a really hot technology right now and there is huge demand for people who have it as a skill.

If you want to follow some folks who know their Kubernetes inside out, the people I would recommend are:

  • Chad Crowell who you can follow on Twitter or his blog. Chad also has an excellent Kubernetes from Scratch course over at CloudSkills.io containing over 30 real world projects to help you ramp up on Kubernetes.
  • Michael Levan who you can follow from all his socials on Linktree and who has published multiple content pieces on his social channels.
  • Richard Hooper (aka Pixel Robots and Microsoft Azure MVP) who you can follow on Twitter or his blog which contains in-depth blog posts and scenarios for AKS. Richard also co-hosts the Azure Cloud Native user group which you can find on Meetup.

Hope you enjoyed this post, until next time!

100 Days of Cloud – Day 87: Installing and Configuring Kubernetes

Its Day 87 of my 100 Days of Cloud journey and as promised, in todays post I’m going to install and configure Kubernetes locally using Minikube.

In the last post, we listed out all of the components that make up Kubernetes, tools used to manage the environment and also some considerations you need to be aware of when using Kubernetes.

Local Kubernetes – Minikube

We’re going to install Minikube on my Windows Laptop, however you can also install for both Linux and MacOS if thats your preference. These are the requirements to install Minikube:

  • 2 CPUs or more
  • 2GB of free memory
  • 20GB of free disk space
  • Internet connection
  • Container or virtual machine manager, such as: Docker, Hyperkit, Hyper-V, KVM, Parallels, Podman, VirtualBox, or VMware Fusion/Workstation

So we download the latest stable release of Minikube from here. The installer is a simple install, and will display this screen once completed:

Now, we run an administrative PowerShell session, and run minikube start in order to start our cluster. Note that because I’m running on this on Windows 10, minikube automatically tried to create the cluster in Hyper-V. Therefore, I needed to run minikube start --driver=docker in order to force minikube to use docker to create the cluster.

So we can see from the output above that the cluster has been created successfully. And the eagle-eyed will also notice that we are using Kubernetes version 1.23.3, which is not the latest version. This is because Kubernetes no longer supports Docker as of version 1.24. Full support will be provided up to April 2023 for all versions up to 1.23 that run Docker. I’ve decided to base this build around Docker as I know it, but you can read more about the changes here and how they affect existing deployments here.

So we move on, and the first thing we need to do is install kubectl. You can download this directly by running minikube kubectl -- get po -A which will go off and install the appropriate version for your OS.

We can see that this has listed all of the Cluster services. We can also run minikube dashboard to launch a graphical view of all aspects of our Cluster:

Now that we’re up and running, lets do a sample webserver deployment. So we run the following commands (as we can see, the image is coming from gcr.io which is the Google Container Registry):

kubectl create deployment hello-minikube --image=k8s.gcr.io/echoserver:1.4
kubectl expose deployment hello-minikube --type=NodePort --port=8080

Now lets run kubectl get services hello-minikube to check if the deployment is running:

And if we now look in the Dashboard, we can see that the deployment is running:

Now we can use kubectl port-forward service/hello-minikube 7080:8080 to expose the service on http://localhost:7080/, and when we browse to that we can see the metadata values returned:

And thats effectively it – your local cluster is running. You can try running another image from the Google Container Registry also, the full list of images can be found at the link here.

There are also a number of useful commands listed below that are useful to know when running minikube:

minikube pause – Pause Kubernetes without impacting deployed applications
minikube unpause – Unpause a paused instance
minikube stop – Halt the cluster
minikube config set memory 16384 – Increase the default memory limit (requires a restart)
minikube addons list – Browse the catalog of easily installed Kubernetes services
minikube start -p aged --kubernetes-version=v1.16.1 – Create a second cluster running an older Kubernetes release (this is potentially useful given Docker is no longer supported)
minikube delete --all – Delete all of the minikube clusters

You can find all of the information you need on Minikube including documentation and tutorials here at the official site.

Conclusion

So thats how we can run Kubernetes locally using Minikube. Slight change of plan, I’m going to do the Azure Kubernetes Service install in the next post, as we’ll go in-depth with that and look at the differences in architecture between running Kubernetes locally and in a Cloud Service.

Hope you enjoyed this post, until next time!

100 Days of Cloud – Day 86: Introduction to Kubernetes

Its Day 86 of my 100 Days of Cloud journey, and in todays post I’m going to give an introduction to Kubernetes.

We introduced Containers on Day 81 and gave an overview of how they work and how they differ in architecture when compared to traditional Bare Metal Physical or Virtual Infrastructure. A container is a lightweight environment that can be used to build and securely run applications and their dependencies. We need container management tools such as Docker to run commands and manage our containers.

Image Credit – Jenny Fong/Docker

Containers Recap

We saw how easy it is to deploy and manage containers during the series where I built a monitoring system using a telegraf agent to pull data into an InfluxDB docker container, and then used a Grafana Container to display metrics from the time series database.

So lets get back to that for a minute and understand a few points about that system:

  • The Docker Host was an Ubuntu Server VM, so we can assume that it ran in a highly available environment – either an on-premises Virtual Cluster such as Hyper-V or VMware or on a Public Cloud VM such as an Azure Virtual Machine or an Amazon EC2 Instance.
  • It took data in from a single datasource, which was brought into a single time series database, which then was presented on a single dashboard.
  • So altogether we had 1 host VM and 2 containers. Because the containers and datasource were static, there was no need for scaling or complex management tasks. The containers were run with persistent storage configured, the underlying apps were configured and after that the system just happily ran.

So in effect, that was a static system that required very little or no management after creation. But we also had no means of scaling it if required.

What if we wanted to build something more complex, like a an application with multiple layers where there is a requirement to scale out apps, and respond to increased demand by deploying more container instances, and to scale back if demand is decreasing?

This is where container orchestration technologies are useful because they can handle this for you. A container orchestrator is a system that automatically deploys and manages containerized apps. It can dynamically respond to changes in the environment to increase or decrease the deployed instances of the managed app. Or, it can ensure all deployed container instances get updated if a new version of a service is released.

And this is where Kubernetes comes in!

Kubernetes Overview

Kubernetes is an open-source platform created by Google for managing and orchestrating containerized workloads. Kubernetes is also known as “K8s”, and can run any Linux container across private, public, and hybrid cloud environments. Kubernetes allows you to build application services that span multiple containers, schedule those containers across a cluster, scale those containers, and manage the health of those containers over time.

The benefits of using Kubernetes are:

Its important to note though that all of these tasks require configuration and a good understanding of the underlying technologies. You need to understand concepts such as virtual networks, load balancers, and reverse proxies to configure Kubernetes networking.

Kubernetes Components

Image Credit – Microsoft

A Kubernetes cluster consists of:

  • A set of worker machines, called nodes, that run containerized applications. Every cluster has at least one worker node.
  • A master node or control plane manages the worker nodes and the Pods in the cluster

Lets take a look at the components that are contained in each of these components

Control Plane or Master Node

Image Credit – Microsoft

The following services make up the control plane for a Kubernetes cluster:

  • API server – the front end to the control plane in your Kubernetes cluster. All the communication between the components in Kubernetes is done through this API.
  • Backing store – used by Kubernetes to save the complete configuration of a Kubernetes cluster. A key-value store called etcd stores the current state and the desired state of all objects within your cluster.
  • Scheduler – responsible for the assignment of workloads across all nodes. The scheduler monitors the cluster for newly created containers, and assigns them to nodes.
  • Controller manager – tracks the state of objects in the cluster. There are controllers to monitor nodes, containers, and endpoints.
  • Cloud controller manage – integrates with the underlying cloud technologies in your cluster when the cluster is running in a cloud environment. These services can be load balancers, queues, and storage.

Worker Machines or Nodes

Image Credit – Microsoft

The following services run on the Kubernetes node:

  • Kubelet – The kubelet is the agent that runs on each node in the cluster, and monitors work requests from the API server. It monitors the nodes and makes sure that the containers scheduled on each node run, as expected.
  • Kube-proxy – The kube-proxy component is responsible for local cluster networking, and runs on each node. It ensures that each node has a unique IP address.
  • Container runtime – the underlying software that runs containers on a Kubernetes cluster. The runtime is responsible for fetching, starting, and stopping container images.

Pods

Image Credit – Microsoft

Unlike in a Docker environment, you can’t run containers directly on Kubernetes. You package the container into a Kubernetes object called a pod, which is effectively a container with all of the management overhead stripped away and passed back to the Kubernetes Cluster.

A pod can contain multiple containers that make up part of or all of your application, however in general a pod will never contain multiple instances of the same application. So for example, if running a website that requires a database back-end, both of those containers would be packaged into a pod.

A pod also includes information about the shared storage and network configuration, and yaml coded tempates which define how to run the containers in the pod.

Managing your Kubernetes environment

You have a number of options for managing your Kubernetes environment:

  • kubectl – You can use kubectl to deploy applications, inspect and manage cluster resources, and view logs. kubectl can be installed on Linux, macOS and Windows platforms.
  • kind – this is used for running Kubernetes on your local device.
  • minikube – similar to kind in that it allows you to run Kubernetes locally.
  • kubeadm – this is used to create and manage kubernetes clusters in a user friendly way.

kubectl is by far the most used in enterprise Kubernetes environments, and you can find more details in the documentation here.

Important Considerations

While Kubernetes provides an orchestration platform that means you can run your clusters and scale as required, there are certain things you need to be aware that it cannot do, such as:

  • Deployment, scaling, load balancing, logging, and monitoring are all optional. You need to configure these and fit these into your specific solution requirements.
  • There is no limit to the tyes of apps that can run – if it can run in a container, it can run on Kubernetes.
  • Kubernetes doesn’t provide middleware, data-processing frameworks, databases, caches, or cluster storage systems.
  • A container runtime such as Docker is required for managing containers.
  • You need to manage the underlying environment that Kubernetes runs on (memory, networking, storage etc), and also manage upgrades to the Kubernetes platform itself.

Azure Kubernetes Service

All of the above considerations and indeed all of the sections we’ve covered in this post require detailed knowledge of both Kubernetes and also the underlying dependencies. This overhead is removed in some part by cloud services such Azure Kubernetes Service (AKS) which reduces these challenges by providing a hosted Kubernetes environment. 

As a hosted Kubernetes service, Azure handles critical tasks, like health monitoring and maintenance. Since Kubernetes masters are managed by Azure, you only manage and maintain the agent nodes.

You can create an AKS cluster using:

  • The Azure CLI
  • The Azure portal
  • Azure PowerShell
  • Using template-driven deployment options, like Azure Resource Manager templates, Bicep and Terraform.

When you deploy an AKS cluster, the Kubernetes master and all nodes are deployed and configured for you. Advanced networking, Azure Active Directory (Azure AD) integration, monitoring, and other features can be configured during the deployment process.

Conclusion

And thats a description of Kubernetes, how it works, why its useful and the components that are contained within it. In the next post, we’re going to put all that theory into practice and set up both a local Kubernetes Cluster using minikube, and also look at deploying cluster onto Azure Kubernetes Service.

Hope you enjoyed this post, until next time!

100 Days of Cloud – Day 85: Security for Azure Containers

Its Day 85 of my 100 Days of Cloud journey, and in todays post I’m looking at the options for Container Security in Azure.

Image Credit: Docker Saigon Github

We looked at an overview of Containers on Day 81, how they work like a virtual machines in that they utilize the underlying resources offered by the Container Host, but instead of packaging your code with an Operating System, each container only contains the code and dependencies needed to run the application and runs as a process inside the OS Kernel. This means that containers are smaller and more portable, and much faster to deploy and run.

We need to secure Containers in the same way as we would any other services running on the Public Cloud. Lets take a look at the different options that are available to us for securing Containers.

Use a Private registry

Containers are built from images that are stored in either public repositories such as Docker Hub, a private registry such as Docker Trusted Registry, which can be installed on-premises or in a virtual private cloud, or a cloud-based private registry such as Azure Container Registry.

Like all software that is publicly available on the internet, a publicly available container image does not guarantee security. Container images consist of multiple software layers, and each software layer might have vulnerabilities.

To help reduce the threat of attacks, you should store and retrieve images from a private registry, such as Azure Container Registry or Docker Trusted Registry. In addition to providing a managed private registry, Azure Container Registry supports service principal-based authentication through Azure Active Directory for basic authentication flows. This authentication includes role-based access for read-only (pull), write (push), and other permissions.

Ensure that only approved images are used in your environment

Allow only approved container images. Have tools and processes in place to monitor for and prevent the use of unapproved container images. One option is to control the flow of container images into your development environment. For example, you only allow a single approved Linux distribution as a base image in order to minimize the surface for potential attacks.

Another option is to utilize Azure Container Registry support for Docker’s content trust model, which allows image publishers to sign images that are pushed to a registry, and image consumers to pull only signed images.

Monitoring and Scanning Images

Use solutions that have the ability to scan container images in a private registry and identify potential vulnerabilities. Azure Container Registry optionally integrates with Microsoft Defender for Cloud to automatically scan all Linux images pushed to a registry to detect image vulnerabilities, classify them, and provide remediation guidance.

Credentials

Credential management is one of the most basic tyes of security. Because containers can spread across several clusters and Azure regions, you need to ensure that you have secure credentials required for logins or API access, such as passwords or tokens.

Using tools such as TLS encryption for secrets data in transit, least-privilege Azure role-based access control (Azure RBAC), and Azure Key Vault to securely store encryption keys and secrets (such as certificates, connection strings, and passwords) for containerized applications.

Removing unneeded privileges from Containers

You can also minimize the potential attack surface by removing any unused or unnecessary processes or privileges from the container runtime. Privileged containers run as root. If a malicious user or workload escapes in a privileged container, the container will then run as root on that system.

Enable Auditing Logging for all Container administrative user access

Use native Azure Solutions to maintain an accurate audit trail of administrative access to your container ecosystem. These logs might be necessary for auditing purposes and will be useful as forensic evidence after any security incident. Azure solutions include:

  • Integration of Azure Kubernetes Service with Microsoft Defender for Cloud to monitor the security configuration of the cluster environment and generate security recommendations
  • Azure Container Monitoring solution
  • Resource logs for Azure Container Instances and Azure Container Registry

Conclusion

So thats a brief overview of how we can secure containers running in Azure and ensure that we are only using approved images that have been scanned for vulnerabilities.

Hope you enjoyed this post, until next time!

100 Days of Cloud – Day 84: MS-220 Exam Review and Study Guide

Its Day 84 of my 100 Days of Cloud Journey, and last week I sat Exam MS-220: Troubleshooting Microsoft Exchange Online (beta).

The reason I chose to take this exam was that I have a number of years of experience in Exchange Online, both migrating from on-premises Exchange environments, working in hybrid environments and managing full Exchange Online deployments from licensing in Microsoft/Office365 (and BPOS back in the old days!!) right up to mailbox management and compliance.

In this post, I’ll attempt to give an NDA-friendly exam review, and also provide a study guide and useful links to enhance your chances of success in this exam.

Exam Overview

According to the official release article on the Microsoft Learn Blog, the MS-220 exam is aimed at:

Support engineers are professionals who have the energy and expertise to resolve difficult technical issues. They also drive the resolution of highly complex support incidents related to solution-specific development and deployment. In addition to collaborating with other technical specialists on case reviews, troubleshooting, and effective customer interaction, support engineers also:

  • Own, troubleshoot, and solve technical issues, using collaboration, best practices, and transparency within and across teams.
  • Identify technical or strategic cases that require escalation.
  • Create and maintain incident management requests for the product group or engineering group.
  • Contribute to case deflection initiatives, automation, and other digital self-help assets to improve customer and engineer experience.

So lets say this straightaway and simplify the statement above – this is a technical exam. It is difficult, and having worked with these technologies for a number of years I can tell you that I found it challenging! Also, because I took it in beta, I don’t know if I’ve passed it yet and like all exams you are never really certain until the screen at the end gives you the result or confirmation email comes in with the beta results.

An NDA-friendly review

I had already tweeted an NDA-friendly thread here, but lets just cover off the highlights and my thoughts on the exam:

  • Firstly, the exam is challenging and is true to the exam objectives and learning paths covered by Microsoft Learn. This is not an exam for beginners – I have over 10 years of experience in managing Exchange On-Prem, Online and Hybrid environments and I found this challenging.
  • Despite the recent “shift to cloud” that happened last year with the cancellation of Server (MCSE) and Exchange certs, Microsoft clearly feels that there is enough merit to introduce certs that cover hybrid scenarios and follows on from the addition of the AZ800/801 certs.
  • The skills measured is fully covered and nicely weighted across the exam.
  • The PowerShell on the exam was complicated and it tests your ability to understand the correct command structure to use, while also testing your real-world experience of using PowerShell commands to diagnose the issues presented in the question set.

Study Guide

So lets put together a Study Guide. The first port of call when studying for this exam should be the Microsoft Learn Modules for Troubleshoot Microsoft Exchange Online.

Now, lets look at the skills measured list to see how the exam objectives are weighted:

  • Troubleshoot mail flow issues (20–25%)
  • Troubleshoot compliance and retention issues (25–30%)
  • Troubleshoot mail client issues (20–25%)
  • Troubleshoot Exchange Online configuration issues (15–20%)
  • Troubleshoot hybrid and migration issues (10–15%)

Lets break down the content in each of these sections and provide links for each of the skills being assessed under each heading:

  • Troubleshoot mail flow issues (20–25%)
  • Troubleshoot compliance and retention issues (25–30%)

  • Troubleshoot mail client issues (20–25%)

  • Troubleshoot Exchange Online configuration issues (15–20%)
  • Troubleshoot hybrid and migration issues (10–15%)

Conclusion

MS-220 is not a beginners exam, you need to have a lot of experience in Exchange Hybrid, On-Premises and Online and in all areas covered in the Skills Measured.

Hope you enjoyed this post and found it useful, until next time!

100 Days of Cloud – Day 83: The Hill

Its Day 83 of my 100 Days of Cloud journey, and todays post is a hill….

The slight rise you see in the picture above leads off the old Dublin to Galway road and onto a back road where my house is.

You wouldn’t call it a hill – it doesn’t look very challenging to walk or run up it. But this “hill” comes at the end of a variety of 5km, 8km or 10km running routes (or a combination of any of these) that are located around my house. And depending on how you feel or how the run went, this “hill” at the end of the run could be a step too far. It has defeated me too many times to mention – you drag your legs over the last km and as it rears into view, the lactic acid in my legs screams NOOOOO!!!!!

There are a variety of reasons why it defeats me, but in general:

  • I set off too fast early in the run and have no energy left
  • Dehydration or hot days leads to fatigue
  • I don’t have the motivation to get up the hill

Everyone has their own version of the hill, and this is also relevant to the juggling we have to do in balancing our work lives, family lives and other interests or commitments.

Like a lot of people, I’m an “all-in, 100%” type of person when it comes to the different aspects of my life. I don’t want to look back with any regrets that I didn’t do something fully in work, wasn’t there for a family dinner, wasn’t available to bring my kids to their activities. I want to learn every day, attend every User Group or Meetup, and blog and give back to the community as much as I can. I also want to be able to run or exercise, put my kids to bed and read them a story, and spend time with my wife in the evenings.

But there are some days when not all of the above is possible. There are some days when we have long or bad days in work, and then you get home late to find there is no time for that family dinner as its straight out to priotitise whatever activities te kids have on that day. And by the time you finally get home that night, you are exhausted to the point where the motivation for learning and blogging just isn’t there.

Image Credit: SAP

And thats brings me back to the “hill”. We all have our own “hill”, some hills are higher than others and we embrace and scale them with gusto and energy. But sometimes its the small ones that defeat you.

Its not a failure. It called life. Sometimes we need to step back and accept that the next “hill” we encounter isn’t going to happen today. Take the time to step back, reset yourself, and get back to it the next day or when you feel ready.

On the days it happens, its useful to reflect and work out why. Write down the timeline of your day. What went wrong? Did it cause a ripple effect that put the entire day out of sync? Was it avoidable, and if so how can you make sure it won’t happen again? If needed, look back to the day before. Did you get enough sleep? Did you go to bed later than usual? If so, why? Did you really need to watch 3 episodes of Better Call Saul?

You’re now getting into Habit Hacking, where you can look at your habits and see whats going wrong. My favourite one is our obsession with SmartPhones and the concept of “Social Media doom-scrolling” either before you sleep at night or first thing in the morning. Do you need your phone beside the bed? If its just as an alarm, go buy an alarm clock or a watch with an alarm and then commit to putting your phone away at 9pm every night (effectively a Digital Sunset). Go to bed and read (I mean an actual book, not a Kindle or App) or meditate to relax yourself. Next morning, try to give yourself an hour before reaching for the phone (so this is a Digital Sunrise!). Try to not pick up your phone for 10 hours.

Habit Hacking works the same way for running or any other sport – most people have a protocol before and after their exercise routine, and this affects the performance during the exercise.

Finally, for those of you who are interested – on the day I took the photo, the hill had defeated me. I hadn’t properly hydrated prior to the run. That was a week ago. I’ve gone back to habit hacking and my own protocol, returned and conquered the hill twice since. I have no doubt it will defeat me again some day, but thats the circle of life.

Hope you enjoyed this post, until next time (when we get back into Tech)!

100 Days of Cloud – Day 82: Options for Managing Containers in Azure

Its Day 82 of my 100 Days of Cloud journey, and in todays post I’m going to look at options for managing Containers in Azure.

In the last post, we looked at the comparison between Bare Metal or Physical Servers, Virtual Servers and Containers and the pros and cons of each.

We also introducted Docker, which is the best known method of managing containers using the Docker Engine and built-in Docker CLI for command management.

The one thing we didn’t show was how to install Docker or use any of the commands to manage our containers. This is because I’ve previously blogged about this and you can find all of the details as part of my series about Monitoring with Grafana and InfluxDB using Docker Containers. Part 1 shows how you can create your Docker Host running on an Ubuntu Server VM (this could also run on a Bare Metal Physical Server), and Part 2 shows the setup and configuration of Docker Containers that have been pulled from Docker Hub. So head over there and check that out, but don’t forget to come back here!

Docker Context

By default when running any Docker commands from the CLI, Docker automatically assumes that you wish to use the local Docker Host for storing and running your containers. However, you can manage multiple Docker or Kubernetes hosts or nodes by specifying contexts. A single Docker CLI can have multiple contexts. Each context contains all of the endpoint and security information required to manage a different cluster or node. The docker context command makes it easy to configure these contexts and switch between them.

In short, this means that you can manage container instances that are installed on multiple hosts and/or multiple cloud providers from a single Docker CLI.

Let take a look at the different options for managing containers in Azure.

The Docker CLI Method

In order to use containers in Azure using Docker, we first need to log on to Azure using the docker login azure command, which will prompt us for Azure credentials. Once entered, this will return “login succeeded”:

We then need to create a context by running the docker context create aci command. This will associate Docker with an Azure subscription and resource group that you can use to create and manage container instances. So we would run docker context create aci myacicontext to create a context called myacicontext.

This will select your Azure subscription ID, then prompt to select an existing resource group or create a new resource group. If you choose a new resource group, it’s created with a system-generated name. Like all Azure resources, Azure container instances must be deployed into a resource group

Once thats completed, we then run docker context use myacicontext – this ensures that any subsequent commands will run in this context. We can now use docker run to deploy containers into our Azure resource group and manage these using the Azure CLI. So lets run the following command to deploy a quickstart container runing Node.js that will give us a static website:

docker run -p 80:80 mcr.microsoft.com/azuredocs/aci-helloworld

We can now run docker ps to see the running container and get the Public IP that we can use to browse to it:

And if we log onto the Portal, we can see our running container:

So as we’ve always done, lets remember to remove the container by running docker stop sweet-chatterjee, and then docker rm sweet-chatterjee. These commands stops and deletes the Azure Container Instance:

Finally, run docker ps to ensure the container has stopped and is no longer running.

The Azure Portal Method

There are multiple ways to create and manage containers natively in Azure. We’ll look at the portal method in this post, and reference the remaining options at the end of the page.

To create the container, log on to the Portal and select Container Instances from the Marketplace:

Once we select create, we are brought into the now familiar screen for creating resources in Azure:

One important thing to note on this screen is the “Image Source” option – we can select container images from either:

  • The quickstarts that are available in Azure.
  • Images stored in your Azure Container Registry.
  • Other registry – this can be Docker or other public or private container registry.

On the “Networking” screen, we need to specify a public DNS name for our container, and also the ports we wish to expose across the Public Internet

And once thats done, we click “Review and Create” to deploy our container:

Once thats done, we can see the FQDN or Public IP that we can use to browse to the container:

As always, make sure to stop and delete the container instance once finished if you are running these in a test environment.

There are a total of four other options in Azuire for creating and managing containers:

Conclusion

So thats a look at how we can create and manage Azure Container Instances using both Docker CLI and the wide range of options available in Azure.

Azure Container Instances is a great solution for any scenario that can operate in isolated containers, including simple applications, task automation, and build jobs. You can find all of the documentation on Azure Container Instances here.

Hope you enjoyed this post, until next time!

100 Days of Cloud – Day 81: Introduction to Containers

Its Day 81 of my 100 Days of Cloud journey, and in todays post I’m going to attempt to give an introduction to containers.

Containers. But not the sort we’re going to talk about…..

I’m building up to look at Kubernetes in later posts but as the saying goes “we need to walk before we can run”, so its important before we dive into container orchestration that we understand the fundamentals of containers.

Containers v Virtualization

Lets start with the comparison that we all make and compare the differences between containers and virtualization. Before that though, lets reverse even further into the mists of time……

  • Bare Metal or Physical Servers
Image Credit – Rick Vanover/Veeam Software

Back in the “good old days” (were they really that good?), you needed a Physical Server to run each one of your applications (or if you were really brave, you ran multiple applictions on a single server). These were normally large noisy beasts that took up half a rack in your datacenter. You had a single operating system per machine, and any recovery in general took time as the system needed to be rebuilt in full up to the application layer before any data recovery was performed.

  • Virtualization
Image Credit – Rick Vanover/Veeam Software

As processing power and capacity increased, applications running on physical servers were unable to utilise the increased resources available, which left a lot of wasted resources left unused. At this point, Virtualization enabled us to install a hypervisor which ran on the physical servers. This allowed us to create Virtual Machines that ran alongside each other on the physical hardware.

Each VM can run its own unique guest operating system, and different VMs running on the same hypervisor can run different OS versions and versions. The hypervisor assigns resources to that VM from the underlying Physical resource pool based on either static values or dynamic values which would scale up or down based on the resource demands.

The main benefits that virtualization gives:

  1. The ability to consolidate applications onto a single system, which gave huge cost savings.
  2. Reduced datacenter footprint.
  3. Faster Server provisioning and improved backup and disaster recovery timelines.
  4. In the development lifecycle, where as opposed to another monster server being purchased and configured, a VM could be quickly spun up which mirrored the Production environment and could be used for the different stages of the development process (Dev/QA/Testing etc).

There are drawbacks though, and the main ones are:

  1. Each VM has separate OS, Memory and CPU resources assigned which adds to resource overhead and storage footprint. So all of that spare capacity we talked about above gets used very quickly.
  2. Although we talked about the advantage of having separate environments for the development lifecycle, the portability of these applications between the different stages of the lifecycle is limited in most cases to the backup and restore method.
  • Containers
Image Credit – Jenny Fong/Docker

Finally, we get to the latest evolution of compute which is Containers. A container is a lightweight environment that can be used to build and securely run applications and their dependencies.

A container works like a virtual machine in that it utilizes the underlying resources offered by the Container Host, but instead of packaging your code with an Operating System, each container only contains the code and dependencies needed to run the application and runs as a process inside the OS Kernel. This means that containers are smaller and more portable, and much faster to deploy and run.

So how do I run Containers?

In On-Premise and test environments, Windows Containers ships on the majority of Windows Client and Server Operating Systems as a built-in feature that is available to use. However, for the majority of people who use containers, Docker is the platform of choice.

Docker is a containerization platform used to develop, ship, and run containers. It doesn’t use a hypervisor, and you can run Docker on your desktop or laptop if you’re developing and testing applications.

The desktop version of Docker supports Linux, Windows, and macOS. For production systems, Docker is available for server environments, including many variants of Linux and Microsoft Windows Server 2016 and above.

When you install Docker on either your Linux or Windows environment, this installs the Docker Engine which contains:

  • Docker client – command-line application named docker that provides us with a CLI to interact with a Docker server. The docker command uses the Docker REST API to send instructions to either a local or remote server and functions as the primary interface we use to manage our containers.
  • Docker server – The dockerd daemon responds to requests from the client via the Docker REST API and can interact with other daemons. The Docker server is also responsible for tracking the lifecycle of our containers.
  • Docker objects – there are several objects that you’ll create and configure to support your container deployments. These include networks, storage volumes, plugins, and other service objects. We’ll take a look at these in the next post when we demo the setup of Docker.

So where do I get the Containers from?

Docker provides the worlds largest respository of container images called Docker Hub. This is a public repository and contains ready made containers from both official vendors (such as WordPress, MongoDB, MariaDB, InfluxDB, Grafana, Jenkins, Tomcat, Apache Server) and also bespoke containers that have been been contributed by developers all over the world.

So there is effectively a Docker Container for every available scenario. And if you need to create one for your own scenario, you just pull the version from the Docker Hub, make your changes and push it back up to Docker Hub and mark it as public and available for use.

But what if I don’t want to store my container images in a public registry?

Thats where the Private Container Registry option comes in. Your organization or team can have access to a private registry where you can store images that are in use in your environment. This is particularly useful when you want to have version control and governance over what images you want to use in your environment.

For example, if you want to run InfluxDB and run the command to pull the InfluxDB container from the Docker Hub, by default you will get the latest stable version (which is 2.2). However, your application may need to use or only support version 1.8, so you need to specify that when pulling from the registry.

Because images are pulled from the Docker Hub by default, you need to specify the location of your Private Container Registry (in https notation) when pulling images.

There are a number of different options for where to store your Private Container Registry:

  • Docker Hub allows companies to host directly
  • Azure Container Registry
  • Amazon Elastic Container Registry
  • Google Container Registry
  • IBM Container Registry

Conclusion

So thats a brief overview of containers and how Docker is the proprietary software in use for managing them. In the next post, we’ll look at setting up a Docker Host machine and creating an Azure Container Registry to house our private Docker Images.

Hope you enjoyed this post, until next time!