100 Days of Cloud — Day 14: Azure Managed Identities

Day 14 of 100 Days of Cloud, and today it’s a brief post on Azure Managed Identities.

One of the most common challenges for both developers and Infrastructure admins is the ability to store secrets/credentials/passwords which are needed to authenticate to different components in a solution.

Let’s take a look at a traditional example — you have a 2 Windows Servers running as VMs. One VM hosts a Web Portal where customers can place orders. The second VM hosts the backend SQL Database which holds data for the front end application. As a best practice, there are separate service accounts and passwords in use with administrative permissions for each of the layers of the solution:

  • Operating System
  • Web Application
  • Database

Now, let’s add another layer of complexity. There are 3 different teams that manage each part of the solution.

During a planned upgrade, one of the Web Developers needs to get an urgent change made and makes the error of embedding a password into the code. 2 months later during an audit, all passwords for the solution are changed. But the developer’s recent change suddenly stops working, taking down the entire site!

We’ve all seen this pain happen many times. On-premise, this would normally be solved using the likes of a shared password vault, but the developers still need to manage credentials.

In Azure, this is solved by using Managed Identities.

Overview of Managed Identities

Managed identities in Azure provide an Azure AD identity to an Azure managed resource. Once that resource has an identity, it can work with anything that supports Azure AD authentication.

Let’s move our example above to Azure. This time, we have an Azure VM which runs the Web Portal Service, and an Azure SQL Database Instance storing the Data.

Because the Azure SQL Database supports Azure Active Directory Authentication, we can enable Managed Identity on the VM and grant this permissions to authenticate to the Azure SQL Database. This means that there is no credential management required.

The benefits of using Managed Identities:

  • No more management of credentials.
  • Can be used to authenticate to any resource that supports Azure Active Directory.
  • It’s free!!

There are 2 types of Managed Identity:

  • System-assigned: When you enable a system-assigned managed identity an identity is created in Azure AD that is tied to the lifecycle of that service instance. So when the resource is deleted, Azure automatically deletes the identity for you. By design, only that Azure resource can use this identity to request tokens from Azure AD. In our example above, we would assign the Managed Identity to the Azure SQL Database. If that Database was ever deleted, the Managed Identity would automatically be deleted.
  • User-assigned: You may also create a managed identity as a standalone Azure resource. You can create a user-assigned managed identity and assign it to one or more instances of an Azure service. In the case of user-assigned managed identities, the identity is managed separately from the resources that use it.

A full list of services that support managed identities for Azure can be found here.

Let’s jump into a Demo and see how this works.

Creating a VM with a System Managed Identity

In previous posts, I created Virtual Machines using the Portal, PowerShell and ARM Templates.

If we jump back to the Portal Method, we can assign a system managed identity in the “Management” tab of the Virtual Machine creation wizard:

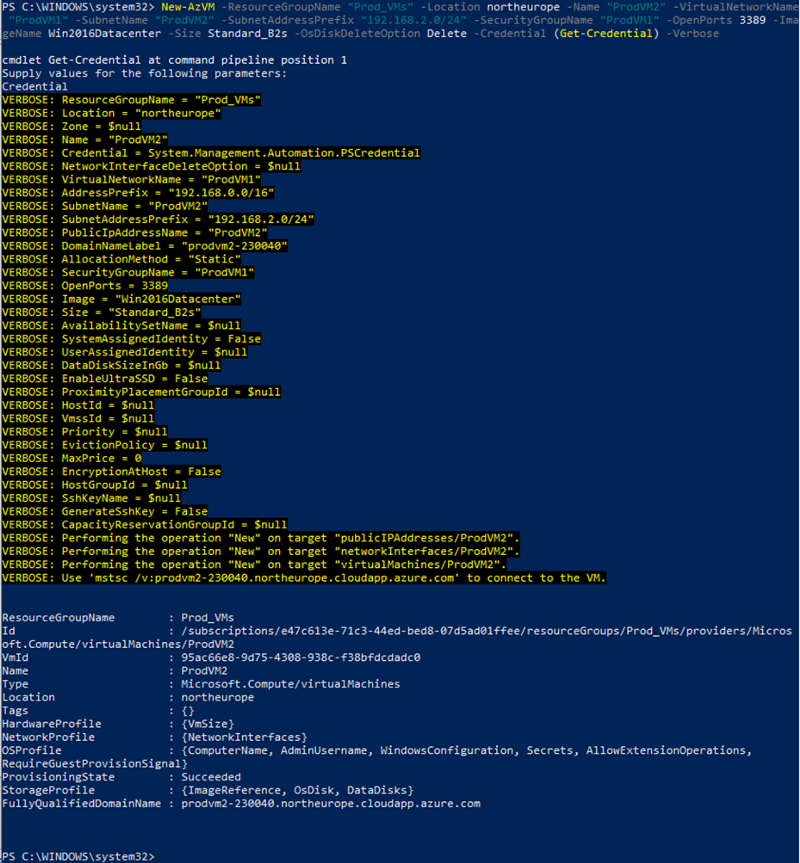
When creating the VM using the Powershell method, I add the “-Verbose” switch to give me the full command output, and I can see the “-SystemAssignedIdentity” parameter is added. However, I don’t add a value, as this tells the command to create the VM with a System Managed Identity

New-AzVM -ResourceGroupName MyExamplePowerShellRG2 -Location northeurope -Name MyPowerShellVM -AddressPrefix “10.30.0.0/16” -SubnetName PSVMSubnet -SubnetAddressPrefix “10.30.30.0/24” -PublicIPAddressName PSPublicIP -DomainNameLabel PSVM001MD -SecurityGroupName PSVMNSG -OpenPorts 3389 -ImageName Win2016Datacenter -Size Standard_B2s -OsDiskDeleteOption Delete -SystemAssignedIdentity -Credential (Get-Credential) –Verbose

Once my VM gets created, I can see under the “Identity” menu option that the System Managed Identity has been created:

So now we have our identity, we need somewhere to assign it to. For the purposes of this Demo, I’ve created an Azure Cosmos DB. So in the Cosmos DB instance, I go to the “Access Control (IAM)” menu option, and click on “Add Role Assignment”:

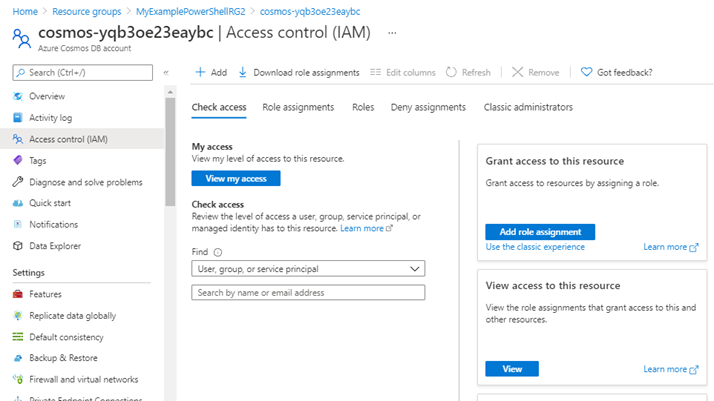
On the “Add Role Assignment” screen, I pick the access level for the role I want to assign:

On the “Members” screen, I can select the Managed Identity that I created on the Virtual Machine:

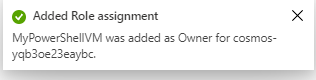
I click “Review and Assign” to confirm the role assignment, and this is then confirmed:

And that is how Managed Identities work in Azure. As you can see, no passwords or credentials are needed. You can view the official Microsoft Docs article on Azure Managed Identities here, which gives a full overview.

Hope you enjoyed this post, until next time!!

100 Days of Cloud – Day 13: Azure Site-to-Site (S2S) VPN Connectivity

It’s Day 13 (unlucky for some….) of 100 Days of Cloud, and today it’s a brief post on Azure Site-to-Site VPN Connectivity back to your on-premise network.

In the last post, I looked at Point-to-Site VPN, how to set that up in simple steps to connect your endpoints to an Azure Virtual Network using a VPN Client.

There is little difference in the 2 setups, and for that reason (along with the fact that I don’t have any supported hardware or sites to test this from) I’m not going to run through the demo in this post.

A brief history of Site to Site VPN

As its name states, a Site-to-Site VPN is a means of connecting multiple sites together so that can exist as part of the same Network. In companies with Sites across multiple geographic locations, Site-to-Site VPN’s connected these sites together to enable users to access resources across those multi-site environments, there site became part of the organization’s WAN (Wide Area Network). The WAN could exist in 2 different architectures:

  • Hub and Spoke, where all “remote” sites connected back to a single head office hub
  • Mesh, where all sites connected to each other

Azure Site to Site VPN

A Site-to-Site VPN tunnel is great for when you need a persistent connection from many on-premise devices or an entire site to your Azure network. This is an ideal option for creating hybrid cloud solutions where you need to be able to connect to your Azure resources seamlessly.

On the Azure side, you’ll need to create your virtual network just like you did with P2S, but this time you are also going to need to define your on-prem network. This is where using this solution is going to take a little more thought and planning. Just like any Site-to-Site VPN, both sides need to know what IP address range should be sent over the tunnel. This means that in Azure you are going to need to configure each on-prem network that you want Azure to be connected to and the subnets that it should be able to communicate with.

Let’s do a quick comparison of exactly what’s required for a S2S VPN:

– A Virtual Network

– A VPN Gateway

– A Local Network Gateway (this is the subnet on your local)

– Local Hardware that has a valid static Public IPv4 Address

Local Network Gateway

The local network gateway is a specific object that represents your on-premises location (the site) for routing purposes. You give the site a name by which Azure can refer to it, then specify the IP address of the on-premises VPN device to which you will create a connection.

You also specify the IP address prefixes that will be routed through the VPN gateway to the VPN device. The address prefixes you specify are the prefixes located on your on-premises network. If your on-premises network changes or you need to change the public IP address for the VPN device, you can easily update the values later.

Supported Local Hardware

Microsoft has defined a list of supported devices that support VPN Connections, which can be found here. It also provides setup scripts for major vendors such as Cisco, Juniper and Ubiquity. Not all devices are listed, and even of not listed may still work.

Authentication

Another difference between S2S and P2S is that S2S is authenticated using a pre-shared key (PSK) instead of certificates because it uses Internet Protocol Security (IPsec) rather than Secure Socket Tunneling Protocol (SSTP). You can have the Azure tools generate a PSK for you, or you can manually configure one that you have generated yourself. This means that the networking equipment will handle maintaining the encryption of the tunnel itself, and the computers and devices communicating over the tunnel don’t each need an individual certificate to identify themselves and encrypt their own connections.

Conclusion

And that’s S2S VPN Connections in a nutshell!

Hope you enjoyed this post, until next time!!

100 Days of Cloud – Day 12: Azure Point-to-Site (P2S) VPN Connectivity

It’s Day 12 of 100 Days of Cloud, and as promised in the last post, I’m going to set up a Point-to-Site (P2S) VPN Gateway Connection.

In a later post I’ll deal with Site-to-Site (S2S) VPN’s. These are the most common type of VPN where you create a connection between your local site network and a remote network (such as Azure, AWS or another remote site in your organization).

Point-to-Site (P2S) Overview

As always, let’s get some concepts and scenarios first. A Point-to-Site VPN gateway connection let you create a secure connection to your Azure Virtual network from your individual client computer. This is useful in the following scenarios:

  • Working from a remote location or from home where you need to access company resources.
  • If you only have a small number of clients that need to connect to a specific resource and don’t want to set up a Site-to-Site (S2S) connection.

Traditional Examples of P2S VPN connections would be:

  • SSL VPN Client (from vendors such as Cisco/Fortinet), where users would authenticate using RADIUS authentication with optional MFA.
  • Direct Access, where a VPN Connection would automatically connect once internet connectivity is established on the client device.

P2S VPN’s use the following network protocols:

  • OpenVPN — This is SSL/TLS based, and can be used with Windows, Android, iOS (v 11.0 and above), Linux and Mac (macOS 11.0 and above).
  • Secure Socket Tunneling Protocol (SSTP) — this is a proprietary TLS-based VPN protocol, and is only supported on Windows Devices.
  • IKEv2 VPN — a standards based IPSec VPN that can only be used to connect from Mac devices (macOS 11.0 and above)

So as we can see from the above, when planning a P2S deployment, you’ll need to know exactly what the Client Machines are that need to connect so you can use the correct protocols.

There are 3 ways that P2S VPN connections can authenticate:

  • Azure Certificate Authentication — this uses a certificate that is present on the client device. You need 2 certificates — firstly, you can generate a self-signed certificate or use a root cert generated using an Enterprise solution which must be uploaded to Azure. Second, client certificates are generated from a Trusted Root CA and installed on the client devices. The certificate validation is done on the VPN Gateway.
  • Azure AD Authentication — this allows users to use their Azure AD credentials to connect. This is only supported with OpenVPN protocol and Windows 10, and requires the use of the Azure VPN Client. This solution allows you to leverage Multi-Factor Authentication (MFA).
  • On-Premise AD DS Authentication — this solution allows users to connect to Azure using their organization domain credentials. It requires a RADIUS server that integrates with the AD server. The RADIUS server can be in Azure or On-Premise, however in the On-Premise scenario, this requires a S2S VPN Connection between Azure and the On-Premise network. The diagram below shows the requirements for this scenario:

Finally, client requirements. Users use the native VPN clients on Windows and Mac devices for P2S. Azure provides a VPN client configuration zip file that contains settings required by these native clients to connect to Azure.

  • For Windows devices, the VPN client configuration consists of an installer package that users install on their devices.
  • For Mac devices, it consists of the mobileconfig file that users install on their devices.

The zip file also provides the values of some of the important settings on the Azure side that you can use to create your own profile for these devices. Some of the values include the VPN gateway address, configured tunnel types, routes, and the root certificate for gateway validation.

That’s the theory side out of the way, let’s do a quick Demo and get this set up. I’m going to use the Certificate Authentication method for the demo.

Point-to-Site (P2S) Overview

The pre-requisite requirements for setting up a P2S connection are quite simple. I need something to connect to. So I’ll use the following:

– Resource Group (I’ll use the Prod_VMs RG I set up previously)

– Virtual Network

– Virtual Machine, or some other resource that I can connect to over the VPN once the connection is established.

Now I need to create some resources for the P2S VPN to work. I’ll create the Virtual Network Gateway first:

Virtual Network Gateway

Give the gateway a name and define the VPN type. I’ll select gateway type VPN and VPN type Route-based. Choose SKU type. Select the virtual network (in our case ProdVM1) and create a new public IP address. Click Create.

VPN Gateway throughput and connection limit capabilities are defined by the VPN SKU type. I’m using “Basic” SKU for the demo purposes only. More information on VPN SKUs can be found here, and it’s important to refer to this when planning the deployment in a Production environment.

It may take up to 45 minutes to provision the virtual network gateway.

Generate a Root Certificate

The root certificate I generate is what I’ll to upload to Azure, as this will be used to authenticate the P2S Connection. After I create the root certificate, I’ll export the public certificate data (not the private key) as a Base64 encoded X.509 .cer file. Then, I’ll upload the public certificate data to the Azure.

I’ll open PowerShell ISE as an Administrator and run the following script:

$cert = New-SelfSignedCertificate -Type Custom -KeySpec Signature `
-Subject “CN=MDP2SRootCert” -KeyExportPolicy Exportable `
-HashAlgorithm sha256 -KeyLength 2048 `
-CertStoreLocation “Cert:\CurrentUser\My” -KeyUsageProperty Sign -KeyUsage CertSign

This creates the root cert and installs it under the current user cert store.

Generate a Client Certificate from the Root Certificate

Open PowerShell as an Administrator and run the following command:

Get-ChildItem -Path “Cert:\CurrentUser\My”

This should provide a thumbprint:

Next, run this command (Thumbprint should match to my Certificate):

$cert = Get-ChildItem -Path “Cert:\CurrentUser\My\8833EB3542CEA84339882232BB2C081D8926EDAF”

Finally, I want to run this script from PowerShell ISE to generate my client certificate

New-SelfSignedCertificate -Type Custom -KeySpec Signature `
-Subject “CN=MDP2SClientCert” -KeyExportPolicy Exportable -NotAfter (Get-Date).AddYears(1) `
-HashAlgorithm sha256 -KeyLength 2048 `
-CertStoreLocation “Cert:\CurrentUser\My” `
-Signer $cert -TextExtension @(“2.5.29.37={text}1.3.6.1.5.5.7.3.2”)

Now that I have certs in place, I need to export root certificate to upload it in Azure.

Export the root certificate public key (.cer)

Hit the Windows Key + “R”, to bring up the run dialog box and type in “certmgr.msc”. When the management console opens, I can see my newly created certificates in “Current User\Personal\Certificates”. I’ll right-click on the root certificate, go to All Tasks > Export:

In the Wizard, click Next:

Select No, do not export the private key, and then click Next:

On the Export File Format page, select Base-64 encoded X.509 (.CER), and then click Next:

For File to Export, I’ll browse to the location to where I want to export the certificate. Give the file a name, and click Next:

Click Finish to export the certificate:

The certificate is successfully exported, and looks similar to this:

Now I’ll open the exported file in Notepad. The section in blue contains the information that is uploaded to Azure.

Configure Point-to-Site Connection

The next step is to configure the point-to-site connection. This where we define the client IP address pool the VPN Clients will use when connected, as well as importing the certificate.

Back in the Portal, I’ll go to my Virtual Network Gateway that I created above and select the option for “Point-to-site configuration” in the menu:

Click on Configure now:

In new window type IP address range for VPN address pool. In this demo, I will be using 20.20.20.0/24.

In the same window, there is a place to define a root certificate. Under root certificate name type the cert name and under public certificate data, paste the root certificate data (you can open the cert in notepad to get data).

Then click on Save to complete the process.

Note: when you paste certificate data, do not copy — –BEGIN CERTIFICATE — — & — –END CERTIFICATE — — text.

Testing VPN connection

Once that’s completed, it’s time to test and see if it works!

From the “Point-to-site configuration” page, I’ll click on “Download VPN Client”:

This downloads a ZIP file where I have both x86 and x64 Clients. When I double click on the VPN client setup, it asks if I wish to install a VPN client for my Virtual Network:

Once this finishes, I can see a new connection under windows 10 VPN page:

Click on connect to VPN. Then it will open up this new window. Click on Connect:

Then run ipconfig to verify IP allocation from VPN address pool:

Now, I can check if I can ping my “ProdVM1” Virtual machine across the VPN:

And can I RDP to it?:

Yes I can …..

And that’s how to set up a Point-to-Site (P2S) VPN Connection.

Hope you enjoyed this post, until next time!!

100 Days of Cloud — Day 11: Azure Virtual Networks (Part 2 — Peering)

Its Day 11 of 100 Days of Cloud, and as promised its part 2 of Azure Virtual Networks.

In the last post I covered creating a Virtual Network, having multiple subnets and also have NSG Rules govern how subnets within the same Virtual Network communicate.

Today’s post is about Virtual Network Peering, or Vnet Peering. This allows you to seamlessly connect 2 Azure Virtual Networks. Once connected, these networks communicate over the Microsoft backbone infrastructure, so no public internet, gateways or VPN’s are required for the networks to communicate.

Overview of Vnet Peering

Vnet peering enables you to connect two Azure virtual networks without using VPN or Public Internet. Once peered, the virtual networks appear as one, for connectivity purposes. There are two types of VNet peering.

  • Regional VNet peering connects Azure virtual networks in the same region.
  • Global VNet peering connects Azure virtual networks in different regions. When creating a global peering, the peered virtual networks can exist in any Azure public cloud region or China cloud regions, but not in Government cloud regions. You can only peer virtual networks in the same region in Azure Government cloud regions.

Once the peering connection is created, traffic routed through Microsoft’s private backbone network only, it never goes out onto the internet.

Naturally, Global Vnet Peering has a higher cost than Regional Vnet peering. Check out Microsoft’s Azure Pricing site for Virtual Networks here, which gives full details of the costs of each.

Benefits of Vnet Peering

The benefits of using virtual network peering, include:

  • Resources in either network can directly connect with resources in the peered network.
  • A low-latency, high-bandwidth connection between resources in peered virtual networks.
  • Use of NSG’s in peered Vnets to block access to other virtual networks or subnets.
  • Data Transfer between virtual networks across subscriptions, Azure Active Directory tenants, deployment models, and Azure regions.
  • Peering of Networks created using ARM Templates or using classic deployment models (Portal/PowerShell/CLI) to each other.
  • No downtime in either virtual network is required when creating the peering, or after the peering is created.

Demo

Let’s dive into a demonstration to see how this works. To do this, I’ll need to create 2 VMs in separate Virtual Networks. I’ll create these in separate regions also. Another thing I need to make sure of is that the Subnets do not overlap.

So I’ll jump into PowerShell first and use this command to create a Resource Group called “Prod_VMs”:

New-AzVM -ResourceGroupName “Prod_VMs” -Location northeurope -Name “ProdVM1” -VirtualNetworkName “ProdVM1” -SubnetName “ProdVM1” -SubnetAddressPrefix “192.168.2.0/24” -SecurityGroupName “ProdVM1” -OpenPorts 3389 -ImageName Win2016Datacenter -Size Standard_B2s -OsDiskDeleteOption Delete -Credential (Get-Credential) -Verbose

I’ll then use the same command with different input values to create the second VM in a resource group called “Test_VMs”:

New-AzVM -ResourceGroupName “Test_VMs” -Location eastus -Name “TestVM1” -VirtualNetworkName “TestVM1” -AddressPrefix “10.10.0.0/16” -SubnetName “TestVM1” -SubnetAddressPrefix “10.10.2.0/24” -SecurityGroupName “TestVM1” -OpenPorts 3389 -ImageName Win2016Datacenter -Size Standard_B2s -OsDiskDeleteOption Delete -Credential (Get-Credential) –Verbose

Once the 2 VMs are created, we need to note the Private IP Addresses they’ve been assigned. In the “Overview” screen on each, we note that they have been given the first available IP in their Subnets.

So it’s 192.168.2.4 for ProdVM1:

And its 10.10.2.4 for TestVM1:

And just to be sure, lets launch TestVM1 and see if we can ping ProdVM1:

Back in the Portal, I’ll go into the TestVM1 Virtual Network and in the left hand menu go to Peerings:

And when I click Add, this brings me into the options for adding Peering:

As I can see, I need to specify the Peering in both Directions. I can also see that I can specify to Allow or Block Traffic, so I can peer the networks but only allow traffic to flow in one direction.

So when I click “Add”, this sets up the Peering on both sides:

I can now see on “TestVM1” that I’m connected to “ProdVM1”:

And same on the other side:

Now, lets test ping connectivity from TestVM1 to ProdVM1:

And that is how to set up Vnet Peering of Azure Virtual Networks!

Important Points!

There a few things you need to know about Vnet Peering before we close this post out. Vnet Peerings are not transitive. So in a Hub and Spoke Topology where VnetA is peered with VnetB, and VNetA is peered with VnetC, this doesn’t automatically mean that VNetB can talk to VnetC. There are 3 options available to make this work:

  • VnetB would need to be peered directly with VnetC. However, lets say you have a large environment and would need to create multiple peerings. This would then create a Mesh Topology which is more difficult to manage in the long term.
  • The second option is to use Azure Firewall or another virtual network appliance in the Hub Network. Then create routes to forward traffic from the Spoke Networks to the Azure Firewall, which can then route to the other Spoke Networks. We saw in the “Add peering” screen the option to Allow “Traffic Forwarded from a remote Virtual Network”, this needs to be enabled.
  • The third option is to use VPN gateway transit on the Hub Virtual Network to route traffic between spokes. This is effectively the same option as Azure Firewall, but this choice will impact latency and throughput

Both option 2 and 3 can also be used to route traffic from on-premise networks when using Site-to-Site (S2S) or Point-to-Site (P2S) connections to Azure.

Conclusion

I hope you enjoyed this post on Azure Virtual Networks! Next time, I’ll create a P2S VPN Connection in order to connect directly to my Virtual Networks from my laptop via a Gateway Subnet.

Hope you enjoyed this post, until next time!!

100 Days of Cloud — Day 10: Azure Virtual Networks (Part 1)

It’s Day 10 of 100 Days of Cloud, and as promised in the last post, I’m going to talk about Azure Virtual Networks in today’s post and also the next post, so there will be 2 parts dedicated to Virtual Networks.

You’ll have seen Virtual Networks created as I was going through the Virtual Machine creating posts. So, what more is there to know about Virtual Networks? I mean, it’s just a private network in Azure for your resources with block of Subnets and IP Addresses that can be used to provide network connectivity, right?

Well yes, but that’s not all. Let’s dive into Virtual Networks and learn how they are the fundamental building block for your networks in Azure.

Overview

An Azure Virtual Network (VNet) is a network or environment that can be used to run VMs and applications in the cloud. When it is created, the services and Virtual Machines within the Azure network interact securely with each other. This is what we saw in the Default NSG Rules — any resources within the Virtual Network can talk to each other by default.

Virtual networks also provide the following key functionality:

  • Communication with the Internet: Outbound Internet connectivity is enabled by default for all resources in the VNet.
  • Communication between Azure resources: This is achieved in 3 ways, within the Virtual Network, through Service Endpoints, and through Vnet Peering.
  • Communication with On-Premise resources, using VPN (Site-to-Site or Point-to-Site) or Azure Express Route.
  • Filter Network Traffic: Using either NSG’s or Virtual Appliances such as Firewalls.
  • Route Network Traffic: You can control where traffic is routed for each subnet using route tables, or use BGP (Border gateway protocol) to learn your On-Premise routes when using VPN or Azure Express Route.

A Virtual Network contains the following components:

  • Subnets, which allow you to break the Vnet into one or more segments.
  • Routing, which routes traffic and creates a routing table. This means data is delivered using the most suitable and shortest available path from source to destination
  • Network Security Groups, which I covered in detail in Day 9.

One Vnet, Multiple Subnets

So I talked above about having multiple Subnets in a Vnet. This isn’t a new concept for anyone who has ever managed an On-Premise environment with multiple subnets — chances are at some point you would have expanded the network from good old “192.168.1.0/24”.

We’ve seen how a Virtual network and Subnet are created automatically when you create a Virtual Machine using default settings. Let’s expand on that and create a second VM on a new subnet in an existing Vnet to see how it behaves.

Referring quickly back to Day 8, I created a “Prod_VMs” resource group and Virtual machine. This used the default settings as I ran this PowerShell command to create:

New-AzVM –Name ProdVM1 –ResourceGroupName Prod_VMs –Location northeurope -Verbose

This in turn created a ProdVM1 Vnet which contained the following subnet:

So now, I’m going to create a second subnet called “ProdVM2” within this Vnet. And seeing as I’m in the Portal already, I’ll add it from there! So I click on the “+ Subnet” button to begin the process. As I can see below, it asks me for the following information:

  • Name of the new Subnet
  • Subnet Address range (this needs to be within the address range of the Vnet). I can also add a IPv6 range if required.
  • NAT Gateway — this is needed to specify a Public IP Address to use for Outbound connectivity. I’ll leave this blank for now
  • Network Security Group — this associates the Subnet with an NSG. I’ll choose the resource group NSG here.
  • Route Table — needed for routing traffic for our subnet. Again, I’ll leave this blank.
  • Service Endpoints — this option allows secure and direct access to the endpoint of an Azure Service without needing a Public IP Address on the Vnet. You can read more about Service Endpoints here.
  • Subnet Delegation — this option means to can delegate the subnet specifically for a specified Azure resource, such as SQL, Web Hosting or Containers.

Once I have all options filled in, this is what I see:

And when I click save, this is what I see in the Portal under my Virtual Network:

Now I have a new subnet, I’m going to deploy a new Virtual Machine to that Subnet. I’m going to open PowerShell to do this, and I’ll enter this command to create the VM, specifying the Vnet, subnet and NSG I want to deploy it to:

New-AzVM -ResourceGroupName “Prod_VMs” -Location northeurope -Name “ProdVM2” -VirtualNetworkName “ProdVM1” -SubnetName ProdVM2 -SubnetAddressPrefix “192.168.2.0/24” -SecurityGroupName “ProdVM1” -OpenPorts 3389 -ImageName Win2016Datacenter -Size Standard_B2s -OsDiskDeleteOption Delete -Credential (Get-Credential) –Verbose

And if I check the Resource group, I can see my 2 VM’s with all resources present. Note that I don’t have a Virtual network or NSG dedicated to VM2:

Now, before I go any further. We can now see from the above how important it is to define your naming convention correctly in Azure when creating resources. This is indeed a lab environment which I’ll deleting, but in a Production environment you’ll need to know how to identify machines correctly.

Testing using NSGs

What I want to test now is connectivity between resources in the same Vnet to prove this works. I RDP into the 2 machines (which are on different subnets). A quick “ipconfig” on both gives me the IP Addresses of both, and they do indeed correspond to the subnets I created:

Now I’ll ping the machines from each other:

And it’s successful, so this proves that even though the 2 machines are in different subnets, they can communicate as the NSG Rules for traffic inside the Vnet allow this.

Now let’s mess this up a little! I’ll go into my NSG and add a rule denying Ping/ICMP from ProdVM1 to ProdVM2:

And if I try again to ping, it times out:

Conclusion

So as we can see, Virtual Networks are the building blocks of building your Azure Networks and resources from the ground up. They need to be planned properly to ensure the network design both meets your needs from a functionality and security standpoint. You also need to ensure the networks you create in Azure does not overlap with any of your On-Premise networks in the event you are operating in a Hybrid environment.

I did say that this was Part 1 of Virtual Networks — the next post is Part 2 where I’ll be delving into Vnet Peering, which allows you to connect to resources across Virtual Networks located either in the same region or across regions. and showing how that works.

Hope you enjoyed this post, until next time!!

100 Days of Cloud — Day 2: Azure Budgets and Cost Management

One of the most common concerns raised when any organization is planning a move to the Cloud is Cost. Unlike Microsoft 365 where you have set costs based on license consumption, there are a number of variables to be considered when moving to any Cloud Provider (be that Azure, AWS or others).

For example, let’s say we want to put a Virtual Machine in the Cloud. Its sounds easy — if this was on-premise, you would provision storage on your SAN, assign CPU and Memory, assign an IP Address, and if required purchase a license for the OS and other additional software that will be running on the Virtual Machine.

All of the above still holds true when creating a Virtual Machine in the Cloud, but there are also other considerations, such as:

  • What Storage Tier will the VM run on (Standard HDD, Standard SSD, Premium SSD)
  • How HA do we need the VM to be (Locally Redundant, Geographically Redundant)
  • Does the VM need to be scalable based on demand/local (Auto Scaling/Scale Sets)

In an on-premise environment, there needs to be an up-front investment (CAPEX) to make that feasible. When running with a Cloud Provider such as Azure, this uses an on-demand model (OPEX). This is where costs can mount.

There are a number of ways to tackle this. The Azure TCO (Total Cost of Ownership) Calculator gives an estimate of costs of moving infrastructure to the cloud. The important word there is “estimate”.

So you’ve created your VM with all of the settings you need, and the TCO has given you the estimate for what total “should” be on your monthly invoice. Azure Cost Management and Budgets can provide you with forecasting and alerts with real-time analysis of your projected monthly spend. That way, there are no nasty surprises when the invoice arrives!

Firstly, lets create our Azure Account. Browse the Azure Portal to sign up. You get:

  • 12 months of free services
  • $200 credit for 30 days
  • 25 always free services

Azure Portal Method

When your account is set up, go to https://portal.azure.com to sign in:

Once you’ve signed in, you can search for “Cost Management and Billing”

From the “Cost Management + Billing” page, select “Cost Management” from the menu:

This brings us into the Cost Management Page for our Azure Subscription:

One important thing to note here before we go any further. We can see at the top of the screen that the “Scope” for the Cost Management is the Azure Subscription. In Azure, Budgets can be applied to the following:

  • Management Group — these allow you to manage multiple subscriptions
  • Subscriptions — Default
  • Resource Groups — Logical groups of related resources that are deployed together. These can be assigned to Departments or Geographical Locations

Also, we can create monthly, quarterly or annual budgets. For the purposes of this demo (and the entire 100 Days), I’ll be using Subscriptions with a monthly budget.

Click on the “Budgets” menu option, and then click “Add”:

This brings us into the “Create Budget” menu. Fill in the required details and set a Budget Amount — I’m going to set €50 as my monthly budget:

Next, we need to set up Alert Conditions and email recipients. In Alert Conditions, we can see from the “Type” field that we can choose either Actual or Forecasted:

  • Actual Alerts are generated when the monthly spend reaches the alert condition.
  • Forecasted Alerts are generated in advance when Azure calculates that you are likely to exceed the alert condition based on the services you are using

Once you have your Alert Conditions configured, add one or more Alert Recipients who will receive alerts based on your conditions. Then click “Create”:

And now we see our budget was created successfully!

So, that’s the Azure Portal way to do it. There are 2 other ways, the first is using Azure PowerShell.

Azure PowerShell Method

Firstly, we need open Windows PowerShell, and install the Azure Module. To do this, run:

install-module -name Az

This will install all packages and modules we require to manage Azure from PowerShell.

We can then run the following commands to create our Budget:

Connect-AzAccount

will prompt us to log on to our subscription:

Once we are logged in, this will return details of our Subscription:

Run

Get-AzContext

to check what level we are at in the subscription:

Now, we can run the following command to create a new budget:

New-AzConsumptionBudget -Amount 100 -Name TestPSBudget -Category Cost -StartDate 2021–09–17 -TimeGrain Monthly -EndDate 2023–09–17 -ContactEmail durkanm@gmail.com -NotificationKey Key1 -NotificationThreshold 0.8 -NotificationEnabled

But it throws an error! Why?

It turns out that after a bit of digging, you can only set a budget using PowerShell if your subscription is part of an Enterprise Agreement. So I’m afraid because I’m using a free account here, its not going to work ☹.

Full documentation can be found at this link:

https://docs.microsoft.com/en-us/azure/cost-management-billing/costs/tutorial-acm-create-budgets#create-and-edit-budgets-with-powershell.

OK so lets move on to option 3, which is using Azure Resource Manager (ARM) Templates.

Azure Resource Manager (ARM) Templates Method

To do this, go to the following site:

https://docs.microsoft.com/en-us/azure/cost-management-billing/costs/quick-create-budget-template?tabs=CLI

And click on the “Deploy to Azure” button:

This will re-direct us into the Azure Portal and allow us to fill in the fields required to create our Budget:

And that is how we create a Budget (3 ways) in Azure. See you on Day 3!!

Hope you enjoyed this post, until next time!!