In the previous post, What Is Azure Kubernetes Service (AKS) and Why Should You Care?, we got an intro to AKS, compared it to Azure PaaS services in terms of asking when is the right choice, and finally spun up an AKS cluster to demonstrate what exactly Microsoft exposes to you in terms of responsibilities.
In this post, we’ll take a step back to first principles and understand why containers and microservices emerged, how Docker changed application delivery, and how those pressures ultimately led to Kubernetes.
Only then does Kubernetes and by extension AKS architecture fully make sense.
From Monoliths to Microservices
If you rewind to the 1990s and early 2000s, most enterprise systems followed a fairly predictable pattern: client/server.
You either had thick desktop clients connecting to a central database server, or you had early web applications running on a handful of physical servers in a data centre. Access was often via terminal services, remote desktop, or tightly controlled internal networks.
Applications were typically deployed as monoliths. One codebase. One deployment artifact. One server—or maybe two, if you were lucky enough to have a test environment.
Infrastructure and application were deeply intertwined. If you needed more capacity, you bought another server. If you needed to update the application, you scheduled downtime. And this wasn’t like the downtime we know today – this could run into days, normally public holiday weekends where you had an extra day. Think you’re going to be having Christmas dinner or opening Easter eggs? Nope – thtere’s an upgrade on those weekends!
This model worked in a world where:
- Release cycles were measured in months
- Scale was predictable
- Users were primarily internal or regionally constrained
But as the web matured in the mid-2000s, and SaaS became mainstream, expectations changed.
Virtualisation and Early Cloud
Virtual machines were the first major shift.
Instead of deploying directly to physical hardware, we began deploying to hypervisors. Infrastructure became more flexible. Provisioning times dropped from weeks to hours, and rollback of changes became easier too which de-risked the deployment process.
Then around 2008–2012, public cloud platforms began gaining serious enterprise traction. Infrastructure became API-driven. You could provision compute with a script instead of a purchase order.
Despite these changes, the application model was largely the same. We were still deploying monoliths—just onto virtual machines instead of physical servers.
The client/server model had evolved into a browser/server model, but the deployment unit was still large, tightly coupled, and difficult to scale independently.
The Shift to Microservices
Around the early 2010s, as organisations like Netflix, Amazon, and Google shared their scaling stories, the industry began embracing microservices more seriously.
Instead of a single large deployment, applications were broken into smaller services. Each service had:
- A well-defined API boundary
- Its own lifecycle
- Independent scaling characteristics
This made sense in a world of global users and continuous delivery.
However, it introduced new complexity. You were no longer deploying one application to one server. You might be deploying 50 services across 20 machines. Suddenly, your infrastructure wasn’t just hosting an app—it was hosting an ecosystem.
And this is where the packaging problem became painfully obvious.
Docker and the Rise of Containers

Docker answered the packaging problem.
Containers weren’t new. Linux containers had existed in various forms for years. But Docker made them usable, portable, and developer-friendly.
Instead of saying “it works on my machine,” developers could now package:
- Their application code
- The runtime
- All dependencies
- Configuration
Into a single container image. That image could run on a laptop, in a data centre, or in the cloud—consistently. This was a major shift in the developer-to-operations contract.
The old model:
- Developers handed over code
- Operations teams configured servers
- Problems emerged somewhere in between
The container model:
- Developers handed over a runnable artifact
- Operations teams provided a runtime environment
But Docker alone wasn’t enough.
Running a handful of containers on a single VM was manageable. Running hundreds across dozens of machines? That required coordination.
We had solved packaging. We had not solved orchestration. As container adoption increased, a new challenge emerged:
Containers are easy. Running containers at scale is not.
Why Kubernetes Emerged

Kubernetes emerged to solve the orchestration problem.
Instead of manually deciding where containers should run, Kubernetes introduced a declarative model. You define the desired state of your system—how many replicas, what resources, what networking—and Kubernetes continuously works to make reality match that description.
This was a profound architectural shift.
It moved us from:
- Logging into servers via SSH
- Manually restarting services
- Writing custom scaling scripts
To:
- Describing infrastructure and workloads declaratively
- Letting control loops reconcile state
- Treating servers as replaceable capacity
The access model changed as well. Instead of remote desktop or SSH being the primary control mechanism, the Kubernetes API became the centre of gravity. Everything talks to the API server.
This shift—from imperative scripts to declarative configuration—is one of the most important architectural changes Kubernetes introduced.
Core Kubernetes Architecture
To understand AKS, you first need to understand core Kubernetes components.
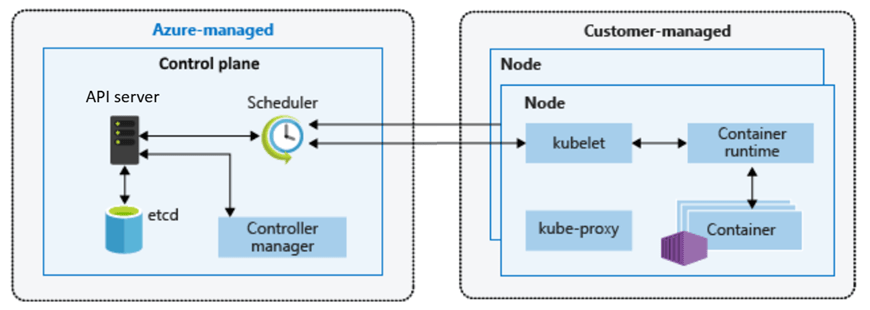
At its heart, Kubernetes is split into two logical areas: the control plane and the worker nodes.
The Control Plane – The Brain of the Cluster
The control plane is the brain of the cluster. It makes decisions, enforces state, and exposes the Kubernetes API.

Key components include:
API Server
The API server is the front door. Whether you use kubectl, a CI/CD pipeline, or a GitOps tool, every request flows through the API server. It validates requests and persists changes.
- Entry point for all Kubernetes operations
- Validates and processes requests
- Exposes the Kubernetes API
Everything—kubectl, CI/CD pipelines, controllers—talks to the API server.
etcd
Behind the scenes sits etcd, a distributed key-value store that acts as the source of truth. It stores the desired and current state of the cluster. If etcd becomes unavailable, the cluster effectively loses its memory.
- Distributed key-value store
- Holds the desired and current state of the cluster
- Source of truth for Kubernetes
If etcd is unhealthy, the cluster cannot function correctly.
Scheduler
The scheduler is responsible for deciding where workloads run. When you create a pod, the scheduler evaluates resource availability and constraints before assigning it to a node.
- Decides which node a pod should run on
- Considers resource availability, constraints, and policies
Controller Manager
The controller manager runs continuous reconciliation loops. It constantly compares the desired state (for example, “I want three replicas”) with the current state. If a pod crashes, the controller ensures another is created.
- Runs control loops
- Continuously checks actual state vs desired state
- Takes action to reconcile differences
This combination is what makes Kubernetes self-healing and declarative.
Worker Nodes – Where Work Actually Happens
Worker nodes are where your workloads actually run.
Each node contains:
kubelet
Each node runs a kubelet, which acts as the local agent communicating with the control plane. It ensures that the containers defined in pod specifications are actually running.
- Agent running on each node
- Ensures containers described in pod specs are running
- Reports node and pod status back to the control plane
Container Runtime
Underneath that sits the container runtime—most commonly containerd today. This is what actually starts and stops containers.
- Responsible for running containers
- Historically Docker, now containerd in most environments
kube-proxy
Networking between services is handled through Kubernetes networking constructs and components such as kube-proxy, which manages traffic rules.
- Handles networking rules
- Enables service-to-service communication n
Pods, Services, and Deployments
Above this infrastructure layer, Kubernetes introduces abstractions like pods, deployments, and services. These abstractions allow you to reason about applications instead of machines.
Pods
- Smallest deployable unit in Kubernetes
- One or more containers sharing networking and storage
Deployments
- Define how pods are created and updated
- Enable rolling updates and rollback
- Maintain desired replica counts
Services
- Provide stable networking endpoints
- Abstract away individual pod lifecycles
You don’t deploy to a server. You declare a deployment. You don’t track IP addresses. You define a service.
How This Maps to Azure Kubernetes Service (AKS)
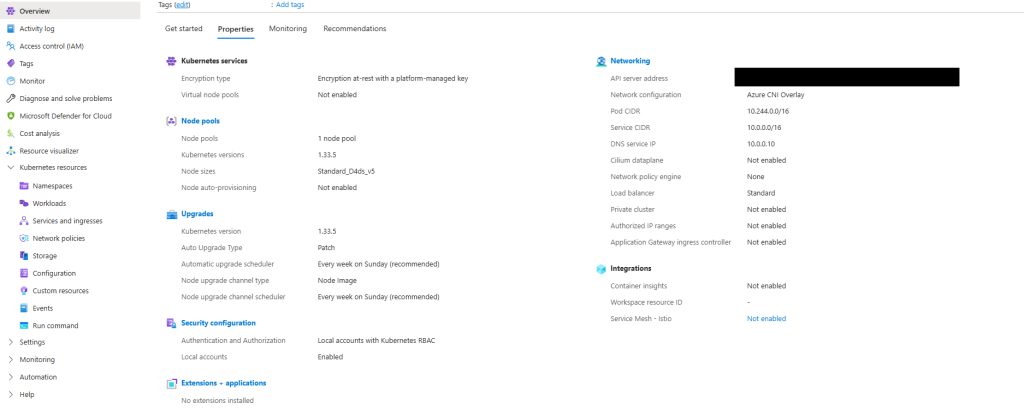
AKS does not change Kubernetes—it operationalises it. The Kubernetes architecture remains the same, but the responsibility model changes.
In a self-managed cluster, you are responsible for the control plane. You deploy and maintain the API server. You protect and back up etcd. You manage upgrades.
In AKS, Azure operates the control plane for you.

Microsoft manages the API server, etcd, and control plane upgrades. You still interact with Kubernetes in exactly the same way—through the API—but you are no longer responsible for maintaining its most fragile components.
You retain responsibility for worker nodes, node pools, scaling, and workload configuration. That boundary is deliberate.
It aligns directly with the Azure Well-Architected Framework:
- Operational Excellence through managed control plane abstraction
- Reduced operational risk and complexity
- Clear separation between platform and workload responsibility
AKS is Kubernetes—operationalised.
Why This Matters for Production AKS
Every production AKS decision maps back to Kubernetes architecture:
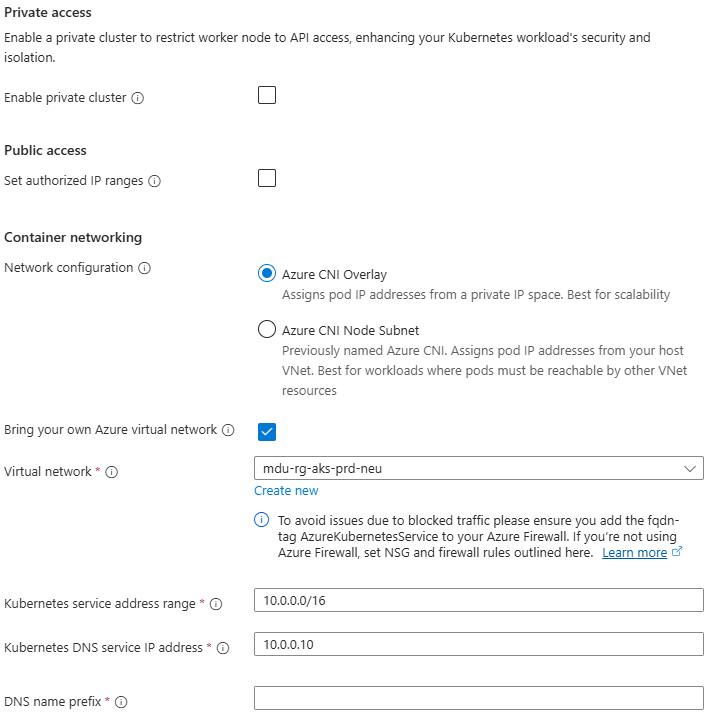
- Networking choices affect kube-proxy and service routing
- Node pool design affects scheduling and isolation
- Scaling decisions interact with controllers and the scheduler
Without understanding the underlying architecture, AKS can feel opaque.
With that understanding, it becomes predictable.
What Comes Next
Now that we understand:
- Why containers emerged
- Why Kubernetes exists
- How Kubernetes is architected
- How AKS maps to that architecture
We’re ready to start making design decisions.
In the next post, we’ll move into AKS architecture fundamentals, including:
- Control plane and data plane separation
- System vs user node pools
- Regional design and availability considerations
See you on the next post