Its Day 39 of 100 Days of Cloud, and I’m slowing it down and bit today to take in some easy listening.
For those who have yet to find it, the Cloudskills.io Podcast is an in-depth look at all things cloud and what happening across all the major Cloud Providers.
In this weeks episode, Mike Pfeiffer is talking to Roger Wahman, CTO at Apex Consulting, and Darin Stevenson, Director of Strategic Solutions and Technical Recruiting at Apex Systems. he guys are having a roundtable discussion, forecasting the hiring trends and in-demand skills for 2022 in the Cloud industry:
This is Episode 136, so for those of you who haven’t listened yet, you have 135 to catch up on! Here are a few of my favourite episodes so far:
John Lunn (aka Jonny Chipz) on Cloud Career Progression:
Derek Smith on Cloud Evangelism:
Luke Orrelana on Terraform and working as an SRE at Microsoft:
Steve Buchanan on DevOps and Cloud Native
Tim Warner on building Azure Cloud Skills
I could list out every single episode, but you can see that these are some of the biggest names in the industry right now, so the podcast is well worth a listen whether you are a seasoned Cloud pro or new to the Cloud.
My advice is to go right back to the start and Episode One – stat listening and take it all in. From Azure to AWS, Ansible to Terraform, DevOps to GitOps, there is something there for everyone.
And before anyone asks – no, this is not affiliate marketing – I’m not employed by Cloudskills.io and they are not paying me to prompte their brand. I found the CloudSkills Podcast at the start of the Covid Pandemic in March 2020, and it was my companion on many walks and runs during that time. I then signed up and joined the community in Autumn 2020, and I can safely say it was the “light-on” moment for me in both my cloud learning and career journey.
And thats all for today! Hope you enjoy listening to the Podcast as much as I do, until next time!
Its Day 38 of 100 Days of Cloud, and I’m continuing my learning journey on Infrastructure as Code (IaC) by using Terraform.
In the previous post, we looked at the different types of variables we can use in Terraform, how we reference them across across terraform config files, and how powerful they can be in helping to make our code reusable.
Todays post is all about modules, which are used to break our terraform deployments up into multiple segments that are much easier to manage. Lets dive in and take a look.
Modules
Modules are a way to split your Terraform code into multiple segments that they can be managed more easily and by cross functional teams.
Lets go back to our traditional setup, which will have the following components:
Operating System
Network Connectivity
Database
Web Application
In our first post on Terraform back on Day 35, we had all of these bundled into a single main.tf file. As our infrastructure footprint in Azure or other Cloud Services grows, this single file will grow exponentially and will make management very dificult, particularly if multiple teams are accessing. There is also the risk that mistakes can be made that could take down the entire infrastructure.
Modules effectively sit in their own file structure, and are called from the main.tf file. If we look at the example below, the root or parent main.tf file sits at the top of the directory structure, and we then have the directory for the storage-account module sitting below that with its own main.tf and variables.tf configuration files :
If we look at the main.tf file, we can see that the resource group code is there as normal, however when we get down to create the storage account, we’re calling the module from the underlying directory structure. If we look the main.tf file within the module, we can see that it contains the basic information required to create the storage account:
What’s missing here is the Terraform source/version and provider code blocks, however in a modules configuration all of that happens in the parent main.tf file. So when we run terraform apply on the parent directory, all providers for the child modules are initialised also.
So why bother break it all up into modules? It goes back to what we said at the start about managing our code effectively, and breaking each of the components out to be managed individually. This also helps from a source repository perspective: instead of having all elements in a single file managed by multiple users or departments, each module can have its own source repository (in Github for example) managed by a teamthat can then be pulled from the repository whenever changes are made. This whats known as “Mono Repo” versus “Multi Repo”.
Image Credit: Luke Orrelana/Cloudskills.io
In the module block, we can also directly reference a Github repository to get the most up to date version of our code. There are multiple sources that can be referenced directly in the code, and full details can be found here.
Learning Resources
Lets wrap this up by looking the learning resources that are available. There are loads of excellent Terraform leaning resources out there. The best place to start is at HashiCorp Learn, which has full tutorials for all of the major cloud providers. Terraform Registry is the place to go for all providers and modules you need to deploy infrastructure.
You then need to look at courses – the aforementioned Luke Orrelana does an excellent Terraform on Azure course over at Cloudskills.io, and Michael Levan has a Terraform for All course on his YouTube Channel. Both Luke and Michael are HashiCorp Ambassadors which is teh HashiCorp equivalent of an MVP, so if you see these guys producing content you know its going to be good (and definitely doing a better job than me of trying to explain how this works!).
Conclusion
And thats all for today! I hope you’ve enjoyed the last few posts on Terraform and learning how powerful a tool it can be. Until next time!
Its Day 37 of 100 Days of Cloud, and I’m continuing my learning journey on Infrastructure as Code (IaC) by using Terraform.
In the previous post, we looked at how Terraform State stores information and acts as a database of the resources deployed in Azure. We also looked at Interpolation and how this is used to reference different parts of the Terraform configuration and the dependencies needed to deploy parts of our infrastructure (such as deploying a subnet into a vnet).
Todays post is all about variables – we saw a sample of that on our first post where I used some variables when initially deploying our Resource Group. However, we need to go deeper than that and see how powerful variables can be in helping to make our code reusable, because ultimately that is the point of using Infrastructure as Code. So lets dive in and take a look.
Types of Variables
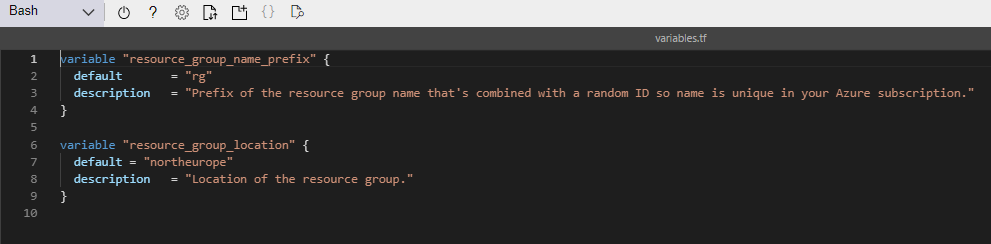
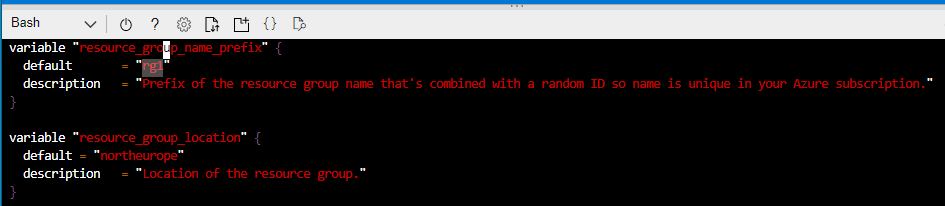
Lets go back to Day 35 when I introduced variables in my resource group deployment. We saw the following 2 variables defined in the variables.tf file:
String Variable
This is the first of our variable types which is a string. This is a sequence of characters representing text, so in our example above it represents the prefix to be used for the resource group name, and also the default location to deploy our resource group into. You could also use this for the likes of admin usernames/passwords, or VM Size/Type we wish to deploy.
List Variable
The next type of variable is a list, which is a sequence of values. In our example, this can be used to define the address space for vnets or subnets. Lists are always surrounded by square brackets.
Map Variable
Next type is a map – this is a list of key value pairs where each value is defined by a label – so in the example above, we are using the map variable to define the type of storage we want to use based on the locations.
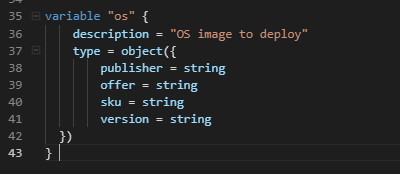
Object Variable
Next type is object – this is a structured variable that can contain different types of values where named attributes each have their own type.
There are 2 other types of variables – a number (which can be a whole number or a fraction) or a boolean variable (which is basically true or false).
So thats the list of variable types, and the above examples show how they would be defined in our variables.tf file. But for the most part the above is just a list of definitions of variables, so where do we store the actual values we want to use?
Variable Inputs
There are 3 ways we can input variables for use with our Terraform code:
Environment Variables – this uses the “TF_VAR_” prefix for all variables you want to store locally. So for example, to store a password variable, you would run export TF_VAR_PASSWORD="password", and then declare the variable in the variables.tf file.
Command Line Switch- we can just use the -var parameter on the command line to input the variables when running terraform apply. So for example, we could run terraform apply -var="location=northeurope" to specify the location we want to deploy to.
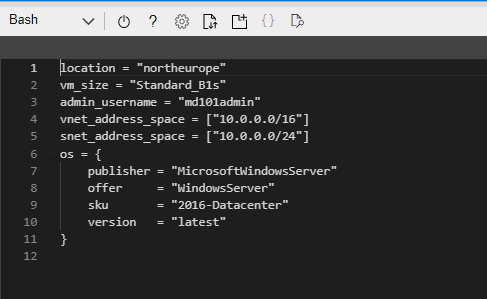
terraform.tfvars file – this is a file that is deployed in the same location as the main.tf and variables.tf files and contains a set of key value pairs that are the variable and its value. An exmaple of this is shown below:
We can see that the variables are on the left and the values are on the right.
Calling Variables in Main.tf
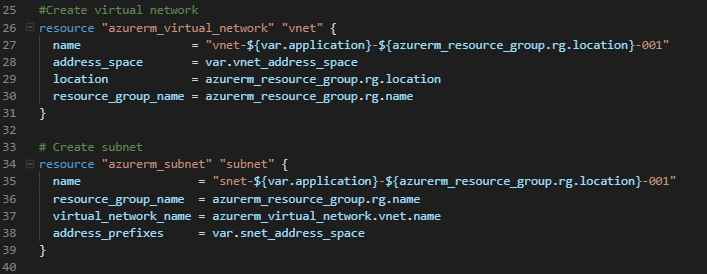
So now we have our variables defined in our terraform.tfvars file, we can now call them from our main.tf when running terraform apply. If you recall on Day 35, I used the var. syntax in the code to call the variables from variables.tf. If we look at the main.tf file now, we can see where this is now calling all of our variables, for example virtual network and subnet:
And below is the virual machine code block:
Now, the eagle-eyed will have noticed that although I’m calling a var.admin_password variable, I didn’t have that defined in my terraform.tfvars file. What will happen here when I run terraform apply is that I will be prompted to input the password, or indeed any variables that are missing.
There is another safer, more secure and in my opinion much cooler way to call the password in, and thats by calling in a secret that is stored in Azure Key Vault. You can find the code for this here.
Conclusion
So now we’re starting to piece things together and understand how the code can become re-usable. For example, we could just copy the main.tf and variables.tf files out and create separate terraform.tfvars files for multiple deployments across multiple teams or regions depending on requirements.
And thats all for today! In the final post in the Terraform series, we’ll dive into modules and how they can used for multiple resources in your architecture when using Terraform. Until next time!
Its Day 36 of 100 Days of Cloud, and I’m continuing my learning journey on Infrastructure as Code (IaC) by using Terraform.
In the previous post, we started working with Terraform on Azure Cloud Shell, created and described the function of the Terraform configuration files, and finally deployed an Azure Resource Group. Lets jump back in and start by looking at Terraform State.
Terraform State
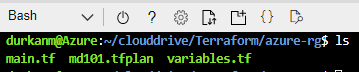
Back in the Cloud Shell, and if we go to our directory where the files are located and do an ll, we can see the config files and also our .tfplan file that we outputted is also in place. We also see that we now have a terraform.tfstate file present:
Lets run cat terraform.tfstate to see whats in the file:
We can see that the file is in JSON format, and contains the information that we used to create our resource group, including the Terraform version, providers used, location and name.
Important Note #1 – We can also see that the tfstate file contains sensitive metadata such as id and other attributes. – this is why it important to never save the tfstate file in a public respository. So as a best practice on Github for example, if you are storing your Terraform config on Github, make sure to add the terraform.tfstate to the list of files to ignore when making a commit – you can find the details on how to do this here.
And thats what tfstate is doing – its acting as a database to store information about what has been deployed in Azure. When running terraform plan, the tfstate file is refreshed to match what it can see in the environment.
But what happens if we make changes to Azure or indeed our Terraform configuration files – let see that in action. If you recall, we used the variables.tf file in conjunction with main.tf to use varibales to deploy the resource group. So what I’ll do here is go into the variables.tf file and change the prefix of the resource group name to rg1:
So we’ll save that and run terraform plan again:
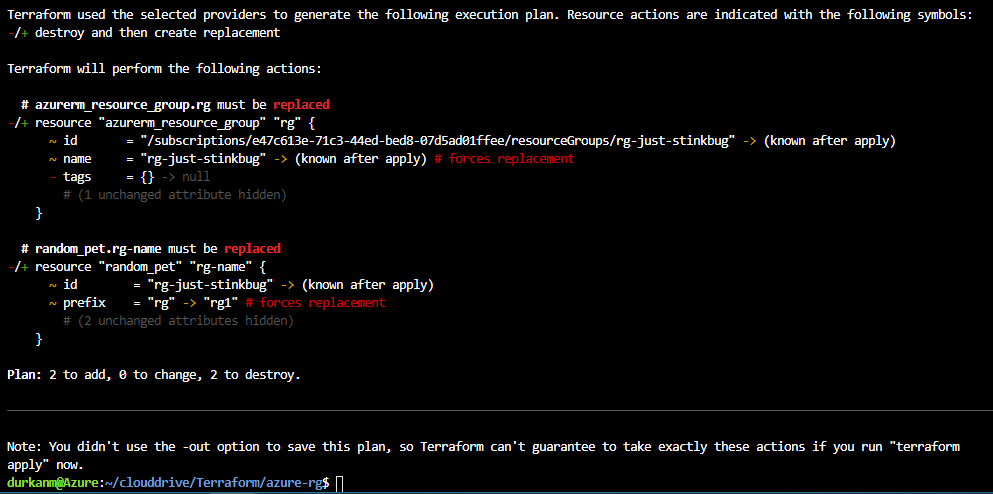
The first thing we see on the output is that its doing a refresh to check for the state of resources in Azure and compare them against the terraform.tfstate file. And immediately, its seeing a discrepancy and telling us that objects have changed (these are the changes made to the variables.tf file). And if we scroll down further:
Its telling me that the resources need to be replaced, so its going to destroy them and create new ones based on the changes.
Important Note #2 – We need to look carefully and understand what this is doing – this is going to destroy existing resources. In this case, I only have a resource group deployed. But what if I had other resources deployed in that resource group, such as a Virtual Machine, Cosmos DB or a Web instance. Yep, they would be blown away as well and replaced by new ones in the new resource group that gets deployed. Thats all very well in a test environment, but in production this could have disastrous consequences.
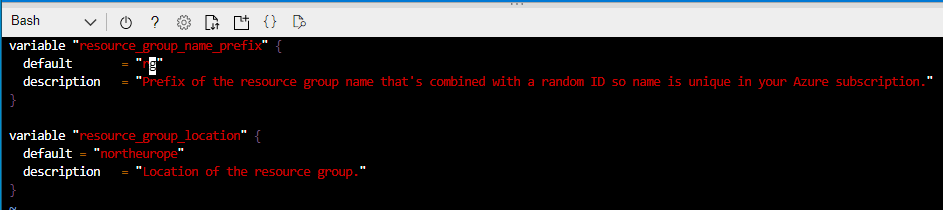
So lets reverse the changes and put my variables.tf file back the way it was:
And lets run terraform plan again just to be sure:
So again, its telling me that there has been a change to config files, but its now reporting that the infrastructure matches the configuration, so no changes need to be made.
So thats Terraform State, lets move on to adding more resources to our Terraform deployment.
Interpolation
We want to add resources to our existing resource group, so we’ll go back in and modify our main.tf file and add the code to do that. If we go to https://registry.terraform.io/, we can search and find details for all of the modules we want to add.
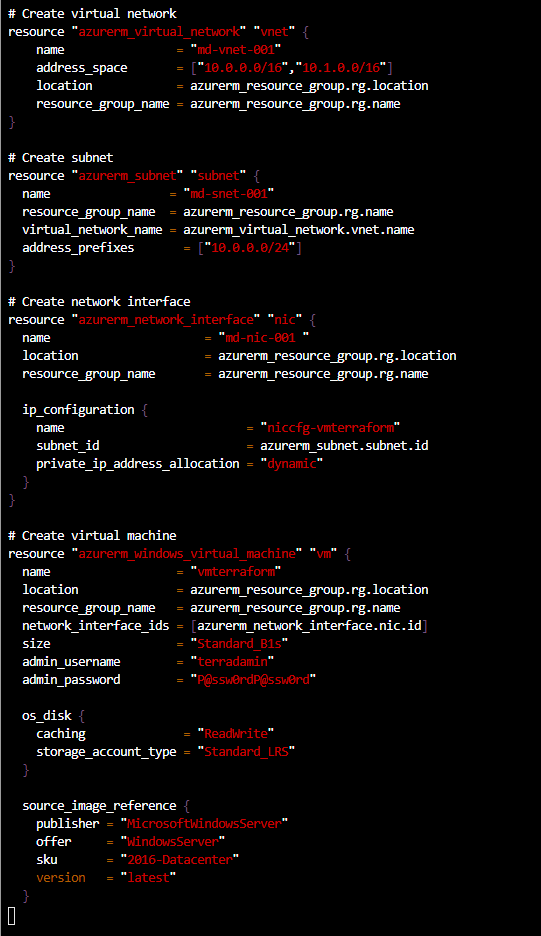
What we’ll add is a virtual network, a subnet, a network interface and a windows virtual machine into our resource group. to do this, we’ll add the following code to our main.tf file:
Important Note #3 – As this is a test, I’m putting the passwords into my config file in plain text. You would never do this in production, and I’ll go through how to do this in a later post.
If we study each of the sections, we can see that we are referencing the resources we need to deploy each of the new resources into. So for example, when deploying the virtual network, we are referencing the resource group higher in the configuration file by the resource type, not directly using the resource group name:
Same happens when we create the subnet, we reference the virtual network configuration, not the name directly:
And in a nutshell, thats how Interpolation works in Terraform. Instead of having to hard code names of dependencies when creating infra, Terraform can reference other sections of the config file for references instead. Whats important about this is you can see how it can easily make your infrastructure scalable very quickly.
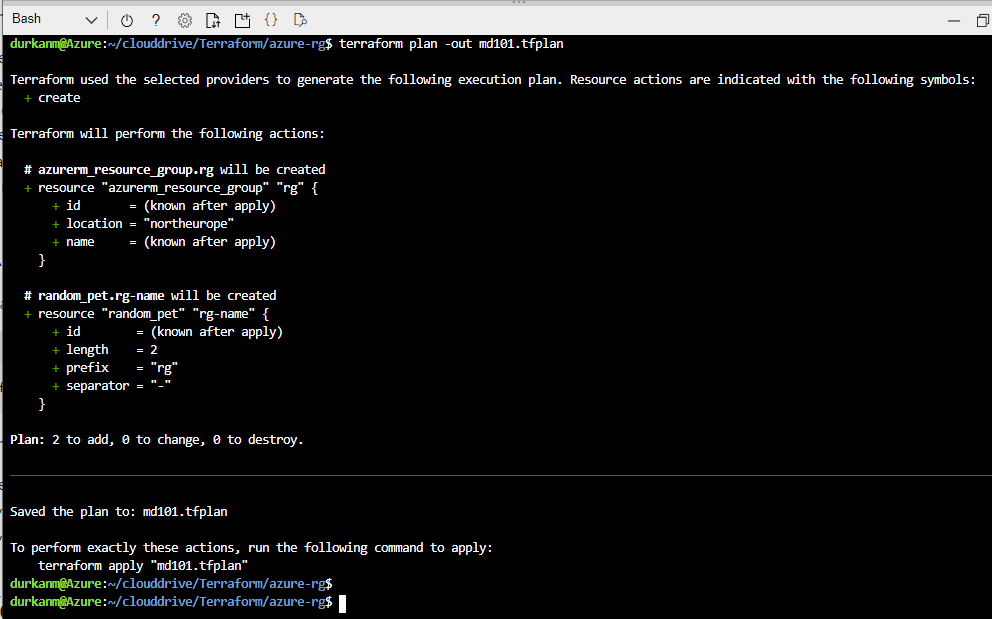
So now lets run terraform plan -out md101.tfplan and see what happens:
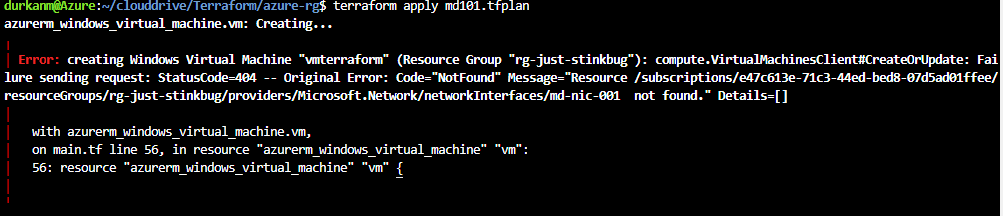
And we can see that we have the resources to add. So lets run terraform apply md101.tfplan to deploy the infrastructure:
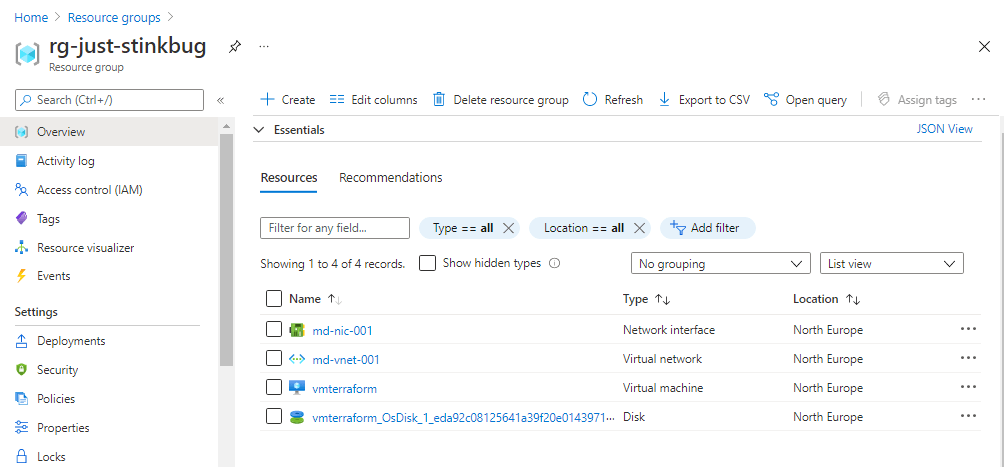
Bah, error! Its complining about the NIC not being found. When I look in the portal, its there, so need to look back at my code. And I find the problem – I’ve left a trailing space in the name of the NIC, hence Terraform is saying it can’t find it:
So lets tidy that up and run the plan and apply again:
Looking much better now! And a quick check of the portal shows me the resources are created:
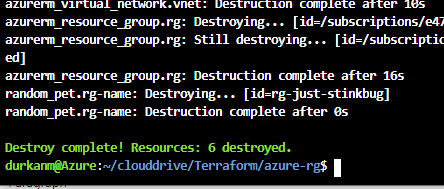
And now last but certainly not least, because I’ve not used best security practises in creating this, I’m immediately going to run terraform destroy to tear down the infrastructure:
I type “yes” and its bye-bye “rg-just-stinkbug” …… 😦
And thats all for today! In the next post, we’ll dive further into variables, and how to securely store items like passwords when using Terraform. Until next time!
Its Day 35 of 100 Days of Cloud, and I’m continuing my learning journey on Infrastructure as Code (IaC) by using Terraform.
In the previous post, I described the definition of Infrastructure as Code, how you don’t need to be a developer or have a development background to use IaC services, and how Terraform is a declarative programming language (instead of telling the code how to do something, we define the results that we expect to see and tell the program to go and do it).
I also gave the steps of how to install Terraform on your own device and adding it into Visual Studio Code. However, because Terraform is built into the Azure Cloud Shell, I’m going to use it directly from there.
Using Terraform in Azure Cloud Shell
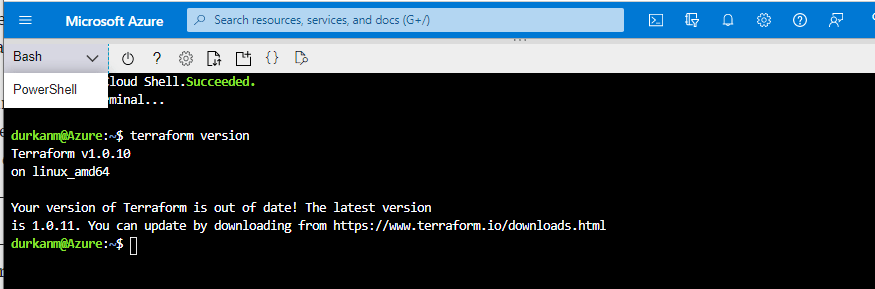
We need to browse to shell.azure.com from any browser and log on using our Azure credentials. This will open the Cloud Shell, adn we have the option to use either Bash or PowerShell. I’ve selected Bash for this session, and when I run terraform version it will give me the version of Terraform available to me in the shell.
Now, we can see that the latest version is not installed – this is not something we need to worry about as Cloud Shell automatically updates to the latest version of Terraform within a couple of weeks of its release.
Now, we need to create a directory to store our Terraform configuration files and code. A default directory called “clouddrive” is available by default in each Cloud Shell session. I’ll cd into that directory, and create a directory structure using the mkdir command
Now we need to create 3 files called main.tf, variables.tf and outputs.tf. Lets quickly describe what these files are for:
main.tf: This is our main configuration file where we are going to define our resource definition.
variables.tf: This is the file where we are going to define our variables.
outputs.tf: This file contains output definitions for our resources.
The name of each file doesn’t need to be the above as we’ll see in the examples – terraform can interpret each of the the files as long as it ends with .tf extension,however the above is a standard naming convention followed in terraform community and make it easier when working in teams on terraform projects.
To create the files, we use the vim command. In main.tf, we’ll add the following code:
Lets step through this block of code.
Firstly, we see the word terraform defined at the top, this is telling us that this is the main configuration file. The required_providers is telling us that Azure is the provider that is required to create the infrastructure (more on providers in a minute). The first resource block is creating the name of the resource group, but also pointing at a var string which will be located in the variables.tf file. The second resource block is again pointing to a var string which will give us the location of the resource group as defined in the variables.tf file.
One thing to note here – both resource blocks contain the code "random_pet" – this is used to generate random pet names that are intended to be used as unique identifiers for resources. Terraform can also use random ids, integers, passwords, strings etc. You can find full documentation here.
Now, back to our files – we’ll now create variables.tf and add the following code:
We can see that this is giving us descrptions of the variables – if we compare the main.tf file above we can now see what is being called from the resource blocks.
Now, back in the shell we need to run terraform init – this is going to initialise the terraform environment for this project and download the required providers as specified in the main.tf file. Once that runs, we get this output:
I we run an ll now, we can see there is a .terraform directory available, and if we drill down we can see that this has downloaded the providers for us:
So now, we need to run terraform plan-out md101.tfplan – this creates and execution plan so we can see what is going to happen, but it doesn’t create anything. The -out parameter just outputs the plan to a file. This is useful if you are creating multiple plans and need to apply or destroy them at a later stage. We can see there are “2 to add, 0 to change, 0 to destroy”:
We can also this that this has been saved to out outfile:
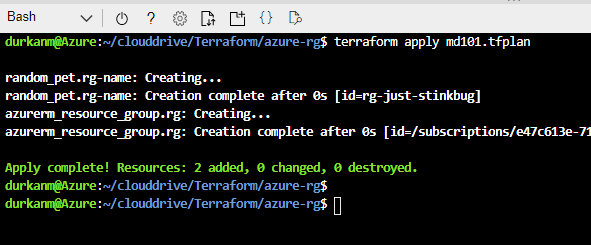
Now lets run terraform apply md101.tfplan to execute and create our Resource Group:
And if we check in the portal, we can see that we have created rg-just-stinkbug:
If we wanted to destroy the resources, the command to run would be terraform destroy md101.tfplan.
But we’re not going to do that – because in the next post, I’ll look at adding resources to that existing resourge group we’ve created. I’ll also look at the Terraform State file, and look at why its important to manage resources that have been deployed with Terraform only with Terraform and not manually within the Portal, ARM or PowerShell. Until next time!
Its Day 34 of on 100 Days of Cloud, and in todays post I’m starting my learning journey on Infrastructure as Code (IaC).
Infrastructure as Code is one of the phrases we’ve heard a lot about in the last few years as the Public Cloud has exploded. In one of my previous posts on AWS, I gave a brief description of AWS CloudFormation, which is the built-in AWS Tool that was decribed as:
Infrastructure as Code tool, which uses JSON or YAML based documents called CloudFormation templates. CloudFormation supports many different AWS resources from storage, databases, analytics, machine learning, and more
I’ll go back to cover AWS CloudFormation at a later date when I get more in-depth into AWS. For today and the next few days, I’m heading back across into Azure to see how we can use HashiCorp Terraform to deploy and manage infrastructure in Azure.
In previous posts on Azure, we looked at the 3 different ways to deploy Infrastructure in Azure:
Over the coming days, we’ll look at deploying, changing and destroying existing infrastructure in Azure using Infrastructure as Code using Terraform.
Before we move on….
Now before we go any further and get into the weeds of Terraform and how it works, I want to allay some fears.
When people see the word “Code” in a service description, the automatic assumption is that you need to be a developer to understand and be competent in using this method of deploying infrastructure. As anyone who knows me and those of you who have read my bio know, I’m not a developer and don’t have a development background.
And I don’t need to be in order to use tools like Terraform and CloudFormation. There are loads of useful articles and training courses out there which walks you through using these tools and understanding them. The best place to start is the official HashiCorp Learn site, which gives learning patch for all the major Cloud providers (AWS/Azure/GCP) and also for Docker, Oracle and Terraform Cloud. If you search for HashiCorp Ambassadors such as Michael Levan and Luke Orrelana, they have Video Content on YouTube, CloudAcademy and Cloudskills.io which walks you through the basics of Terraform.
Fundamentals of Terraform
Terraform was originally programmed using JSON, but then switched to use HCL, which stands for HashiCorp Configuration Language. Its very similar to JSON, but has additional capabilities built in. While JSON and YAML are more suited for Data Structures, HCL used syntax that is specifically designed for building structured configuration.
One of the main things we need to understand before moving forward with Terraform is what the above means.
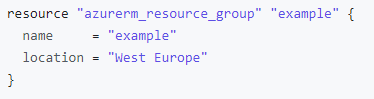
HCL is declarative programming language – this means that we define what needs to be done and the results that we expect to see, instead of telling the program how to do it (which is imperative programming). So if we look at the example HCL config of an Azure Resource Group below, we see that we need to provide specific values:
Image Credit: HashiCorp
When Terraform is used to deploy infrastructure, it creates a “state” file that defines what has been deployed. So if you deploy with Terraform, you need to manage with Terraform also. Making changes to any infrastructure directly can cause corruption in Terraform configuration files and may lead to losing your Infrastructure.
For Azure users, the latest version of Terraform is already build into the Azure Cloud Shell. In order to get Terraform working on your machine, we need to follow these steps:
Extract the file to a folder, and then create a System Environment Variable that points to it.
Open PowerShell and run terraform version to make sure it is installed.
Install the Hashicorp Terraform extension in VS Code
Conclusion
So thats the basics of Terraform. In the next post, we’ll be running throug the 4 steps to install Terraform on our machine, show how we get connected into Azure from VS Code and then start looking at Terraform Configuration Files and Providers. Until next time!
Its Day 33 of my 100 Days of Cloud Journey, and today I’m taking Day 2 of the Cloudskills.io Linux Cloud Engineer Bootcamp
This is being run over 4 Fridays by Mike Pfieffer and the folks over at Cloudskills.io, and is focused on the following topics:
Scripting
Administration
Networking
Web Hosting
Containers
If you recall, on Day 26 I did Day 1 of the bootcamp, and started Day 2 only to realise the topic was AWS, so I went off on a bit of a tangent to get back here to actually complete Day 2.
The bootcamp livestream started on November 12th and continued on Friday November 19th. With the Thanksgiving break now behind us, it resumes on December 3rd and completes on December 10th. However, you can sign up for this at any time to watch the lectures to your own pace and get access to the Lab Exercises on demand at this link:
Week 2 started with Mike going through the steps to create a Linux VM in an AWS EC2 instance and similar to Day 1, installing a WebServer and then scripting that installation into a reusable bash script that can be deployed during VM creation.
I then got my first look at Google Cloud Platform, when Robin Smorenburg gave us a walkthrough of the GCP Portal, and the process to create a Linux VM on GCP both in the Portal and Google Cloud Shell. Robin works as a GCP Architect and can be found blogging at https://robino.io/.
Overall, the creation process is quite similar across the 3 platforms, in that the VM creation asks to create a key pair for certificate authentication, and both AWS and GCP allow SSH access from all IP addresses by default which then can be locked down to a specific IP Address or IP Address range.
Conclusion
That’s all for this post – I’ll update as I go through the remaining weeks of the Bootcamp, but to learn more and go through the full content of lectures and labs, sign up at the link above.
This is the official pre-requisite course on the AWS Skillbuilder platform (which for comparison is the AWS equivalent of Microsoft Learn) to prepare candidates for the AWS Certified Cloud Practitioner certification exam.
Let’s have a quick overview of what the final modules covered, the technologies discussed and key takeaways.
Module 9 – Migration and Innovation
Module 9 covers Migration strategies and advice you can use when moving to AWS.
We dived straight into the AWS Cloud Adoption Framework (AWS CAF) and looked at the 6 Perspectives, each of which have distinct responsibilities and helps prepare the right people across your organization prepare for the challenges ahead.
The 6 Perspectives of AWS CAF are:
Business – ensure that your business strategies and goals align with your IT strategies and goals.
People – evaluate organizational structures and roles, new skill and process requirements, and identify gaps.
Governance – how to update the staff skills and processes necessary to ensure business governance in the cloud.
Platform – uses a variety of architectural models to understand and communicate the structure of IT systems and their relationships.
Security – ensures that the organization meets security objectives for visibility, auditability, control, and agility.
Operations – defines current operating procedures and identify the process changes and training needed to implement successful cloud adoption.
We then moved on to the 6 R’s of Migration which are:
Rehosting – “lift and shift” move of applications with no changes.
Replatforming – “lift, tinker and shift”, move of applications while making changes to optimize performance in the cloud.
Refactoring – adding features to the app in the cloud environment that are not possible in the existing environment.
Repurchasing – this is redesigning the application from scratch, or replacing it with a cloud-based version.
Retaining – keeping some applications that are not suitable for migration in your existing environment.
Retiring – removing applications that are no longer needed
We then looked at the AWS Snow solutions (which is similar to Azure Data Box), which is where you use AWS-provided physical devices to transfer large amounts of data directly to AWS Data Centers as opposed to over the internet. These devices range in size from 8TB of storage up to 100PB, and can come in both storage and compute optimized versions.
Finally, the module looked at some of the cool innovation features available in AWS, such as:
Amazon Lex – based on Alexa, enables you to build conversational interfaces using voice and text.
Amazon Textract – machine learning that extracts data from scanned documents.
Amazon SageMaker – enables you to build train and deploy machine learning models.
AWS Deep Racer – my favourite one! This is an autonomous 1/18 scale race car that you can use to test reinforcement learning models.
Module 10 – The Cloud Journey
Module 10 is a short one but starts by looking at the AWS Well-Architected Framework which helps you understand how to design and operate reliable, secure, efficient, and cost-effective systems in the AWS Cloud.
The Well-Architected Framework is based on five pillars:
Operational excellence – the ability to run and monitor systems to deliver business value.
Security – the ability to protect information, systems and assets while delivering business value.
Reliability – the ability to automatically recover from disruptions or outages using scaling.
Performance efficiency – the ability to use computing resources efficiently to meet demand.
Cost optimization – the ability to run systems to deliver business value at the lowest cost.
Finally, we looked at the six advantages of cloud computing:
Trade upfront expense for variable expense – pay for only the resources you use using an OpEx model.
Benefit from massive economies of scale – achieve a lower variable cost by availing of aggregated costs.
Stop guessing capacity – no more predicting how much resources you need.
Increase speed and agility – flexibility to deploy applications and infrastructure in minutes, while also providing more time to experiment and innovate.
Stop spending money running and maintaining data centers – focus more on your applications and customers instead of overheads.
Go global in minutes – deploy to customers around the world
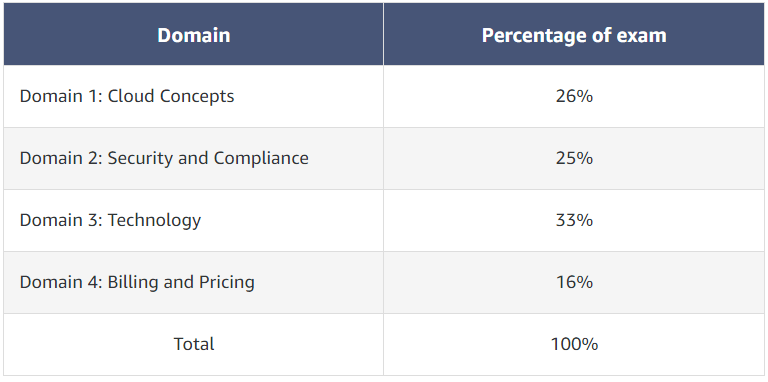
Module 11 – Exam Overview
The final module gives an overview of the AWS Certified Cloud Practitioner exam, giving a breakdown of the domains as shown below.
Image Credit – AWS Skillbuilder
The exam consists of 65 questions to be completed in 90 minutes, and the passing score is 70%. Like most exams, there are 2 types of questions:
A multiple-choice question has one correct response and three incorrect responses, or distractors.
A multiple-response question has two or more correct responses out of five or more options.
As always in any exam, the advice is:
Read the question in full.
Predict the answer before looking at the answer options.
Eliminate incorrect answers first.
And that’s all for today! Hope you enjoyed this mini-series of posts on AWS Core Concepts! Now I need to schedule the exam and take that first step on the AWS ladder. You should too, but more importantly, go and enroll for the course using the links at the top of the post – this is my brief summary and understanding of the Modules, but the course if well worth taking and I found it a great starting point in my AWS journey. Until next time!
This is the official pre-requisite course on the AWS Skillbuilder platform (which for comparison is the AWS equivalent of Microsoft Learn) to prepare candidates for the AWS Certified Cloud Practitioner certification exam.
Let’s have a quick overview of what the 2 modules I completed today covered, the technologies discussed and key takeaways.
Module 7 – Monitoring and Analytics
Module 7 deals with the AWS Offerings for monitoring, analytics and best practise optimization of your AWS account.
Amazon Cloudwatch enables you to monitor and manage various metrics and configure alarm actions based on data from those metrics. CloudWatch uses metrics to represent the data points for your resources. AWS services send metrics to CloudWatch. CloudWatch then uses these metrics to create graphs automatically that show how performance has changed over time. With CloudWatch, you can create alarms that automatically perform actions if the value of your metric has gone above or below a predefined threshold.
Image Credit: AWS Skillbuilder
AWS CloudTrail records API calls for your account. The recorded information includes the identity of the API caller, the time of the API call, the source IP address of the API caller, and more. You can think of CloudTrail as a “trail” of breadcrumbs (or a log of actions) that someone has left behind them. Recall that you can use API calls to provision, manage, and configure your AWS resources. With CloudTrail, you can view a complete history of user activity and API calls for your applications and resources. Events are typically updated in CloudTrail within 15 minutes after an API call. You can filter events by specifying the time and date that an API call occurred, the user who requested the action, the type of resource that was involved in the API call, and more. Within CloudTrail, you can also enable CloudTrail Insights. This optional feature allows CloudTrail to automatically detect unusual API activities in your AWS account.
AWS Trusted Advisor is a web service that inspects your AWS environment and provides real-time recommendations in accordance with AWS best practices. Trusted Advisor compares its findings to AWS best practices in five categories: cost optimization, performance, security, fault tolerance, and service limits. For the checks in each category, Trusted Advisor offers a list of recommended actions and additional resources to learn more about AWS best practices.
Image Credit – AWS Skillbuilder
Module 8 – AWS Pricing and Support
Module 8 dives in the different AWS account models that you can choose from. The main options are:
AWS Free Tier, which is broken into a range of Always Free services, services that are free for 12 Months, and short-term Trials of different AWS Services.
On-Demand Pricing – this is the “Pay as You Use” model.
Reserved Pricing – where you pay up front for reserved instances and services at a discounted price
Tiered Pricing – this is where you pay less the more you use (for example, the more Amazon S3 storage space you use, the less you pay per GB.
The AWS Billing and Cost Management dashboard gives an overview where you can pay bills, monitor usage, and analyse and control costs.
I mentioned AWS Organizations in a previous post, where you can apply IAM and Policies to multiple AWS accounts. AWS Organizations can also be used for Consolidated Billing across multiple AWS accounts from a central location.
AWS Budgets gives you the option to create budgets to plan service costs and instance reservations, while AWS Cost Explorer helps you visualize and manage costs and usage over time (12 months of historical data).
We then moved to the different support plans available in AWS:
Basic Support – which is free for all AWS Customers, and includes a limited selection of Trusted Advisor checks, and the AWS Personal Health Dashboard.
Developer Support – includes access to best practice guidance and diagnostic tools
Business Support – includes all AWS Trusted Advisor checks and use-case guidance for all AWS offerings, features and services that best supports your business needs.
Enterprise Support – includes Architecture Guidance, Infrastructure Event management and a dedicated TAM (Technical Account Manager) who provides expertise in helping you design AWS solutions.
Finally, we looked at the AWS Marketplace which is a catalog of thousands of software listings from multiple third-party vendors that can be used in your AWS Environment. You can explore solutions by categories (such as IoT and Machine Learning) or by industry and use case.
And that’s all for today! Hope you enjoyed this post, join me again next time for the final part of AWS Core Concepts! And more importantly, go and enroll for the course using the links at the top of the post – this is my brief summary and understanding of the Modules, but the course if well worth taking if you want to get more in-depth.
This is the official pre-requisite course on the AWS Skillbuilder platform (which for comparison is the AWS equivalent of Microsoft Learn) to prepare candidates for the AWS Certified Cloud Practitioner certification exam.
Let’s have a quick overview of what the 2 modules I completed today covered, the technologies discussed and key takeaways.
Module 5 – Storage and Databases
Storage
First thingcovered was the Storage types available with EC2 Instances:
An instance store provides temporary block-level storage for an Amazon EC2 instance. An instance store is disk storage that is physically attached to the host computer for an EC2 instance, and therefore has the same lifespan as the instance. When the instance is terminated, you lose any data in the instance store.
Amazon Elastic Block Store (Amazon EBS) is a service that provides block-level storage volumes that you can use with Amazon EC2 instances. If you stop or terminate an Amazon EC2 instance, all the data on the attached EBS volume remains available. It important to note that EBS stores data in a single Availability Zone, as it needs to be in the same zone as the EC2 instance it is attached to.
An EBS snapshot is an incremental backup. This means that the first backup taken of a volume copies all the data. For subsequent backups, only the blocks of data that have changed since the most recent snapshot are saved.
Moving on from that, we looked at Amazon S3 (Simple Storage Service) which provides object (or File Level storage). Objects are stored in buckets (which are like folders or containers). You can upload any type of file to an S3 bucket, which has unlimited storage space. You can set permissions on any object you upload. S3 provides a number of classes of storage which can be used depending on how you plan to store your data and how frequently or infrequently you access it:
S3 Standard: used for high availability, and stores data in a minimum of 3 Availability Zones.
S3 Standard-IA: used for infrequently accessed data, still stores the data across 3 Availability Zones.
S3 One Zone-IA: same as above, but only stores data in a single Availability Zone to keep costs low.
S3 Intelligent-Tiering: used for data with unknown or changing access patterns.
S3 Glacier: low-cost storage that is ideal for data archiving. Data can be retrieved within a few minutes
S3 Glacier Deep Archive: lower cost than above, data is retrieved within 12 hours
Next up is Amazon Elastic File System (Amazon EFS), which is a scalable file storage system that is used with AWS Cloud and On-premise resources. You can attach EFS to a single or multiple EC2 instances. This is a Linux File System, and can have multiple instances reading and writing to it at the same time. Amazon EFS file systems store data across multiple Availability Zones.
Database Types
Now we’re into the different types of Databases that are available on AWS.
Amazon Relational Database Service (Amazon RDS) enables you to run relational databases such as MySQL, PostgreSQL, Oracle and Microsoft SQL Server. You can move on-premises SQL Servers to EC2 instances, or else move the Databases on these servers to Amazon RDS instances. You also have the option to move MySQL or PostgreSQL databases to Amazon Aurora, which cost 1/10th of the cost of RDS and replicates six copies of your data across 3 Availability Zones.
Amazon DynamoDB is a serverless NoSQL or non-relational key-value database that uses tables and attributes. It has specific use cases and is highly scalable.
Amazon Redshift is a data warehousing service used for big data analytics, and has the ability to collect data from multiple sources and analyse relationships and trends across your data.
On top of the above, there is the AWS Database Migration Services (AWS DMS) which can help you migrate existing databases to AWS. The Source database remains active during the migration, and the source and destination databases do not need to be the same type of database.
Module 6 – Security
Shared Responsibility Model
We kicked off the Security Module by looking at the Shared Responsibility Model. This will be familiar to any Cloud service, where AWS is reponsible for some parts f the environment, and the customer is responsibled for other parts.
Image Credit – AWS Skillbuilder
The shared responsibility model divides into customer responsibilities (commonly referred to as “security in the cloud”) and AWS responsibilities (commonly referred to as “security of the cloud”).
Image Credit – AWS Skillbuilder
Identity and Access Control
Onwards to Identity! AWS Identity and Access Management (IAM) allows you to manage AWS services and resources securely. You do this by using a combination of users/groups/roles, policies and MFA. When you first create an AWS account, you have an account called “root”. You can then use the “root” account to create an IAM user that you will use to perform everyday tasks. This is the same concept as any Linux system, you should not use the “root” account. You can then add the user to an IAM group.
You then create policies that allows or denies permissions to specific AWS resources and apply that policy to the user or group.
You then have the concept of roles – roles are identities that can be used to gain temporary access to perform a specific task. When a user assumes a role, they give up all previous permissions they had.
Finally, we should always enable MFA to provide an extra layer of security for your AWS account.
Managing Multiple AWS Accounts
But what if we have multiple AWS accounts that we need to manage? This where AWS Organisations comes into play. AWS Organizations can consolidate and manage multiple AWS accounts. This is useful if you have separate accounts for Production, Development and Testing. You can then group AWS accounts into Organizational Units (OUs). In AWS Organizations, you can apply service control policies (SCPs) to the organization root, an individual member account, or an OU. An SCP affects all IAM users, groups, and roles within an account, including the AWS account root user.
Compliance
Now we move on to Compliance. AWS Artifact is a service that provides on-demand access to AWS security and compliance reports and select online agreements. AWS Artifact consists of two main sections: AWS Artifact Agreements and AWS Artifact Reports:
In AWS Artifact Agreements, you can review, accept, and manage agreements for an individual account and for all your accounts in AWS Organizations.
AWS Artifact Reports provide compliance reports from third-party auditors.
Security
Finally, we reach the deeper level security and defence stuff!
AWS Shield provides built-in protection against DDoS Attached. AWS Shield provides 2 levels of protection:
Standard – automatically protects all AWS customers from the most frequent types of DDoS attacks.
Advanced – on top of Standard, provides detailed attack diagnostics and the ability to detect and mitigate sophisticated DDoS attacks. It can also integrate with services like Amazon Route 53 and Amazon CloudFront.
AWS also offers the following security services:
AWS WAF (Web Application Firewall), which uses machine-learning capabilities to filter incoming traffic from bad actors.
AWS Key Management Service (AWS KMS) which uses cryptographic keys to perform encryption operations for encrypting and decrypting data.
Amazon Inspector, which runs automated security assessments on your infrastructure based on compliance baselines.
Amazon Guard Duty, which provides threat intelligence by monitoring network activity and account behaviour.
And that’s all for today! Hope you enjoyed this post, join me again next time for more AWS Core Concepts! And more importantly, go and enroll for the course using the links at the top of the post – this is my brief summary and understanding of the Modules, but the course if well worth taking if you want to get more in-depth.