100 Days of Cloud – Day 49: Managing Azure Services with Windows Admin Center

Its Day 49 of my 100 Days of Cloud Journey, and today I’m looking at how we can manage Azure Services from Windows Admin Center, either on and Azure or on-premise based installation.

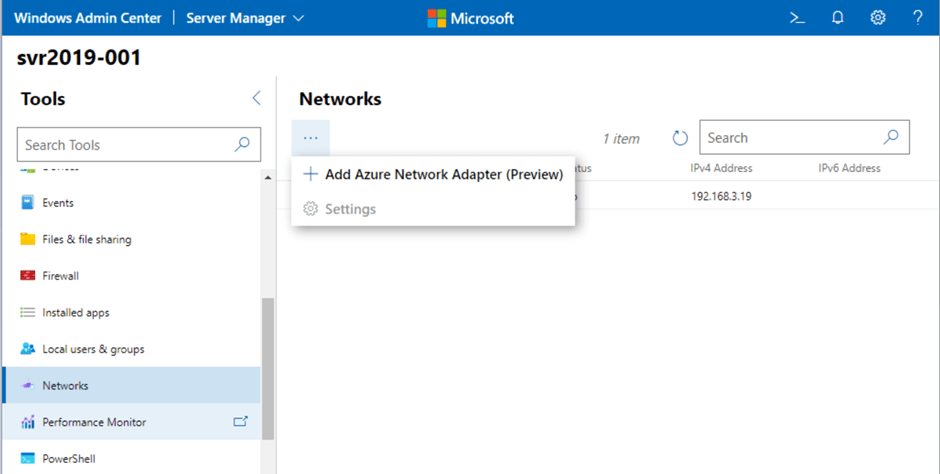
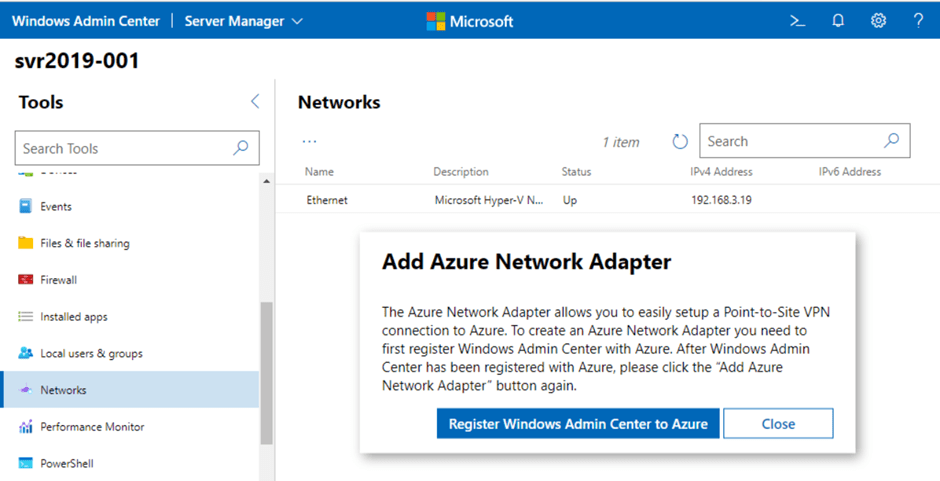
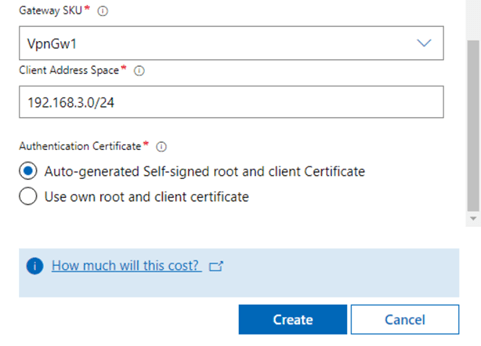
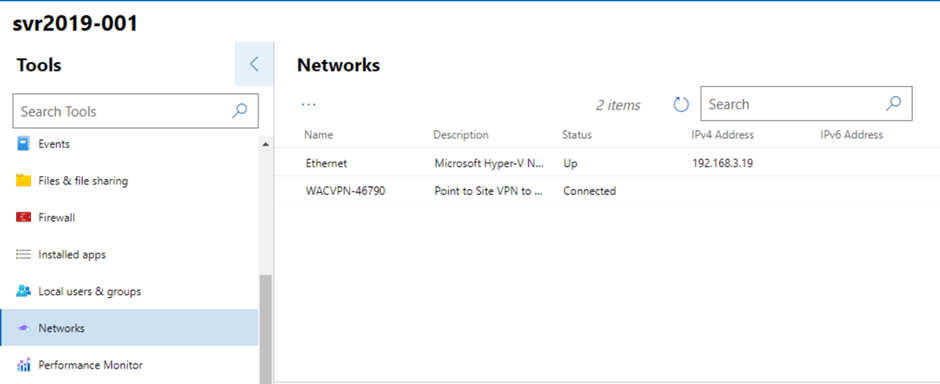
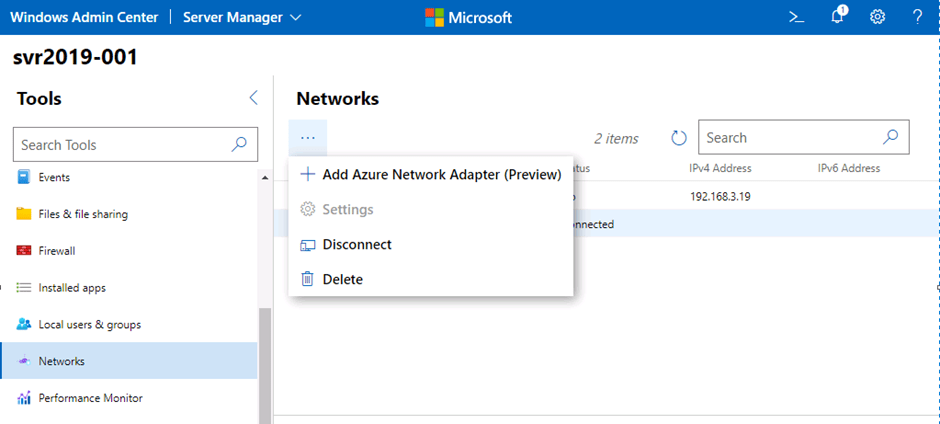
In the previous post, we saw how we can use Azure Network Adapter to connect an on-premise server directly to an Azure Virtual Network using a Point to Site VPN Connection. However when we looked at our Server in the Windows Admin Center console, we saw a number of Azure options on the side menu.

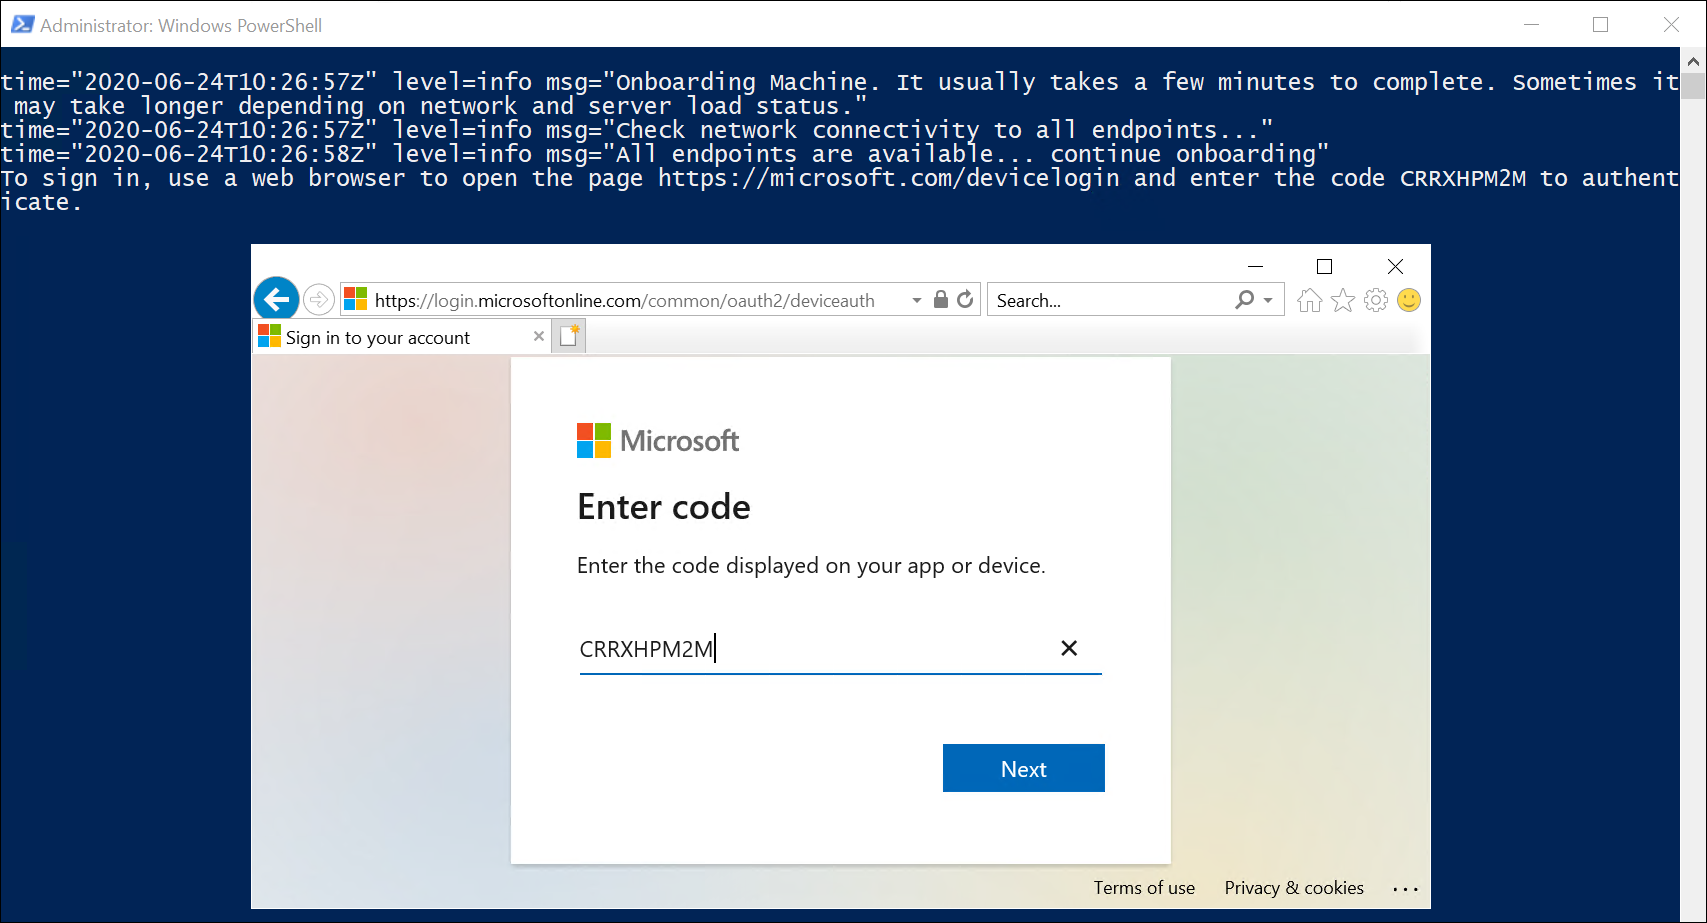
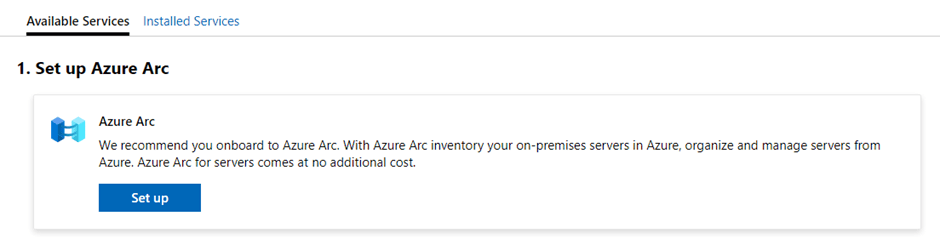
Lets take a look at each of these menu options and what we have available. We’ll start with “Azure hybrid center”, when we click into this, the first option we see is a prompt to onboard the server to Azure Arc (we discussed the benefits of Azure Arc on Day 44):

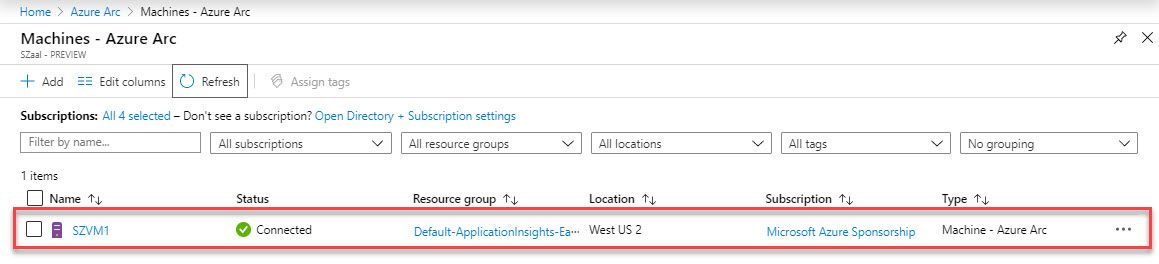
Once we have onboarded to Azure Arc, we scroll down and see a number of other services available to us:

The list of services available here are:

  • Azure Site Recovery, which we covered in Day 19.
  • Azure Update Management, which allows us to manage Windows Updates on Azure Arc registered servers.
  • Azure File Sync, which allows us to host data in Azure File Shares and then sync data to on-premise servers (blog post coming up on that!)
  • Azure Extended Network, which allows us to extend our on-premise networks into Azure so that migrated VMs can keep their original IP Addresses.
  • Azure Monitor, which gives us full monitoring of our applications, infrastructure and networks (need a blog post about that too!).
  • Azure Backup, which we covered in Day 23.
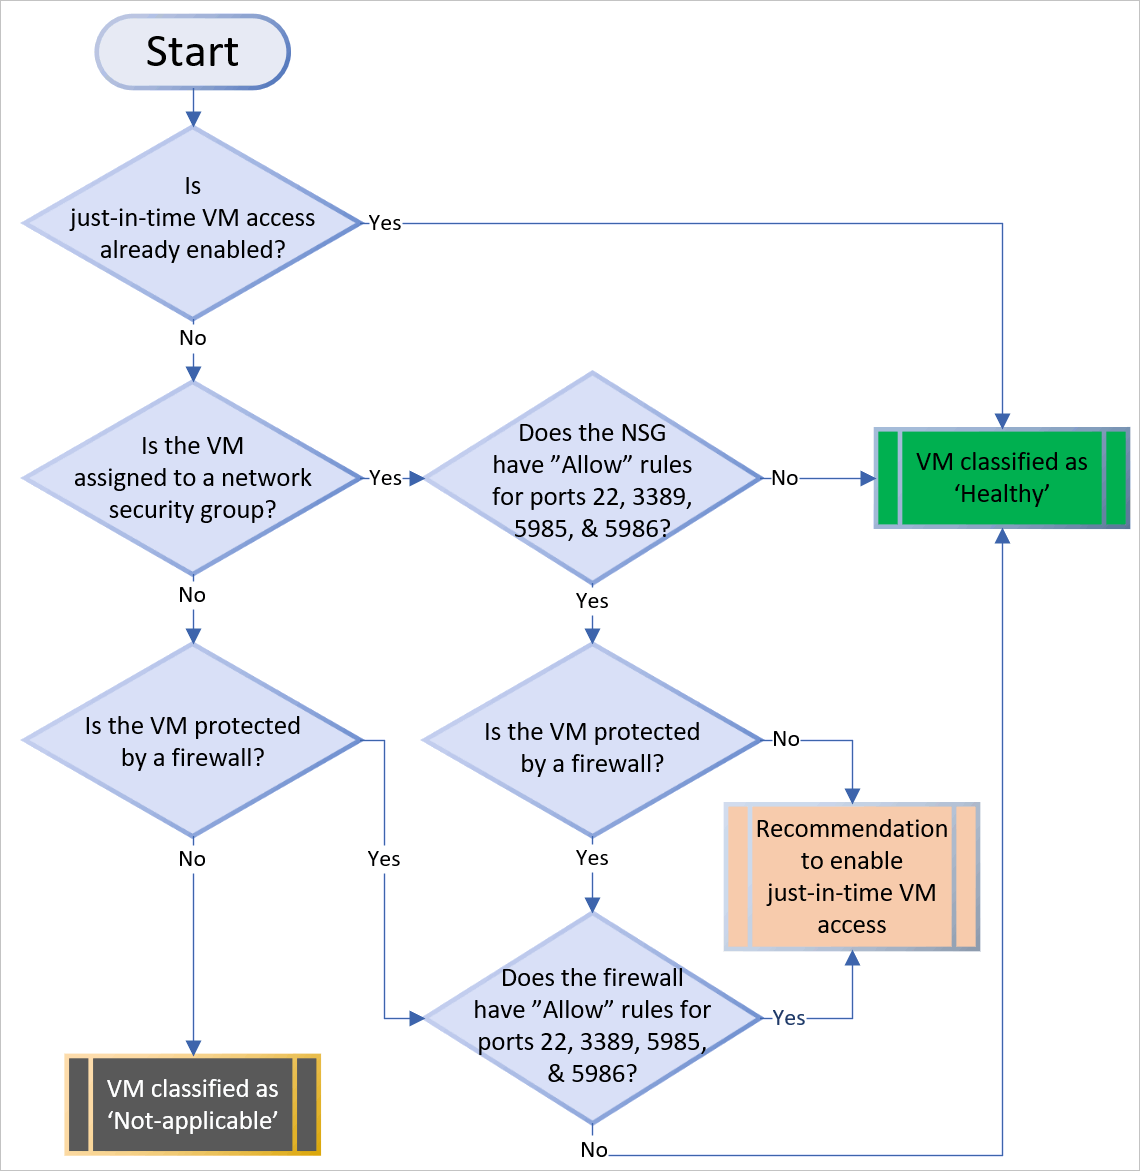
  • Azure Security Center, which monitors security across hybrid workloads, applies policies and compliance baselines, blocks malicious activity, detects attacks and simplifies detection and remediation (another blog post needed on that!)

Wow, gave myself lots more work to do out of that!

A lot of the above options are part of the main menu, the one thats not mentioned above and is on the main menu is Azure Kubernetes Service (or AKS for short). Azure Kubernetes Service is a managed container orchestration service based on the open source Kubernetes system, which is available on the Microsoft Azure public cloud. … AKS is designed for organizations that want to build scalable applications with Docker and Kubernetes while using the Azure architecture.

When we click on the menu option, we can see the option is available to deploy a AKS Cluster:

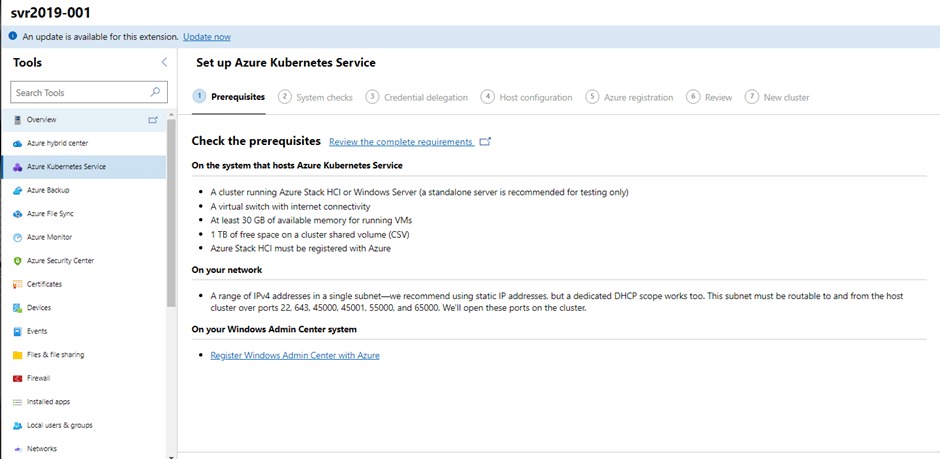
I’m not going to delve in AKS in too much detail here (yes you’ve guessed it, its another blog post….. )

We can see how Windows Admin Center can provide a single management pane for Hybrid Services. You can check out this excellent post from Thomas Maurer’s blog for video descripions of how to use each service with Windows Admin Center.

Hope you enjoyed this post, lots more posts to come out of this one! Until next time!

100 Days of Cloud – Day 48: Azure Network Adapter

Its Day 48 of my 100 Days of Cloud Journey, and today I’m going to run through a quick demo of how to set up Azure Network Adapter.

In previous posts, I looked at the various connectivity offerings that Azure offer to allow access into a Virtual Network from either a peered VNET, an on-premise location using Site to Site VPN or Express Route, or a direct connection from a client PC using a Point to Site VPN.

For the majority of companies who are hosting resources in Azure, a Site to Site VPN will be the most commonly used model, however in most cases this extends their entire on-premise or datacenter location into Azure, and also give them visibility at the very least of all hosted resources.

Azure Network Adapter is a way to set up connectivity from on-premise servers running Windows Server 2019 directly into the Azure Virtual Network of your choice. By using Windows Admin Center to create the connection, this also creates the VPN Gateway Subnet and Certificate options. This eases the pain of creating connections between on-premises environments and Microsoft Azure public cloud infrastructure.

Lets have a look at how this is configured. There are some pre-requisites we need to make this work:

Using Azure Network Adapter to connect to a virtual network requires the following:

  • An Azure account with at least one active subscription.
  • An existing virtual network.
  • Internet access for the target servers that you want to connect to the Azure virtual network.
  • A Windows Admin Center connection to Azure.
  • The latest version of Windows Admin Center.

From Windows Admin Center, we browse to the Server we want to add the Azure Network Adapter to. We can see under Networks we have the option to “Add Azure Network Adapter (Preview)”:

When we click, we are prompted to register Windows Admin Center with Azure:

Clicking this brings us into the Account screen where we can register with Azure:

Follow the prompts and enter the correct information to connect to your Azure Tenant

Once we’re connected to Azure, we go back to our Server in Windows Admin Center and add our Azure Network Adapter:

What this will do is both create the network connection to Azure (which is effectively a Point-to-Site VPN Connection)  from our Server, but it also creates the VPN Gateway Subnet on the Virtual Network in our Azure Subscription. We also see that we can select a VPN Gateway SKU. When we click the “How much does this cost?” link, we can see pricing details for each of the available SKU’s.

We click create and see Success!! We also see that this can take up to 35 minutes to create.

We then get a notification to say our Point to Site Client Configuration has started:

And once that’s completed, we can see our VPN is up and connected:

And we can also see our gateway resources have been created in Azure:

Now, lets see if we can connect directly to our Azure VM. We can see the Private IP Address is 10.30.30.4:

And if we try to open an RDP connection from our Server to the Azure VM, we get a response asking for credentials:

You can disconnect or delete the VPN connection at any time in Windows Admin Center by clicking on the “ellipses” and selecting the required option:

Go ahead and try the demo yourelves, but as always don’t forget to clean up your resources in Azure once you have finished!

Hope you enjoyed this post, until next time!

100 Days of Cloud – Day 47: AZ-800 Exam Day!

Its Day 47 of my 100 Days of Cloud Journey, and today I sat Exam AZ-800: Administering Windows Server Hybrid Core Infrastructure (beta).

AZ-800 is one of 2 exams required for the new Windows Server Hybrid Administrator Associate certification, which was announced at Windows Server Summit 2021. The second exam is Az-801 (Configuring Windows Server Hybrid Advanced Services), which I’m taking next week so will write up a post on that then!

This certification is seen by many as the natural successor to the retired MCSE certifications which retired in January 2021, primarily because it focuses in some part on the on-premise elements within Windows Server 2019.

Because of the NDA, I’m not going to disclose any details on the exam, however I will say that it is exactly as its described – a Hybrid certification bringing together elements of both on-premise and Azure based infrastructure.

The list of skills measured as their weightings are as follows:

  • Deploy and manage Active Directory Domain Services (AD DS) in on-premises and cloud environments (30-35%)
  • Manage Windows Servers and workloads in a hybrid environment (10-15%)
  • Manage virtual machines and containers (15-20%)
  • Implement and manage an on-premises and hybrid networking infrastructure (15-20%)
  • Manage storage and file services (15-20%)

Like all beta exams, the results won’t be released until a few weeks after the exam officially goes live so I’m playing the waiting game! In the meantime, you can check out these resources if you want to study and take the exam:

Hope you enjoyed this post, until next time!

100 Days of Cloud – Day 46: Azure Well Architected Framework

Its Day 46 of my 100 Days of Cloud Journey, and today I’m looking at Azure Well Architected Framework.

Over the course of my 100 Days journey so far, we’ve talked about and deployed multiple different types of Azure resources such as Virtual Machines, Network Security groups, VPNs, Firewalls etc.

We’ve seen how easy this is to do on a Dev-based PAYG subscription like I’m using, however for companies who wish to migrate to Azure, Microsoft provides a ‘Well Architected Framework’ which offers guidance in ensuring that any resource or solution that is deployed or architected in Azure conforms to best practices around planning, design, implementation and on-going maintenance and improvement of the solution.

The Well Architected Framework is based on 5 key pillars:

  • Reliability – this is the ability of a system to recover from failures and continue to function, which in itself is built around 2 key values:
    • Resiliency, which returns the application to a fully functional state after a failure.
    • Availability, which defines whether users can access the workload if they need to.
  • Security – protects applications and data from threats. The first thing people would think of here is “firewalls”, which would protects against threats and DDoS attacks but its not that simple. We need to build security into the application from the ground up. To do this, we can use the following areas:
    • Identity Management, such as RBAC roles and System Managed Identities.
    • Application Security, such as storing application secrets in Azure Key Vault.
    • Data sovereignty and encryption, which ensures the resource or workload and its underlying data is stored in the correct region and is encrypted using industry standards.
    • Security Resources, using tools such as Microsoft Dender for Cloud or Azure Firewall.
  • Cost Optimization – managing costs to maximize the value delivered. This can be achieved in the form of using tools such as:
    • Azure Cost Management to create budgets and cost alerts
    • Azure Migrate to assess the system load generated by your on-premise workloads to ensure thay are correctly sized in the cloud.
  • Operational Excellence – processes that keep a system running in production. In most cases, automated deployments leave little room for human error, and can not only be deployed quickly but can also be rolled back in the event of errors or failures.
  • Performance Efficiency – this is the ability of a system to adapt to changes in load. For this, we can think of tools and methodologioes such as auto-scaling, caching, data partitioning, network and storage optimization, and CDN resources in order to make sure your workloads run efficiently.

On top of all this, the Well Architected Framework has six supporting elements wrapped around it:

Diagram of the Well-Architected Framework and supporting elements.
Image Credit: Microsoft
  • Azure Well-Architected Review
  • Azure Advisor
  • Documentation
  • Partners, Support, and Services Offers
  • Reference Architectures
  • Design Principles

Azure Advisor in particular helps you follow best practises by analyzing your deployments and configuration and provides recommends solutions that can help you improve the reliability, security, cost effectiveness, performance, and operational excellence of your Azure resources. You can learn more about Azure Advisor here.

I recommend anyone who is either in the process of migration or planning to start on their Cloud Migration journey to review the Azure Well Architected Framework material to understand options and best practices when designing and developing an Azure solution. You can find the landing page for Well Architected Framework here, and the Assessments page to help on your journey is here!

Hope you all enjoyed this post, until next time!

100 Days of Cloud – Day 45: Azure Spot and Reserved Instances

Its Day 45 of my 100 Days of Cloud Journey, and today I’m looking at Azure Spot Instances and Reserved Instances.

During previous posts where I deployed virtual machines, the deployments were based on a Pay-As-You-Go pricing model, this is one of the 3 pricing models available to us in Azure. While this type of pricing is good for the likes of what I’m doing here (ie quickly spinning up VMs for a demo and then deleting them immediately), its not considered cost effective for organisations who have a Cloud Migration strategy, a long term plan to host a large number of VMs in Azure, and also need the flexibility to use low costs VMs for development or batch processing.

Lets take a look at the other 2 pricing models, starting with Azure Spot Instances.

Azure Spot Instances

Azure Spot instances allow you to utilize any unused Azure Capacity in your region at the fraction of the cost. However, at any point in time when Azure needs the capacity back, the Spot Instances will be evicted and removed from service at 30 seconds notice.

Because of this there is no SLA on Azure Spot instances, so they are not suitable for running production workloads. They are best suited for workloads that can handle interruptions, such as batch processing jobs, Dev/Test environments or Large compute workloads.

There is no availability guarantees, and availablity can vary based on size required, available capacity in your region, time of day etc. Azure will allocate the VM if there is available capacity, however there is no High Availability guarantees.

When the VMs are evicted, they can be either deallocated or deleted based on the policy you set when creating the VMs. Deallocate (this is the default) stops the VM and makes it available to redeploy (however this is not guaranteed and is based on capacity). You will also be charged for the underlying Storage Disk costs. Delete on the other hand will shut down and destroy the VMs and underlying storage.

You can see the full savings you can achieve by using Spot Instance VMs in the Azure Spot VMs Pricing Table here.

Azure Reserved Instances

Azure Reserved Instances is a way to reserve your compute capacity for a period of 1, 3 or 5 years at savings of over 70% when compared to Pay-As-You-Go pricing. This is best suited to Production workloads that need to have 24/7 runtime and high availability.

As we can see in the image from the Reservations blade in the Azure Portal above, you can purchase Azure Reserved Instances for a large number of Azure Resources, not just VMs.

Reservations can be aplied to a specific scope – that can be Subscription (single or multiple subscriptions), Resource Group or a single resource such as a VM, SQL Database or an App Service.

Once you click into any of the options on the Reservations blade, it will bring you into a list of available SKUs that you can purchase:

Another option to factor in is that Azure Reserved Instances can be use with Azure Hybrid Benefit, meaning you can use your on-premise Software Assurance-enabled Windows OS and SQL Server licences, which can bring your savings up to 80%! You can find out more about Azure Hybrid Benefit here, and get the full lowdown on Azure Reserved Instances here.

Conclusion

And thats a wrap on Azure Pricing models – you can see the cost savings you can make based on what your workloads are. Hope you enjoyed this post, until next time!

100 Days of Cloud – Day 44: Azure Arc

Its Day 44 of my 100 Days of Cloud Journey, and today I’m looking at Azure Arc.

Azure Arc is a service that provides you with a single management plane for services that run in Azure, On Premises, or in other Cloud Providers such as AWS or GCP.

The majority of companies have resources both in on-premise and in come cases multiple cloud environments. While monitoring solutions can provide an overview of uptime and performance over a period of time, control and governance of complex hybrid and multi-cloud environments is an issue. Because these environments span multiple cloud and data centers, each of these environments operate their own set of management tools that you need to learn and operate.

Azure Arc solves this problem by allowing you to manage the following resources that are hosted outside of Azure:

  • Servers – both physical and virtual machines running Windows or Linux in both on-premise and 3rd party Cloud providers such as AWS or GCP.
  • Kubernetes clusters – supporting multiple Kubernetes distributions across multiple providers.
  • Azure data services – Azure SQL Managed Instance and PostgreSQL Hyperscale services.
  • SQL Server – enroll SQL instances from any location with SQL Server on Azure Arc-enabled servers.
Azure Arc management control plane diagram
Image Credit: Microsoft

For this post, I’m going to focus on Azure Arc for Servers, however there are a number of articles relating to the 4 different Azure Arc supported resource types listed above – you can find all of the articles here.

Azure Arc currently supports the following Windows and Linux Operating Systems:

  • Windows Server 2012 R2 and later (including Windows Server Core)
  • Ubuntu 16.04 and 18.04 (x64)
  • CentOS Linux 7 (x64)
  • SUSE Linux Enterprise Server (SLES) 15 (x64)
  • Red Hat Enterprise Linux (RHEL) 7 (x64)
  • Amazon Linux 2 (x64)

In order to register a Physical Server or VM with Azure Arc, you need to install the Azure Connected Machine agent on each of the operating systems targeted for Azure Resource Manager-based management. This is an msi installer which is available from the Microsoft Download Center.

You can also generate a script directly from the Azure Portal which can be used on target computers to download the Azure Connected Machine Agent, install it and connect the server/VM into the Azure Region and Resource Group that you specify:

A screenshot of the Generate script page with the Subscription, Resource group, Region, and Operating system fields selected.
Image Credit: Microsoft
A screenshot of the Administrator: Windows PowerShell window with the installation script running. The administrator is entering a security code to confirm their intention to onboard the machine.
Image Credit: Microsoft

The server then gets registered in Azure Arc as a connected machine:

Azure Arc for Servers: Getting started - Microsoft Tech Community
Image Credit: Microsoft

OK, so now we’ve got all of our servers connected into Azure Arc, what can we do with them? Is it just about visibility?

No. When your machine is connected to Azure Arc, you then have the following capabilities:

  • Protect Servers using Microsoft Defender for Endpoint, which is part of Microsoft Defender for Cloud
  • Collect security-related events in Microsoft Sentinel
  • Automate tasks using PowerShell and Python
  • Use Change Tracking and Inventory to assess configuration changes in installed software and operating system changes such as registry or services
  • Manage operating system updates
  • Monitor system performance using Azure Monitor and and collect data which can be stored in a Log Analytics Workspace.
  • Assign policy baselines using Azure Policy to report on compliance of these connected servers.

Conclusion

We can see how useful Azure Arc can be in gaining oversight on all of your resources that are spread across multiple Cloud providers and On Premise environments. You can check out the links provided above for a full list of capabilities, or else this excellent post by Thomas Maurer is a great starting point in your Azure Arc leaning journey.

Hope you enjoyed this post, until next time!

100 Days of Cloud – Day 43: Azure JIT VM Access using Microsoft Defender for Cloud

Its Day 43 of my 100 Days of Cloud Journey, and today I’m looking at Just-In-Time (JIT) VM access and how it can provide further security for your VMs.

JIT is part of Microsoft Defender for Cloud – during the Autumn Ignite 2021, it was announced that Azure Security Center and Azure Defender would be rebranded as Microsoft Defender for Cloud.

There are 3 important points you need to know before configuring JIT:

  • JIT does not support VMs protected by Azure Firewalls which are controlled by Azure Firewall Manager (at time of writing). You must use Rules and cannot use Firewall policies.
  • JIT only supports VMs that have deployed using Azure Resource Manager – Classic deployments are not supported.
  • You need to have Defender for Servers enabled in your subscription.

JIT enables you to lock down inbound traffic to your Azure VMs, which reduces exposure to attacks while also providing easy access if you need to connect to a VM.

Defender for Cloud uses the following flow to decide how to categorize VMs:

Just-in-time (JIT) virtual machine (VM) logic flow.
Image Credit: Microsoft

Once Defender for Cloud finds a VM that can benefit from JIT, its add the VM to the “Unhealthy resources” tab under Recommendations:

Just-in-time (JIT) virtual machine (VM) access recommendation.
Image Credit: Microsoft

You can use the steps below to enable JIT:

  • From the list of VMs displaying on the Unhealthy resources tab, select any that you want to enable for JIT, and then select Remediate.
    • On the JIT VM access configuration blade, for each of the ports listed:
      • Select and configure the port using one of the following ports:
        • 22
        • 3389
        • 5985
        • 5986
      • Configure the protocol Port, which is the protocol number.
      • Configure the Protocol:
        • Any
        • TCP
        • UDP
      • Configure the Allowed source IPs by choosing between:
        • Per request
        • Classless Interdomain Routing (CIDR) block
      • Choose the Max request time. The default duration is 3 hours.
    • If you made changes, select OK.
    • When you’ve finished configuring all ports, select Save.

When a user requests access to a VM, Defender for Cloud checks if the user has the correct Azure RBAC permissions for the VM. If approved, Defender for Cloud configures the Azure Firewall and Network Security Groups with the specified ports in order to give the user access for the time period requested, and from the source IP that the user makes the request from.

You can request this access through either Defender for Cloud, the Virtual Machine blade in the Azure Portal, or by using PowerShell or REST API. You can also audit JIT VM access in Defender for Cloud.

For a full understanding of JIT and its benefits, you can check out this article, and also this article shows how to manage JIT VM access. To test out JIT yourself, this link brings you to the official Microsoft Learn exercise to create a VM and enable JIT.

Hope you enjoyed this post, until next time!

100 Days of Cloud – Day 42: Azure Bastion

Its Day 42 of my 100 Days of Cloud Journey, and today I’m taking a look at Azure Bastion.

Azure Bastion is a PaaS VM that you provision inside your virtual network, providing secure and seamless RDP or SSH connectivity to your IAAS VMs directly from the Azure portal over TLS. When you connect via Azure Bastion, your virtual machines do not need a public IP address, agent, or special client software.

We saw in previous posts that when we create a VM in Azure, it automatically creates a Public IP Address, access to which we then need to control using Network Security Groups. Azure Bastion does away with the need for controlling access – all you need to do is create rules to allow RDP/SSH access from the subnet where Bastion is deployed to the subnet where your IAAS VMs are deployed.

Deployment

Image Credit – Microsoft
  • We can see in the diagram a typical Azure Bastion deployment. In this diagram:
    • The bastion host is deployed in the VNet.
      • Note – The protected VMs and the bastion host are connected to the same VNet, although in different subnets.
    • A user connects to the Azure portal using any HTML5 browser over TLS.
    • The user selects the VM to connect to.
    • The RDP/SSH session opens in the browser.
  • To deploy an Azure Bastion host by using the Azure portal, start by creating a subnet in the appropriate VNet. This subnet must:
    • Be named AzureBastionSubnet
    • Have a prefix of at least /27
    • Be in the VNet you intend to protect with Azure Bastion

Cross-VNET Connectivity

Bastion can also take advantage of VNET Peering rules in order to connect to VMs in Multiple VNETs that are peered with the VNET where the Bastion host is located. This negates the need for having multiple Bastion hosts deployed in all of your VNETs. This works best in a “Hub and Spoke” configuration, where the Bastion is the Hub and the peered VNETs are the spokes. The diagram below shows how this would work:

Design and Architecture diagram
Image Credit – Microsoft
  • To connect to a VM through Azure Bastion, you’ll require:
    • Reader role on the VM.
    • Reader role on the network information center (NIC) with the private IP of the VM.
    • Reader role on the Azure Bastion resource.
    • The VM to support an inbound connection over TCP port 3389 (RDP).
    • Reader role on the virtual network (for peered virtual networks).

Security

One of the key benefits of Azure Bastion is that its a PAAS Service – this means it is managed and hardened by the Azure Platform and protects againsts zero-day exploits. Because your IAAS VMs are not exposed to the Internet via a Public IP Address, your VMs are protected against port scanning by rogue and malicious users located outside your virtual network.

Conclusion

We can see how useful Bastion can be in protecting our IAAS Resources. You can run through a deployment of Azure Bastion using the “How-to” guides on Microsoft Docs, which you will find here.

Hope you enjoyed this post, until next time!

100 Days of Cloud – Day 41: Linux Cloud Engineer Bootcamp, Day 4


Its Day 41 of my 100 Days of Cloud Journey, and today I’m taking Day 4 and the final session of the Cloudskills.io Linux Cloud Engineer Bootcamp

This image has an empty alt attribute; its file name is image-11.png

This was run live over 4 Fridays by Mike Pfieffer and the folks over at Cloudskills.io, and is focused on the following topics:

  • Scripting
  • Administration
  • Networking
  • Web Hosting
  • Containers

If you recall, on Day 26 I did Day 1 of the bootcamp, , Day 2 on Day 33 after coming back from my AWS studies, and Day 3 was on Day 40.

The bootcamp livestream started on November 12th and ran for 4 Fridays (with a break for Thanksgiving) before concluding on December 10th. However, you can sign up for this at any time to watch the lectures to your own pace (which I’m doing here) and get access to the Lab Exercises on demand at this link:

https://cloudskills.io/courses/linux

Week 4 was all about Containers, and Mike gave us a run through of Docker and the commands we would use to download, run and build our own Docker Images. We then looked at how this works on Azure and how we would spin up Docker Containers in Azure. The Lab exercises include exercises for doing this, and also for running containers in AWS.

The Bootcamp as a whole then concluded with Michael Dickner running though the details around Permissions in the Linux File system and how they affect and can be changed for file/folder owners, users, groups and “everyone”.

Conclusion

That’s all for this post – hope you enjoyed the Bootcamp if you did sign up – if not you can sign up at the link above! I thought it was fun – the big takeaway and most useful day for me was defintely Day 3 when looking at LAMP and MEAN stack and how to run a Web Server on Linux using OpenSource technologies.

Until next time, when we’re moving on to a new topic!

100 Days of Cloud – Day 40: Linux Cloud Engineer Bootcamp, Day 3


Its Day 40 of my 100 Days of Cloud Journey, and today I’m back taking Day 3 of the Cloudskills.io Linux Cloud Engineer Bootcamp

This image has an empty alt attribute; its file name is image-11.png

This is being run over 4 Fridays by Mike Pfieffer and the folks over at Cloudskills.io, and is focused on the following topics:

  • Scripting
  • Administration
  • Networking
  • Web Hosting
  • Containers

If you recall, on Day 26 I did Day 1 of the bootcamp, and completed Day 2 on Day 33 after coming back from my AWS studies. Having completed my Terraform learning journey for now, I’m back to look at Day 3.

The bootcamp livestream started on November 12th, continued on Friday November 19th and December 3rd, and completed on December 10th. So I’m a wee bit behind! However, you can sign up for this at any time to watch the lectures to your own pace (which I’m doing here) and get access to the Lab Exercises on demand at this link:

https://cloudskills.io/courses/linux

Week 3 consisted of Mike going through the steps to create a website hosted on Azure using the LAMP Stack:

A stack of Lamps

No, not that type of lamp stack. I had heard the LAMP Stack before but never really paid much attention to it because in reality, it sounded too much like programming and web development to me. The LAMP Stack refers to the following:

  • L – Linux Operating System
  • A – Apache Web Server
  • M -MySQL Database
  • P – PHP

The LAMP Stack is used in some of the most popular websites in used on the internet today, as its an OpenSource and low cost alternative to commercial software packages.

At the time of writing this post, the world is in the grip of responding to the Log4j vulnerability, so the word “Apache” might scream out to you as something that we shouldn’t be doing. Follow the advice from your software or hardware vendor, and patch as much as you can and as quickly as you can. There is an excellent GitHub Repository here with full details and updates from all major vendors, its a good one to bookmark to check and see if you or your Customers infrastructure may be affected.

The alternative to the LAMP Stack is the MEAN Stack (I could go for another funny meme here but that would be too predicatable!). MEAN stands for:

  • M – MongoDB (data storage)
  • E – Express.js (server-side application framework)
  • A – AngularJS (client-side application framework)
  • N – Node.js (server-side language environment although Express implies Node.js)

Different components, but still open source so essentially trying to achieve the same thing. There is a Microsoft Learn path covering Linux on Azure, which contains a full module on building and running a Web Application with the MEAN Stack on an Azure Linux VM – this is well worth a look.

Conclusion

That’s all for this post – I’ll update as I go through the remaining weeks of the Bootcamp, but to learn more and go through the full content of lectures and labs, sign up at the link above.

I’ll leave you with a quote I heard during the bootcamp that came from the AWS re:Invent 2021 conference – every day there are 60 million EC2 instances spun up around the world. Thats 60 million VMs! And if we look at the Global Market Share across the Cloud providers, AWS has approx 32%. Azure has 21%, GCP has 8%, leaving the rest with 39%. So its safe to say over 100 million VMs daily across the world. It means VMs are still pretty important despite the push to go serverless.

Hope you enjoyed this post, until next time!